Getting Started with Docker by Practice | 2. Building a Docker Image
The previous section introduced the Docker overview and basic hands-on operations for managing images and containers step by step. So far, we have used public images, but to distribute an application you are developing as a Docker image, you also need to know how to create an image yourself. This section explains how to create an image directly and start a container from it. The sample introduced here is based on Docker’s beginner tutorial.
How Docker image builds work
First, let’s look at how Docker images are created.
Building a Docker image means adding features to a base image and creating a custom image of your own.
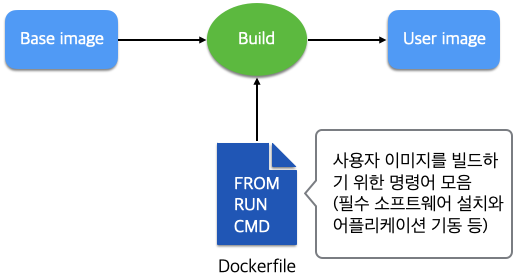
The base image is usually an OS image provided by Docker or the Docker community. You create a custom image by installing various dependent libraries and middleware, or by installing and configuring your own application. You can distribute this custom image to third parties in a form that includes libraries, middleware, applications, and so on.
The configuration file that describes the operations to perform on the base image is the Dockerfile. The way to write a Dockerfile is defined by Docker. For details, refer to the documentation.
Build a sample image
Here, we will build a Docker image that deploys a web application using Flask, a web application framework for Python. The application displays a random GIF image. Details about Flask itself are omitted here.
Prepare the files needed for the build
Create a directory and download the four files needed to build the image as follows.
% mkdir flask-app
% cd flask-app
% wget https://raw.githubusercontent.com/docker/labs/master/beginner/flask-app/app.py
% wget https://raw.githubusercontent.com/docker/labs/master/beginner/flask-app/requirements.txt
% wget https://raw.githubusercontent.com/docker/labs/master/beginner/flask-app/templates/index.html -P templates
% wget https://raw.githubusercontent.com/docker/labs/master/beginner/flask-app/Dockerfile
Next, let’s look at the contents of each file.
The app.py file is the source code that becomes the entry point of the web application. It searches for GIF images on the web and returns a random URL.
from flask import Flask, render_template
import random

app = Flask(__name__)

# list of cat images
images = [
    "https://raw.githubusercontent.com/devkuma/docker-tutorial/main/flask-app/image/anigif_enhanced-buzz-26388-1381844103-11.gif",
    "https://raw.githubusercontent.com/devkuma/docker-tutorial/main/flask-app/image/anigif_enhanced-buzz-31540-1381844535-8.gif",
    "https://raw.githubusercontent.com/devkuma/docker-tutorial/main/flask-app/image/anigif_enhanced-buzz-26390-1381844163-18.gif",
    "https://raw.githubusercontent.com/devkuma/docker-tutorial/main/flask-app/image/anigif_enhanced-buzz-1376-1381846217-0.gif",
    "https://raw.githubusercontent.com/devkuma/docker-tutorial/main/flask-app/image/anigif_enhanced-buzz-3391-1381844336-26.gif",
    "https://raw.githubusercontent.com/devkuma/docker-tutorial/main/flask-app/image/anigif_enhanced-buzz-29111-1381845968-0.gif",
    "https://raw.githubusercontent.com/devkuma/docker-tutorial/main/flask-app/image/anigif_enhanced-buzz-3409-1381844582-13.gif",
    "https://raw.githubusercontent.com/devkuma/docker-tutorial/main/flask-app/image/anigif_enhanced-buzz-19667-1381844937-10.gif",
    "https://raw.githubusercontent.com/devkuma/docker-tutorial/main/flask-app/image/anigif_enhanced-buzz-26358-1381845043-13.gif",
    "https://raw.githubusercontent.com/devkuma/docker-tutorial/main/flask-app/image/anigif_enhanced-buzz-18774-1381844645-6.gif",
    "https://raw.githubusercontent.com/devkuma/docker-tutorial/main/flask-app/image/anigif_enhanced-buzz-25158-1381844793-0.gif",
    "https://raw.githubusercontent.com/devkuma/docker-tutorial/main/flask-app/image/anigif_enhanced-buzz-11980-1381846269-1.gif"
]

@app.route('/')
def index():
    url = random.choice(images)
    return render_template('index.html', url=url)

if __name__ == "__main__":
    app.run(host="0.0.0.0")
The requirements.txt file lists the required Python modules. It is used when installing Flask with pip, the package manager.
Flask==1.0
The templates/index.html file is the HTML template output by the web application. It only displays the image.
<html>
  <head>
    <style type="text/css">
      body {
        background: black;
        color: white;
      }
      div.container {
        max-width: 500px;
        margin: 100px auto;
        border: 20px solid white;
        padding: 10px;
        text-align: center;
      }
      h4 {
        text-transform: uppercase;
      }
    </style>
  </head>
  <body>
    <div class="container">
      <h4>Cat Gif of the day</h4>
      <img src="{{url}}" />
      <p><small>Courtesy: <a href="http://www.catshaming.co.uk/20-best-cat-gif-posts">Catshaming</a></small></p>
    </div>
  </body>
</html>
The Dockerfile is a file that summarizes the commands used by the Docker daemon when creating an image. The sample Dockerfile performs the following operations. Dockerfile syntax is explained later.
- Specify Alpine Linux, a lightweight Linux distribution developed for Docker, as the base image.
- Install Python and pip, the package manager.
- Install the Python modules required by the application with pip.
- Copy
app.pyandindex.htmlto the specified locations. - Expose port 5000 externally.
- Run the web application.
# our base image
FROM alpine:3.5

# Install python and pip
RUN apk add --update py2-pip

# upgrade pip
RUN pip install --upgrade pip

# install Python modules needed by the Python app
COPY requirements.txt /usr/src/app/
RUN pip install --no-cache-dir -r /usr/src/app/requirements.txt

# copy files required for the app to run
COPY app.py /usr/src/app/
COPY templates/index.html /usr/src/app/templates/

# tell the port number the container should expose
EXPOSE 5000

# run the application
CMD ["python", "/usr/src/app/app.py"]
Supplement: commands used in a Dockerfile
At first glance, a Dockerfile looks like a shell script, but it actually uses Dockerfile-specific commands. The commands used in the sample Dockerfile are shown in the following table. For detailed syntax, refer to the manual.
| Command | Meaning | Notes |
|---|---|---|
| FROM | Specifies the base image | |
| RUN | Specifies a command for building the image | In the case of RUN apk add -update py-pip, the apk add -update py-pip part is actually executed. |
| COPY | Copies files from the host to the container. | |
| EXPOSE | Specifies the container port to expose externally. | Container ports are closed by default. |
| CMD | Specifies the command to run when starting a container from the image. | Only one CMD can be specified in a Dockerfile. |
Dockerfile best practices are summarized in Best practices for writing Dockerfiles, so refer to that as well.
Build the image
You cannot build unless the Docker daemon is running. Start the daemon in advance.
Run the following command in a directory that contains a Dockerfile. You should see the contents of the Dockerfile being executed in order.
Note: No sample proxy configuration is provided, so run this in an environment without an HTTP proxy.
% docker build -t myfirstapp .
Sending build context to Docker daemon  8.192kB
Error response from daemon: dial unix docker.raw.sock: connect: connection refused
kimkc@kimkcui-MacBookPro flask-app % docker build -t myfirstapp .
[+] Building 16.1s (12/12) FINISHED
 => [internal] load build definition from Dockerfile                                                                                                 0.0s
 => => transferring dockerfile: 571B                                                                                                                 0.0s
 => [internal] load .dockerignore                                                                                                                    0.0s
 => => transferring context: 2B                                                                                                                      0.0s
 => [internal] load metadata for docker.io/library/alpine:3.5                                                                                        4.1s
 => [internal] load build context                                                                                                                    0.0s
 => => transferring context: 2.46kB                                                                                                                  0.0s
 => [1/7] FROM docker.io/library/alpine:3.5@sha256:66952b313e51c3bd1987d7c4ddf5dba9bc0fb6e524eed2448fa660246b3e76ec                                  0.5s
 => => resolve docker.io/library/alpine:3.5@sha256:66952b313e51c3bd1987d7c4ddf5dba9bc0fb6e524eed2448fa660246b3e76ec                                  0.0s
 => => sha256:66952b313e51c3bd1987d7c4ddf5dba9bc0fb6e524eed2448fa660246b3e76ec 433B / 433B                                                           0.0s
 => => sha256:f7d2b5725685826823bc6b154c0de02832e5e6daf7dc25a00ab00f1158fabfc8 528B / 528B                                                           0.0s
 => => sha256:f80194ae2e0ccf0f098baa6b981396dfbffb16e6476164af72158577a7de2dd9 1.51kB / 1.51kB                                                       0.0s
 => => sha256:8cae0e1ac61cead281f41115cc0ebd39117f7e54dffc8fd5e05a7590dca3cd4e 1.97MB / 1.97MB                                                       0.3s
 => => extracting sha256:8cae0e1ac61cead281f41115cc0ebd39117f7e54dffc8fd5e05a7590dca3cd4e                                                            0.2s
 => [2/7] RUN apk add --update py2-pip                                                                                                               4.9s
 => [3/7] RUN pip install --upgrade pip                                                                                                              2.8s
 => [4/7] COPY requirements.txt /usr/src/app/                                                                                                        0.0s
 => [5/7] RUN pip install --no-cache-dir -r /usr/src/app/requirements.txt                                                                            3.0s
 => [6/7] COPY app.py /usr/src/app/                                                                                                                  0.0s
 => [7/7] COPY templates/index.html /usr/src/app/templates/                                                                                          0.0s
 => exporting to image                                                                                                                               0.7s
 => => exporting layers                                                                                                                              0.7s
 => => writing image sha256:b012c41a03101ad398f22ed50e569d3b5277f608847ca3275a555d6d21babf0c                                                         0.0s
 => => naming to docker.io/library/myfirstapp                                                                                                        0.0s

Use 'docker scan' to run Snyk tests against images to find vulnerabilities and learn how to fix them
Start the container
After the image build is complete, start a container from the image with the following command.
% docker run -p 8888:5000 --name myfirstapp myfirstapp
 * Serving Flask app "app" (lazy loading)
 * Environment: production
   WARNING: Do not use the development server in a production environment.
   Use a production WSGI server instead.
 * Debug mode: off
 * Running on http://0.0.0.0:5000/ (Press CTRL+C to quit)
In this command, the option maps container port 5000 to host port 8888. Open a web browser and access http://localhost:8888; the web application introduced above should be displayed.
Stop and delete the container
Run the following command to stop the running container.
% docker stop myfirstapp
Then run the following command to delete the stopped container.
% docker rm myfirstapp
Summary
This section introduced how to use a Dockerfile to build an image and start a container from that image through a concrete sample application. It covered the basics of image building, so you should now have an overview of Docker image builds. Because this topic is well covered in Docker’s official documentation, reading that documentation as well will help you handle many other cases.
This time we built locally and started the container locally. To allow other people to use the image, you need to publish it in a form that third parties can access. The next section introduces how to publish images.