実習で学ぶDocker入門 | 2. Dockerイメージのビルド
前回までは、Dockerの概要と、最も基本的なイメージおよびコンテナ管理の実際の操作方法を段階的に紹介した。これまでは公開されているイメージを利用してきたが、自分で開発しているアプリケーションをDockerイメージとして配布するには、自分でイメージを作れるようになる必要もある。そこで今回は、イメージを直接作成し、コンテナを起動する方法を紹介する。なお、ここで紹介するサンプルはDocker社が公開している初心者向けチュートリアルの内容を基にしている。
Dockerイメージビルドの仕組み
まずDockerイメージを作成する方法について紹介する。
Dockerイメージのビルドとは、ベースとなるイメージに何らかの機能を追加し、ユーザーイメージ(自分だけのイメージ)を作成することをいう。
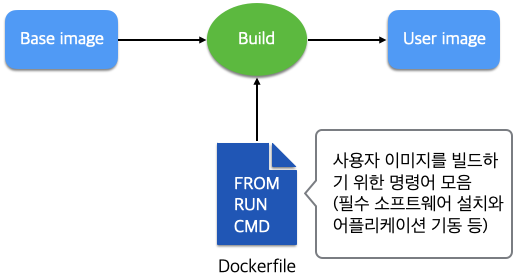
ベースイメージは一般的に、Docker社またはDockerコミュニティが提供するOSイメージになることが多い。イメージにさまざまな依存ライブラリやミドルウェアをインストールしたり、自分のアプリケーションをインストールおよび設定したりしてユーザーイメージを作成する。このユーザーイメージを第三者へ配布することで、ライブラリ、ミドルウェア、アプリケーションなどをすべて含む形で配布できる。
このとき、ベースイメージに対して実行する作業を記述する設定ファイルがDockerfileである。Dockerfileの書き方はDocker社によって定められている。詳しくはドキュメントを参照してほしい。
サンプルイメージをビルドする
ここではFlaskというPython用Webアプリケーションフレームワークを使用したWebアプリケーションを配布するDockerイメージを構築してみる。アプリケーションはランダムにGIF画像を表示するものである。Flask自体の詳細な説明はここでは省略する。
ビルドに必要なファイルを準備する
ディレクトリを作成し、次のようにイメージのビルドに必要な4つのファイルを取得する。
% mkdir flask-app
% cd flask-app
% wget https://raw.githubusercontent.com/docker/labs/master/beginner/flask-app/app.py
% wget https://raw.githubusercontent.com/docker/labs/master/beginner/flask-app/requirements.txt
% wget https://raw.githubusercontent.com/docker/labs/master/beginner/flask-app/templates/index.html -P templates
% wget https://raw.githubusercontent.com/docker/labs/master/beginner/flask-app/Dockerfile
次に各ファイルの内容を紹介する。
app.pyファイルはWebアプリケーションのエントリポイントとなるソースコードである。Web上のGIF画像を検索し、ランダムにURLを返す処理を行う。
from flask import Flask, render_template
import random

app = Flask(__name__)

# list of cat images
images = [
    "https://raw.githubusercontent.com/devkuma/docker-tutorial/main/flask-app/image/anigif_enhanced-buzz-26388-1381844103-11.gif",
    "https://raw.githubusercontent.com/devkuma/docker-tutorial/main/flask-app/image/anigif_enhanced-buzz-31540-1381844535-8.gif",
    "https://raw.githubusercontent.com/devkuma/docker-tutorial/main/flask-app/image/anigif_enhanced-buzz-26390-1381844163-18.gif",
    "https://raw.githubusercontent.com/devkuma/docker-tutorial/main/flask-app/image/anigif_enhanced-buzz-1376-1381846217-0.gif",
    "https://raw.githubusercontent.com/devkuma/docker-tutorial/main/flask-app/image/anigif_enhanced-buzz-3391-1381844336-26.gif",
    "https://raw.githubusercontent.com/devkuma/docker-tutorial/main/flask-app/image/anigif_enhanced-buzz-29111-1381845968-0.gif",
    "https://raw.githubusercontent.com/devkuma/docker-tutorial/main/flask-app/image/anigif_enhanced-buzz-3409-1381844582-13.gif",
    "https://raw.githubusercontent.com/devkuma/docker-tutorial/main/flask-app/image/anigif_enhanced-buzz-19667-1381844937-10.gif",
    "https://raw.githubusercontent.com/devkuma/docker-tutorial/main/flask-app/image/anigif_enhanced-buzz-26358-1381845043-13.gif",
    "https://raw.githubusercontent.com/devkuma/docker-tutorial/main/flask-app/image/anigif_enhanced-buzz-18774-1381844645-6.gif",
    "https://raw.githubusercontent.com/devkuma/docker-tutorial/main/flask-app/image/anigif_enhanced-buzz-25158-1381844793-0.gif",
    "https://raw.githubusercontent.com/devkuma/docker-tutorial/main/flask-app/image/anigif_enhanced-buzz-11980-1381846269-1.gif"
]

@app.route('/')
def index():
    url = random.choice(images)
    return render_template('index.html', url=url)

if __name__ == "__main__":
    app.run(host="0.0.0.0")
requirements.txtファイルは必要なPythonモジュールを記入したファイルである。pip(パッケージマネージャ)を使ってFlaskをインストールするときに使用する。
Flask==1.0
templates/index.htmlファイルはWebアプリケーションが出力するHTMLテンプレートである。画像を表示するだけである。
<html>
  <head>
    <style type="text/css">
      body {
        background: black;
        color: white;
      }
      div.container {
        max-width: 500px;
        margin: 100px auto;
        border: 20px solid white;
        padding: 10px;
        text-align: center;
      }
      h4 {
        text-transform: uppercase;
      }
    </style>
  </head>
  <body>
    <div class="container">
      <h4>Cat Gif of the day</h4>
      <img src="{{url}}" />
      <p><small>Courtesy: <a href="http://www.catshaming.co.uk/20-best-cat-gif-posts">Catshaming</a></small></p>
    </div>
  </body>
</html>
Dockerfileは、Dockerデーモンがイメージを作成するときに使用するコマンドをまとめたファイルである。サンプルDockerfileでは次のような処理を実行している。Dockerfileの構文については後で説明する。
- ベースイメージとしてAlpine Linux(Docker用に開発された軽量Linuxディストリビューション)を指定する。
- Pythonとpip(パッケージマネージャ)をインストールする。
- pipでアプリケーションに必要なPythonモジュールをインストールする。
app.pyとindex.htmlを所定の位置へコピーする。- ポート5000番を外部へ公開する。
- Webアプリケーションを実行する。
# our base image
FROM alpine:3.5

# Install python and pip
RUN apk add --update py2-pip

# upgrade pip
RUN pip install --upgrade pip

# install Python modules needed by the Python app
COPY requirements.txt /usr/src/app/
RUN pip install --no-cache-dir -r /usr/src/app/requirements.txt

# copy files required for the app to run
COPY app.py /usr/src/app/
COPY templates/index.html /usr/src/app/templates/

# tell the port number the container should expose
EXPOSE 5000

# run the application
CMD ["python", "/usr/src/app/app.py"]
補足: Dockerfileで使用される命令
Dockerfileを見ると、最初はシェルスクリプトのように見えるが、実際にはDockerfile固有の命令が使用されている。サンプルDockerfileで使用される命令は次の表のとおりである。構文の詳細はマニュアルに記載されているので参照してほしい。
| 命令 | 意味 | 補足 |
|---|---|---|
| FROM | ベースイメージとなるイメージを指定 | |
| RUN | イメージをビルドするためのコマンドを指定 | RUN apk add -update py-pipの場合、実際にはapk add -update py-pip部分が実行される。 |
| COPY | ホストからコンテナへファイルをコピーする。 | |
| EXPOSE | 外部へ公開するコンテナポートを指定する。 | 基本的にコンテナポートは閉じている。 |
| CMD | イメージからコンテナを起動するときに実行するコマンドを指定する。 | DockerfileでCMDは1つだけ指定できる。 |
そのほかDockerfile作成のベストプラクティスについてはBest practices for writing Dockerfilesにまとめられているので、こちらも参照してほしい。
イメージをビルドする
Dockerデーモンが実行されていなければビルドできない。事前にデーモンを起動しておく。
現在のディレクトリにDockerfileがある状態で次のコマンドを実行する。Dockerfileの内容が順番に実行されることが分かるはずである。
注: サンプルのプロキシ設定は用意されていないため、HTTPプロキシがない環境で実行する必要がある。
% docker build -t myfirstapp .
Sending build context to Docker daemon  8.192kB
Error response from daemon: dial unix docker.raw.sock: connect: connection refused
kimkc@kimkcui-MacBookPro flask-app % docker build -t myfirstapp .
[+] Building 16.1s (12/12) FINISHED
 => [internal] load build definition from Dockerfile                                                                                                 0.0s
 => => transferring dockerfile: 571B                                                                                                                 0.0s
 => [internal] load .dockerignore                                                                                                                    0.0s
 => => transferring context: 2B                                                                                                                      0.0s
 => [internal] load metadata for docker.io/library/alpine:3.5                                                                                        4.1s
 => [internal] load build context                                                                                                                    0.0s
 => => transferring context: 2.46kB                                                                                                                  0.0s
 => [1/7] FROM docker.io/library/alpine:3.5@sha256:66952b313e51c3bd1987d7c4ddf5dba9bc0fb6e524eed2448fa660246b3e76ec                                  0.5s
 => => resolve docker.io/library/alpine:3.5@sha256:66952b313e51c3bd1987d7c4ddf5dba9bc0fb6e524eed2448fa660246b3e76ec                                  0.0s
 => => sha256:66952b313e51c3bd1987d7c4ddf5dba9bc0fb6e524eed2448fa660246b3e76ec 433B / 433B                                                           0.0s
 => => sha256:f7d2b5725685826823bc6b154c0de02832e5e6daf7dc25a00ab00f1158fabfc8 528B / 528B                                                           0.0s
 => => sha256:f80194ae2e0ccf0f098baa6b981396dfbffb16e6476164af72158577a7de2dd9 1.51kB / 1.51kB                                                       0.0s
 => => sha256:8cae0e1ac61cead281f41115cc0ebd39117f7e54dffc8fd5e05a7590dca3cd4e 1.97MB / 1.97MB                                                       0.3s
 => => extracting sha256:8cae0e1ac61cead281f41115cc0ebd39117f7e54dffc8fd5e05a7590dca3cd4e                                                            0.2s
 => [2/7] RUN apk add --update py2-pip                                                                                                               4.9s
 => [3/7] RUN pip install --upgrade pip                                                                                                              2.8s
 => [4/7] COPY requirements.txt /usr/src/app/                                                                                                        0.0s
 => [5/7] RUN pip install --no-cache-dir -r /usr/src/app/requirements.txt                                                                            3.0s
 => [6/7] COPY app.py /usr/src/app/                                                                                                                  0.0s
 => [7/7] COPY templates/index.html /usr/src/app/templates/                                                                                          0.0s
 => exporting to image                                                                                                                               0.7s
 => => exporting layers                                                                                                                              0.7s
 => => writing image sha256:b012c41a03101ad398f22ed50e569d3b5277f608847ca3275a555d6d21babf0c                                                         0.0s
 => => naming to docker.io/library/myfirstapp                                                                                                        0.0s

Use 'docker scan' to run Snyk tests against images to find vulnerabilities and learn how to fix them
コンテナの起動
イメージのビルドが完了したら、次のコマンドでイメージからコンテナを起動する。
% docker run -p 8888:5000 --name myfirstapp myfirstapp
 * Serving Flask app "app" (lazy loading)
 * Environment: production
   WARNING: Do not use the development server in a production environment.
   Use a production WSGI server instead.
 * Debug mode: off
 * Running on http://0.0.0.0:5000/ (Press CTRL+C to quit)
このコマンドでは、コンテナの5000番ポートをホストの8888番に割り当てている。Webブラウザを開いてhttp://localhost:8888へアクセスすると、前述のWebアプリケーションが表示されるはずである。
コンテナの停止・削除
起動中のコンテナを停止するには、次のコマンドを実行する。
% docker stop myfirstapp
そして、停止したコンテナを削除するには次のコマンドを実行する。
% docker rm myfirstapp
まとめ
ここでは、具体的なサンプルアプリケーションを通じて、Dockerfileを使ってイメージをビルドし、そのイメージのコンテナを起動する方法を紹介した。今回はイメージビルドの基礎部分を扱ったため、イメージビルドの概要を把握できたはずである。Dockerの公式ドキュメントは非常に充実しているので、該当ドキュメントもあわせて参照すれば、さまざまなケースにも対応できるだろう。
今回はローカルでビルドし、ローカルでコンテナを起動する作業を行ったが、自分以外の人がイメージを利用できるようにするには、第三者が利用できる形でイメージを公開する必要がある。次回はイメージの公開方法を紹介する。