Getting Started with Docker by Practice | 3. Docker Image Management
The previous section introduced how to build an image from a Dockerfile. An image built locally is only cached in Docker Engine and cannot be used by other people. To make an image available to others, you must publish it somewhere users can access. Docker Inc. and cloud vendors such as AWS provide services called “registries” as a mechanism for managing and sharing Docker images. This section introduces Docker Hub and AWS ECR (EC2 Container Registry) as Docker image registries, explains basic image push and pull operations, and discusses points to consider when managing images within a team.
Sharing images through a registry
First, to understand the overall approach to team image management, this section introduces registries at a vendor-neutral level. Service-specific details are covered in each service section.
A registry mainly provides two roles for managing and sharing images in a team.
- Image registration and sharing
- You can register images in an image repository.
- You can publish images to other users.
- Access control for images (authentication and authorization)
- You can allow only specific people to read or write images.
The following diagram shows the concept of a registry service.
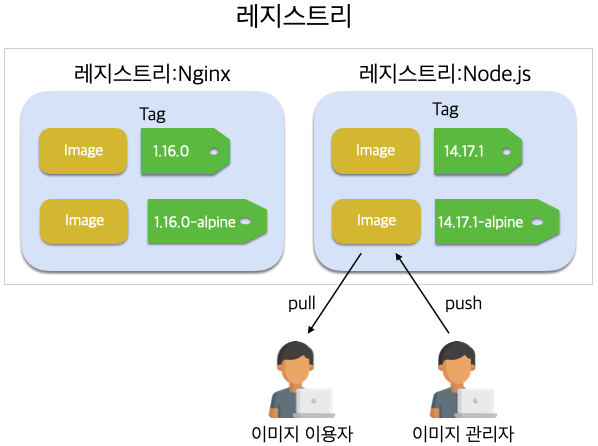
- A “registry” refers to the whole service that stores images.
- For a category of images to publish to the registry, such as Nginx or Node.js, a “repository” is registered as the actual image storage location.
- Multiple images can be registered in a repository, and each image is distinguished by a tag. If you want to distinguish images by version number, specify the version number in the tag. For example, Docker’s official Node.js image represents the Node.js version and Linux distribution in tags such as
14.17.1and14.17.1-alpine.- Caution: Images with the same tag are overwritten, so be careful when pushing images to a repository.
- Authentication is required when accessing the registry. You can also configure per-user permissions for repository operations such as push and pull. Therefore, you can grant push permission to image managers and pull permission to image users.
Docker Hub, Docker’s official registry
Next, let’s look at individual registries. First, this section introduces Docker Hub, a cloud service provided by Docker Inc.
What is Docker Hub?
Docker Hub is a cloud service for image management provided by Docker Inc. It has the following characteristics.
- Fully managed
- It is a cloud service managed by Docker Inc., so you do not need to manage servers yourself.
- Web UI
- You can manage images and Docker Hub accounts from a browser.
- Metadata repository
- It supports communication between users by allowing comments on repositories and stars, similar to “likes” on Facebook.
- Authentication and authorization
- You can restrict access to repositories for other users, such as read, write, and administration permissions.
- Repository sharing and management in teams
- Teams can share repositories and manage them collaboratively.
- Webhook
- It provides webhooks for integration with CI/CD environments.
Push and pull images with Docker Hub
Now create a public repository and push an image to it. This uses the image built earlier, so if you have not completed the “Docker image build” exercise, do that first.
Create a repository
You need a Docker Hub account to create a repository. Go to Docker Hub and create an account in advance.
When you sign up for Docker Hub, email verification is performed. Account creation is complete only after verification is finished.
After logging in to Docker Hub, click Create Repository to display the repository creation screen. Set the repository name to the same name as the image, myfirstapp. It is fine to set Visibility to public.
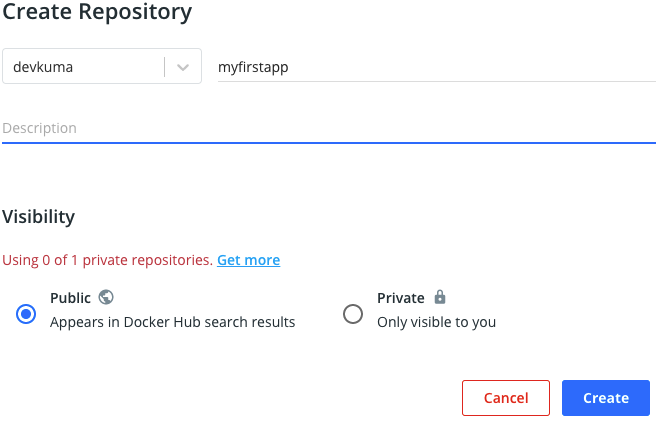
Authenticate to the registry
Before pushing an image to the repository, authenticate to the registry. When prompted for username and password, enter the values used when signing up for Docker Hub. If Login Succeeded is displayed, login succeeded.
% docker login
Login with your Docker ID to push and pull images from Docker Hub. If you don't have a Docker ID, head over to https://hub.docker.com to create one.
Username: devkuma
Password:
Login Succeeded
Push an image to the repository
The image name to push to the repository should be repository name/image name. In Docker Hub, the repository name is the account name; in this example it is devkuma.
The image built locally earlier does not include a repository name, so you must set an alias to push to Docker Hub with the docker tag command as follows. Put the image ID you want to alias as the first argument and the alias as the second argument. Change each value to match your environment.
% docker images
REPOSITORY   TAG       IMAGE ID       CREATED        SIZE
myfirstapp   latest    ca9348c3dcd2   47 hours ago   67.7MB
% docker tag ca9348c3dcd2  devkuma/myfirstapp
If you display the image list with docker images, you can confirm that devkuma/myfirstapp has been added as a result of docker tag. Since myfirstapp and devkuma/myfirstapp have the same IMAGE ID, both refer to the same image.
% docker images
REPOSITORY           TAG       IMAGE ID       CREATED        SIZE
devkuma/myfirstapp   latest    ca9348c3dcd2   47 hours ago   67.7MB
myfirstapp           latest    ca9348c3dcd2   47 hours ago   67.7MB
Next, push the image to the repository with the docker push command.
% docker push devkuma/myfirstapp
Using default tag: latest
The push refers to repository [docker.io/devkuma/myfirstapp]
59714c8e53ee: Pushed
8b0d10b320d2: Pushed
8fd4f6c343b1: Pushed
29f7edf0d8fd: Pushed
38f96c395e73: Pushed
c311a1e10929: Pushed
f566c57e6f2d: Mounted from library/alpine
latest: digest: sha256:5a06d6baf0481446a51c590099608145935d6f3e903aa2472c081fde0a12d6fe size: 1783
Open the Docker Hub dashboard again and look at the Tags list of the pushed myfirstapp repository. You can confirm that the image was pushed with the tag latest. This is because the image tag was omitted during the push, so Docker used the default tag latest, which points to the newest image.
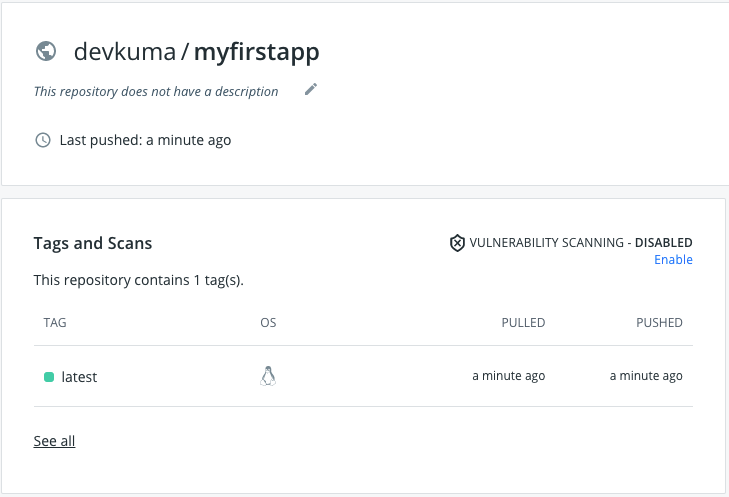
If you want to explicitly specify a tag for image version management, push again by specifying the tag in the image name as repository name/image name:tag.
% docker tag ca9348c3dcd2 devkuma/myfirstapp:0.0.1
% docker push devkuma/myfirstapp:0.0.1
The push refers to repository [docker.io/devkuma/myfirstapp]
59714c8e53ee: Layer already exists
8b0d10b320d2: Layer already exists
8fd4f6c343b1: Layer already exists
29f7edf0d8fd: Layer already exists
38f96c395e73: Layer already exists
c311a1e10929: Layer already exists
f566c57e6f2d: Layer already exists
0.0.1: digest: sha256:5a06d6baf0481446a51c590099608145935d6f3e903aa2472c081fde0a12d6fe size: 1783
If you check the Docker Hub dashboard again, you should see that an image with the tag 0.0.1 has been added.
How can a private repository be shared with a team?
So far, this section introduced how to push an image to a personal public repository. Since it is a public repository, anyone can pull the image with the following command.
% docker pull devkuma/myfirstapp
For a personal project that is not very important, a public repository under a personal account may be acceptable. In real development, however, you should provide a team’s private repository so that only team members can access it.
Docker Hub can create private repositories. One repository is free, and more than that requires a paid plan. For pricing, refer to the Pricing page from the Docker Hub dashboard.
Docker Hub provides features called Organizations and Teams for creating team repositories. An Organization means an organization that team members belong to, and a Team means a group with a specific role within that organization.
As a concrete example, if you want to prevent problems by allowing only image managers to push images and allowing other members only to pull images, provide Organizations and Teams as follows.
- Register all team members in an Organization. Then all members can view the private repositories created under that Organization.
- Grant write permission for the repository to the image managers’ Team, and register image managers in that Team. Now image managers can push images to the repository.
- Grant read permission for the repository to the image users’ Team, and register image users in that Team. Now image users can pull images from the repository.
Refer to Docker documentation for details.
Image management with AWS ECR
Next, this section introduces AWS ECR (EC2 Container Registry), an image repository provided by AWS.
What is ECR?
ECR is a cloud service for image management provided by AWS. Because it can integrate easily with other AWS services, it is very easy to use for people already using AWS.
Specifically, it has the following features.
- Fully managed
- It is a cloud service managed by AWS as a managed service, so you do not need to manage servers yourself.
- Web UI
- You can manage images from the AWS Management Console through a browser.
- Easy integration with other AWS services
- Integration examples
- Configure authentication and authorization with AWS IAM (Identity and Access Management), the AWS authentication foundation.
- Deploy containers to AWS ECS (EC2 Container Service), AWS’s container cluster management service.
- Build CI/CD environments together with AWS CodeBuild, AWS CodeDeploy, AWS CodePipeline, and other services.
- Integration examples
- Authentication and authorization
- Configure authentication and authorization for images using IAM.
- Team repository management
- You can create shared repositories for teams. IAM can be used to implement features equivalent to Docker Hub Organizations and Teams.
ECR itself has no usage fee, but charges apply based on the amount of data stored in repositories and the amount of data transferred over the internet. Check the pricing table for details.
Push and pull images with ECR
Prepare the following in advance to use ECR.
- Prepare an AWS account.
- Refer to the AWS documentation for details.
- Create an IAM user.
- Access to the repository is authenticated and authorized through IAM, so an IAM user is required. Create an IAM user by referring to the AWS documentation.
- Install the AWS CLI (command-line interface).
- To perform repository operations from the CLI, install the CLI in advance by referring to the AWS documentation.
- Also configure keys and region with the
aws configurecommand.
Caution: The following steps should be performed with an IAM user that has the AdministratorAccess policy.
Authenticate to the registry
To push an image to ECR, you must authenticate to the registry from the CLI in advance. Authentication uses the docker login command, the same as Docker Hub.
Caution: Be aware that the docker login command for ECR login must include AWS-specific authentication information, and the AWS CLI automatically generates the command.
Run the following command to obtain the docker login command. After --region, specify the region where you will create the repository. If login information is generated successfully, the docker login command is displayed. (Reference: authentication information is omitted below; an actual long string is displayed.)
$ aws ecr get-login --region us-west-2
docker login -u AWS -p xxx -e none
 https://xxx.dkr.ecr.us-west-2.amazonaws.com
Run the displayed docker login command. If successful, Login Succeeded is displayed.
$ docker login -u AWS -p xxx -e none
 https://xxx.dkr.ecr.us-west-2.amazonaws.com
Flag --email has been deprecated, will be removed in 1.14.
Login Succeeded
The docker login command obtained from AWS CLI has an expiration time. After a certain amount of time, you can no longer access the registry, so you must authenticate to the registry again.
Create a repository
After preparing to push an image, provide the target repository.
To create a repository from a browser, perform the following steps.
- Go to https://console.aws.amazon.com/ecs/ and open the AWS ECS (EC2 Container Service) management console. (Caution: ECR is integrated into ECS, so image management is also performed from the ECS management console.)
- On the repository settings screen, enter
myfirstappas the repository name and click Next step. - The repository URI is displayed, so record it for later operations. The URI format is
account number.dkr.ecr.region name.amazonaws.com/repository name.
You can also create it from the CLI with the following command.
# aws ecr create-repository --repository-name myfirstapp
{
    "repository": {
        "registryId": "xxx",
        "repositoryName": "myfirstapp",
        "repositoryArn": "arn:aws:ecr:us-west-2:xxx:repository/myfirstapp2",
        "createdAt": 1490510283.0,
        "repositoryUri": "xxx.dkr.ecr.us-west-2.amazonaws.com/myfirstapp2"
    }
}
Push an image to the repository
To push an image to the repository, prepare an alias for the image name that specifies the repository name with the docker tag command. Specify the repository URI shown in the management console or CLI response as the alias.
% docker tag myfirstapp xxx.dkr.ecr.us-west-2.amazonaws.com/myfirstapp
You can push the image with docker push.
% docker push xxx.dkr.ecr.us-west-2.amazonaws.com/myfirstapp
The push refers to a repository [xxx.dkr.ecr.us-west-2.amazonaws.com/myfirstapp]
17c42ed7fd27: Pushed
213ceaccd73e: Pushed
ac71ddba259e: Pushed
f8a68ba3c32d: Pushed
509e95f0d599: Pushed
3369321ad418: Pushed
23b9c7b43573: Pushed
latest: digest: sha256:7844dcb21756932f0cc93399519159f02f6c7b68f86af516d30c50b18b85d2ea size: 1783
When pulling the image, also specify the repository in the image name.
% docker pull xxx.dkr.ecr.us-west-2.amazonaws.com/myfirstapp
How can a private repository be shared with a team?
As with Docker Hub, you can configure IAM policies for IAM user groups of team members to allow all image managers to push and all image users to pull.
Also, in ECR, repositories are private by default, so you should allow specific operations only for permitted parties.
There are two concrete ways to configure permissions. Ultimately both apply IAM policies to IAM users, but the latter method using the management console is recommended because it is easier for beginners to understand.
- Common to services other than ECR: create an IAM policy directly and attach it to users.
- Create an IAM policy with appropriate permissions for the repository and attach it to the IAM users or user groups to allow.
- Refer to the AWS documentation for details.
- Advantages
- Since it can be run from the CLI, it is effective when you want to automate configuration.
- Disadvantages
- IAM itself is complex, so there is a risk of writing the IAM policy incorrectly and failing to set appropriate permissions. Verification is required when applying it.
- ECR only: configure from the ECR management console.
- Method
- Open the repository’s “Permissions” page from the ECR management console and create a repository management policy.
- Refer to the AWS documentation for details.
- Advantages
- You can work from the management console GUI. It is easier to understand for people who are not used to CUI.
- You only select users and choose allowed actions from “pull only”, “push and pull”, and “all three”, so it is easy to understand who is allowed to do what.
- Disadvantages
- Since it is GUI-based, automation is difficult.
- Method
Conclusion
This section introduced registry services as a way to share built images. It also introduced Docker Hub and Amazon ECR as concrete registry services and explained how to manage repositories and push images. This time, access permission management for team sharing was described only at a high level. When applying this to a real project, it is important to establish an appropriate repository permission policy to prevent problems. Refer to the Docker and AWS documentation introduced in this article, verify in advance, and then introduce it.