Getting Started with Docker by Practice | 4. Deploying Multiple Containers with Docker Compose
So far, we have covered how to handle a single image or container. In real development, however, systems are commonly composed by combining multiple processes such as databases and web servers. In systems that use Docker, one concern is assigned to one container; this is also recommended in the official documentation as “Each container should have only one concern”, so cases that handle multiple containers are common. This document introduces Docker Compose as a tool for starting multiple containers on a local host for development and test environments.
Overview of Docker Compose, a tool for managing multiple containers
Docker Compose is a tool for writing and running the configuration of Docker applications composed of multiple containers.
If you start a system composed of multiple containers such as a database, cache, and web API using only the docker command, you must specify settings for each container as parameters and run commands in the order of container dependencies.
With Docker Compose, you can write multiple container settings and dependencies in a configuration file and run multiple containers at once with a single command.
Main use cases for Docker Compose
Standardizing development environments
If team members manually prepare development environments according to rules, it takes time and can cause manual mistakes. By delivering a configuration file with Docker Compose, the environment can be prepared with a single command without worrying about development environment details. This simplifies environment setup work.
Automating test environments
When performing CI (Continuous Integration) and CD (Continuous Deployment), ideally an independent test environment should be provided for each test when automating end-to-end tests, which combine all components. Docker Compose can start the required test environment with a single command and can also destroy it easily after testing is complete.
Single-host deployment
If the production environment is a single server, Docker Compose can be used for deployment. Refer to the documentation for details.
However, when deploying to multiple nodes to scale an application, Docker Engine’s Swarm mode or a cloud cluster manager such as AWS ECS or Google Container Engine is usually more suitable.
Understanding Docker Compose with a single container
To understand how to write and run a Docker Compose configuration file (docker-compose.yml), this section uses the image created in the Docker image build page and introduces how to start and stop a single container. If you have not completed the exercise in advance, do it first.
Write docker-compose.yml
The following is a configuration file for starting a container from the image created earlier. Save this configuration file as docker-compose.yml.
version: '3'
services:
  myfirstapp:
    image: myfirstapp
    ports:
    - "8888:5000"
The contents of this configuration file are as follows.
- The Docker Compose file format version is
3.- For details about the format, refer to the official documentation.
- Caution: Docker Compose file format version 3 works with Docker Engine 1.13.0 or later. If it is not installed, refer to the “Docker image and container management mechanism” page and install it. Also, if Docker for Windows, Docker for Mac, or Docker Toolbox is installed, Docker Compose is automatically installed, so no additional installation is required. For how to install on Linux, refer to the official documentation.
- The service name is
myfirstapp.- Items under
servicesare externally recognizable functional units and are called services. - However, because a service is connected to a container, the actual entity of the service is a container.
- Items under
- The container connected to the service starts from the image
myfirstapp. - Container port 5000 is mapped to host port 8888. This allows access to the container’s web server at
https://localhost:8888.
Start the container with Docker Compose
Run the following command in the directory containing docker-compose.yml to start the container.
$ docker-compose up
.. omitted ...
Creating network "myfirstapp_default" with the default driver
Creating myfirstapp_1
Attaching to myfirstapp_1
As shown in Docker image build, accessing https://localhost:8888/ displays the web application.
This has the same meaning as running the following Docker command.
% docker run -p 8888:5000 myfirstapp
Compared with the docker command, the advantage of Docker Compose is that rough settings are written in a configuration file. As introduced in the main use cases section, if only Docker Engine and Docker Compose are installed, the same environment can be built with docker-compose up.
Commands supported by Docker Compose
docker-compose up can perform container creation and startup written in docker-compose.yml all at once.
If run without options, it runs in the foreground and logs are displayed on standard output. Add the -d option as follows to run it in the background.
% docker compose up -d
Run the following command to stop containers.
% docker compose stop
Run the following command to start containers again.
% docker compose start
You can also specify and start a particular container.
% docker compose start myfirstapp
Run the following command to stop and remove containers all at once.
% docker compose down
For details about other commands, refer to the official documentation.
Start multiple containers
Now that you understand how to use Docker Compose, let’s introduce Docker’s official sample voting app as a more practical example.
This application consists of five services.
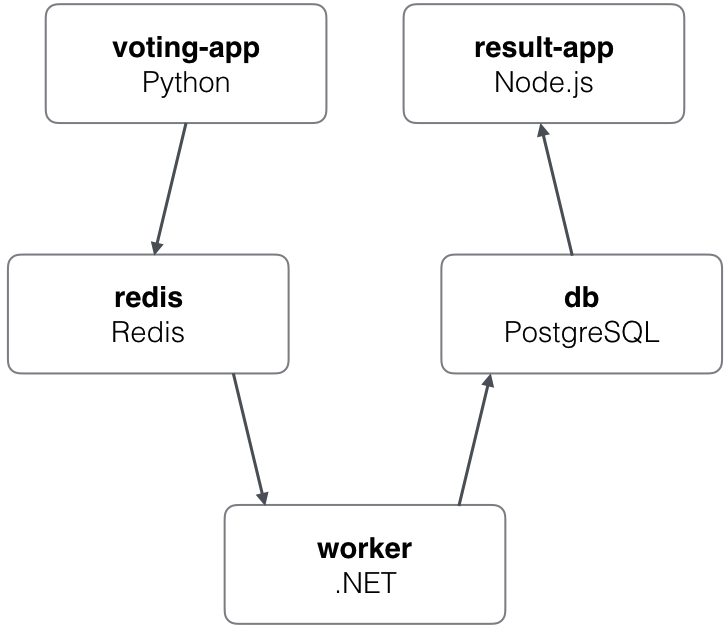
Architecture of the voting app, quoted from github.com/dockersamples/example-voting-app.
Caution: This sample focuses on how to use Docker Compose and how to write docker-compose.yml. Refer to the GitHub repository for details about the implementation of each container.
| Service | Name | Notes |
|---|---|---|
| voting-app | Application that displays a web page prompting users to vote. | Data is stored in Redis. A web application based on Python and Flask. |
| redis | Cache that temporarily stores voting results. | Redis |
| worker | Worker that retrieves voting results and stores them in a Postgres database. | .NET |
| db | Database that stores voting results. Data is stored in a Docker volume. | Postgres |
| result-app | Web application that displays real-time voting results. | Web application based on Node.js. |
Start the voting app
To check the application behavior, download the source code from the GitHub repository and start the containers with docker-compose up as follows. Be aware that the first run takes time because images are built.
% git clone https://github.com/dockersamples/example-voting-app.git
% cd example-voting-app
% docker-compose up
When console output stops and the containers are running, open https://localhost:5000 in a browser. The voting screen appears. Choose either CATS or DOGS.
Voting screen
Open https://localhost:5001 in a browser. The voting result screen appears. You can confirm that the selected option from the voting screen has received a vote.
Voting result screen
Write docker-compose.yml to handle multiple containers
This section explains Docker Compose features and configuration file writing. For detailed configuration file syntax, refer to the official documentation.
The configuration file for voting-app is as follows. The configuration file defines:
- Five services: vote, result, worker, redis, and db
- One volume: db-data
- Two networks: front-tier and back-tier
version: "3"

services:
  vote:
    build: ./vote
    command: python app.py
    volumes:
     - ./vote:/app
    ports:
      - "5000:80"
    networks:
      - front-tier
      - back-tier

  result:
    build: ./result
    command: nodemon --debug server.js
    volumes:
      - ./result:/app
    ports:
      - "5001:80"
      - "5858:5858"
    networks:
      - front-tier
      - back-tier

  worker:
    build:
      context: ./worker
    networks:
      - back-tier

  redis:
    image: redis:alpine
    container_name: redis
    ports: ["6379"]
    networks:
      - back-tier

  db:
    image: postgres:9.4
    container_name: db
    volumes:
      - "db-data:/var/lib/postgresql/data"
    networks:
      - back-tier

volumes:
  db-data:

networks:
  front-tier:
  back-tier:
services: service definitions
As explained in the single-container example, an externally recognizable functional unit is called a service. Because a service is connected to a container, the actual entity of the service is a container.
volumes: defining volumes, or persistent data areas
A volume is a data area that can retain data even after a container lifecycle ends. Its characteristics are as follows.
- Because it is a feature for data persistence, data in a volume is retained even if the container is deleted, unless the volume is explicitly discarded.
- A volume can be exclusive to a specific container, or it can be visible from multiple containers.
- A host-side directory can be mounted into a container as a volume.
- This feature is useful when passing files between host and container.
The volumes of each service describe service-specific volume settings. For example, the vote service mounts the host-side directory ./vote as an automatically created container-specific volume to the container directory /app. This passes the files required to run the application into the container.
services:
  (omitted)
  vote:
  (omitted)
    volumes:
     - ./vote:/app
Meanwhile, the db service mounts the volume named db-data, which is defined with a name in the top-level volumes section of docker-compose.yml, to the container directory /var/lib/postgresql/data. A volume declared with a name at the top level of docker-compose.yml, such as db-data, is called a named volume.
services:
  (omitted)
  db:
  (omitted)
    volumes:
      - "db-data:/var/lib/postgresql/data"
volumes:
  db-data:
- Like the volume of the
voteservice, a volume declared in a service definition with only host and container directory paths becomes a service-specific volume. - A named volume such as
db-datacan be seen by multiple containers.
networks: network settings
A network is the network to which a service belongs.
In voting-app, to prevent unintended data changes from direct database access on the host side, the database is placed in the back-tier network, which cannot be accessed directly from the host, while the web server is placed in the front-tier network, which can be accessed from the host.
To specify the networks each service belongs to, first declare networks at the top level of docker-compose.yml.
networks:
  front-tier:
  back-tier:
Then specify the networks that each service participates in under the service definition. In the following case, the vote service belongs to both back-tier and front-tier, while the redis service belongs only to back-tier.
  vote:
  (omitted)
    networks:
      - front-tier
      - back-tier
  (omitted)

  redis:
  (omitted)
    networks:
      - back-tier
Services that belong to the same network can connect to each other by specifying the service name as the host name. For example, both vote and redis belong to back-tier, so the vote service can access the redis service using the host name redis. In fact, looking at the implementation of the vote service (app.py) shows that redis is specified as the host name. The port is omitted, so the default port 6379 is used.
def get_redis():
    if not hasattr(g, 'redis'):
        g.redis = Redis(host="redis", db=0, socket_timeout=5)
    return g.redis
Also, when docker-compose up is first run, Docker Compose creates one default network and attaches each service to that default network. For example, in the voting-app example, voting_default is created.
$ docker-compose up
  (omitted)
Creating network "voting_default" with the default driver
For details about other network settings, refer to the official documentation below.
ports: port mapping between host and container
ports specifies port mappings between host and container. By mapping container port 80 to host port 5000, accessing https://localhost:5000/ from a browser allows access to the vote service web application.
    ports:
      - "5000:80"
image: specify the image to use
image specifies the image to use. In the following case, you can see that the redis service uses the existing image redis:alpine.
  redis:
    image: redis:alpine
build: image build
If an existing image does not satisfy the container requirements, specify image build settings with build. When build is specified, if the image is not in the local cache, the image build runs before starting the container and creates the image.
In the following case, the vote service specifies that the configuration files required for the build are in the ./vote directory.
services:
  vote:
    build: ./vote
If you open example-voting-app/vote/, you will see several files required for the web application, including a Dockerfile for building the Docker image. For Docker image builds, refer to “Image and container management mechanism”.
If both image and build are specified, the resulting built image name is the image name specified by image.
command: container startup command
command specifies the container startup command. The vote service is implemented with Flask, a Python web framework. Here, it runs app.py, the entry point of the web application.
command: python app.py
This concludes the Docker Compose explanation. This document covered only part of Docker Engine and Docker Compose features. Review the sample code and official documentation, understand the content, and apply it to your own services.
Conclusion
This article introduced how to write Docker Compose configuration files and execute commands using Docker’s official sample voting-app.
When providing middleware, giving users a Docker image and a Docker Compose configuration file makes environment setup easy, which is also very useful for users from the software provider’s perspective.
However, as mentioned earlier, Docker Compose is a tool for deployment to a single node, so it cannot scale out and is not suitable for production environments. Next, we will introduce a cloud cluster manager suitable for production environments.