Getting Started with Docker Through Hands-on Practice | 1. Docker Image and Container Management Mechanism
Docker provides simple and practical features, and as a lightweight virtual environment it is rapidly spreading and being used for application deployment. This material is intended for people who are interested in Docker but have not yet used it, and provides hands-on material for understanding Docker through actual practice. In this chapter, we introduce an overview of Docker and step-by-step practical operations for the most basic image and container management.
Docker Practice
So far, we have explained Docker itself. To properly understand Docker, the best approach is to run it yourself. I strongly recommend trying a quick hands-on exercise at least once.
Display Hello World
After installation, let’s try the familiar “hello world” for programmers.
% docker run hello-world
docker run is a command that starts a container from an image. The command above means starting a container from the image named hello-world. However, because the hello-world image does not exist locally, the Docker daemon downloads the hello-world image from Docker Hub, a PaaS-style Docker Registry operated by Docker, and starts a container from the image. This container prints standard output as follows and then exits.
Unable to find image 'hello:latest' locally
docker: Error response from daemon: pull access denied for hello, repository does not exist or may require 'docker login': denied: requested access to the resource is denied.
See 'docker run --help'.
% docker run hello-world
Unable to find image 'hello-world:latest' locally
latest: Pulling from library/hello-world
b8dfde127a29: Pull complete
Digest: sha256:9f6ad537c5132bcce57f7a0a20e317228d382c3cd61edae14650eec68b2b345c
Status: Downloaded newer image for hello-world:latest

Hello from Docker!
This message shows that your installation appears to be working correctly.

To generate this message, Docker took the following steps:
 1. The Docker client contacted the Docker daemon.
 2. The Docker daemon pulled the "hello-world" image from the Docker Hub.
    (amd64)
 3. The Docker daemon created a new container from that image which runs the
    executable that produces the output you are currently reading.
 4. The Docker daemon streamed that output to the Docker client, which sent it
    to your terminal.

To try something more ambitious, you can run an Ubuntu container with:
 $ docker run -it ubuntu bash

Share images, automate workflows, and more with a free Docker ID:
 https://hub.docker.com/

For more examples and ideas, visit:
 https://docs.docker.com/get-started/
Run Linux in a Container
In the hello-world example above, we confirmed that image retrieval and container startup can be done easily from the command line.
Next, as a slightly more complex example, this section introduces how to operate a container for Alpine Linux, a lightweight Linux distribution developed for containers. Through this tutorial, you can learn the following basic topics for using Docker.
- Pulling images
- Listing images
- Managing the container lifecycle
- create
- start
- stop
- rm
- Displaying containers with ps
First, download the alpine image. To download an image, use the pull command.
% docker pull alpine
Using default tag: latest
latest: Pulling from library/alpine
5843afab3874: Pull complete
Digest: sha256:234cb88d3020898631af0ccbbcca9a66ae7306ecd30c9720690858c1b007d2a0
Status: Downloaded newer image for alpine:latest
docker.io/library/alpine:latest
You can check the list of downloaded images with the images command. You can see that the hello-world and alpine images from above are displayed.
% docker images
REPOSITORY    TAG       IMAGE ID       CREATED        SIZE
alpine        latest    d4ff818577bc   26 hours ago   5.6MB
hello-world   latest    d1165f221234   3 months ago   13.3kB
Now start a container from the alpine image. Use the run command to start a container.
The command syntax is as follows.
`docker run <image name> <command to start in the container>`
run creates a container and starts it. For advanced options, refer to the official Docker documentation.
% docker run alpine echo "hello from alpine"
hello from alpine
Because echo was specified as <command to start in the container>, the echo command was executed immediately after the container started, and the container exited.
So far, only one command was executed when starting the container, and it exited immediately. If you want to perform interactive command work in the container, add the -it option to the run command and connect to the container. In the following example, the container is started and a shell is executed, so Linux commands can be used inside the container.
% docker run -it alpine bin/sh
/ # ls
bin    dev    etc    home   lib    media  mnt    opt    proc   root   run    sbin   srv    sys    tmp    usr    var
Open one more terminal and run the ps command. The ps command checks currently running containers. You can see that another terminal is currently starting a container from the alpine image and running the bin/sh command.
% docker ps
CONTAINER ID   IMAGE     COMMAND    CREATED          STATUS          PORTS     NAMES
d0736179149d   alpine    "bin/sh"   56 seconds ago   Up 55 seconds             nifty_keller
If you run the stop command here, you can stop the container. Open the terminal where the alpine container was started above and confirm that the container is stopping.
% docker stop d0736179149d
d0736179149d
stop does not delete the container; it only stops it. A stopped container can be started again with the start command. Use the ps command to confirm that the container is actually running.
% docker start d0736179149d
d0736179149d
% docker ps
CONTAINER ID   IMAGE     COMMAND    CREATED         STATUS          PORTS     NAMES
d0736179149d   alpine    "bin/sh"   5 minutes ago   Up 13 seconds             nifty_keller
However, in this state, you cannot operate the container again. To connect to the container from the terminal, use the attach command. The argument is the container ID.
% docker attach d0736179149d
/ # ls
bin    dev    etc    home   lib    media  mnt    opt    proc   root   run    sbin   srv    sys    tmp    usr    var
/ #
To exit the container, meaning stop and delete it, run the exit command while connected to the container. On Windows, Ctrl+C is also possible.
/ # exit
Alternatively, you can stop it with the stop command and remove the container with the rm command.
% docker stop 30cf0829bee2
30cf0829bee2
% docker rm 30cf0829bee2
30cf0829bee2
Once a container is deleted, it cannot be restarted with the start command.
% docker start 30cf0829bee2
Error response from daemon: No such container: 30cf0829bee2
Error: failed to start containers: 30cf0829bee2
Run a Web Server in a Container
So far, we have explained image and container management using the Alpine Linux image as an example.
As a final example, let’s introduce a more practical deployment of a web server with Docker.
Here, we use an image published on Docker Hub called seqvence/static-site. Inside the container for this image, Nginx (a web server) is included, and it provides static web pages inside the container to an accessible web browser. Docker can map guest-side ports to the host side, so access to the host port by a web browser can be forwarded to the guest. In this way, you can start a web server in Docker and provide a web application.
First, start the container. Put an appropriate name in the Your Name part.
% docker run --name static-site -e AUTHOR="Docker" -d -p 80:80 seqvence/static-site
Unable to find image 'seqvence/static-site:latest' locally
latest: Pulling from seqvence/static-site
Image docker.io/seqvence/static-site:latest uses outdated schema1 manifest format. Please upgrade to a schema2 image for better future compatibility. More information at https://docs.docker.com/registry/spec/deprecated-schema-v1/
fdd5d7827f33: Pull complete
a3ed95caeb02: Pull complete
716f7a5f3082: Pull complete
7b10f03a0309: Pull complete
aff3ab7e9c39: Pull complete
Digest: sha256:41b286105f913fb7a5fbdce28d48bc80f1c77e3c4ce1b8280f28129ae0e94e9e
Status: Downloaded newer image for seqvence/static-site:latest
9277612d90a1c6eb434c976db6bd6f1e1c651b05c0c35b1cc053656f53544ba1
When it starts for the first time, the image is downloaded as shown above, and you can confirm that Docker is running as follows.
% docker ps
CONTAINER ID   IMAGE                  COMMAND                  CREATED          STATUS          PORTS                                        NAMES
9277612d90a1   seqvence/static-site   "/bin/sh -c 'cd /usr..."   54 seconds ago   Up 52 seconds   0.0.0.0:80->80/tcp, :::80->80/tcp, 443/tcp   static-site
The command options above are as follows.
| Option | Meaning |
|---|---|
| -name static-site | Specifies static-site as the container name. |
| -e AUTHOR=“Docker” | Passes the environment variable Author with the value Docker to the container. This container uses the Author environment variable to display the web page. |
| -d | Starts in detach mode, meaning the container starts as a daemon in the background. |
| -p 80:80 | Assigns the container’s open port 80 to host port 80. |
In the example above, guest port 80 is assigned to host port 80, so when you access port 80 in a browser, the web page generated by the web application in the Docker container is displayed.
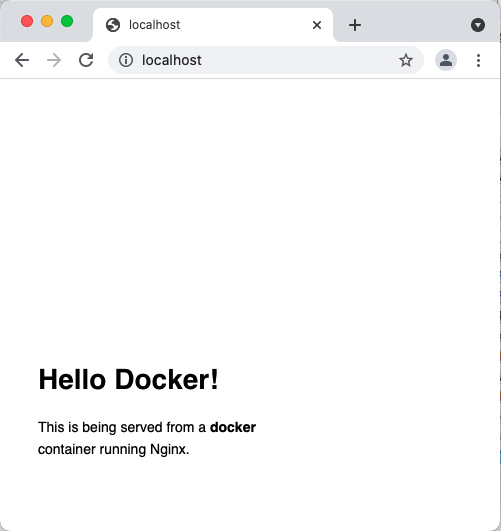
Note: The URI used for access differs depending on the Docker Engine you use.
- For Linux, Docker for Windows (Windows 10 or later), and Docker for Mac (OS X 10.10 Yosemite or later), you can check the result at
localhost:80. - Otherwise, check the Docker daemon’s IP address with
docker-machine ip default.
You can change the -p option to assign the port to another port on the host side. In the following case, a second container is started and guest port 80 is assigned to host port 8080. Therefore, you can access localhost:8080 in a web browser to display the web page.
% docker run --name static-site2 -e AUTHOR="My second Docker" -d -p 8080:80 seqvence/static-site
8996b832b603037d37e7d32c456fdc259929fe0a9094968ad2762c0c9651db3b
With this simple example, we confirmed that the web server in a Docker container can be accessed from the host. If you change firewall settings, such as iptables on Linux, and allow external access to the host HTTP port, you can expose the Docker web server externally.
By applying this, if Docker is installed on a cloud server, deployment tasks from image search to starting the container web server can be done easily with Docker commands. We also confirmed that by simply changing the contents of the web page, pulling a new Docker image on the host side and starting a container is enough.
Summary
This section explained the Docker overview and how to work with existing images and containers. It also introduced how to deploy a web server. In this section, you should have understood that image and container management is not difficult and that application deployment can also be done easily. However, to actually deploy an application with Docker, you need to create and deploy your own image. Next, we will introduce how to create an image.