Getting Started with Docker by Practice | 6. Experiencing the Structure of Docker Engine
This section explains the structure of Docker Engine from the perspective of a client-server model. We will call the Docker Engine API, connect remotely, and understand the structure of Docker Engine through hands-on experience.
Docker Engine overview
Docker Engine is Docker’s core software. Commands that have appeared so far, such as docker run and docker build, and the various operations executed by those commands, such as image builds and container execution, are collectively called Docker Engine.
When people simply say Docker, they may mean Docker Engine, or they may mean the Docker Platform including surrounding services and tools such as Docker Hub. The term Docker Engine is used when distinguishing it from Docker in the broader sense, such as Docker Platform.
According to the official documentation, Docker Engine mainly consists of the following three elements.
- Docker CLI
- Docker Engine API
- Docker daemon
Docker CLI is a command-line tool that runs Docker commands such as docker run and docker build. Docker CLI calls the Docker Engine API according to the entered Docker command. The Docker daemon waits as a Linux daemon process for Docker Engine API calls and executes image builds, container startup, and other operations according to the called Docker Engine API.
In this way, Docker Engine can be considered a client-server application. The Docker CLI, which is the client, requests processing from the Docker daemon, which is the server, through the Docker Engine API and receives responses.
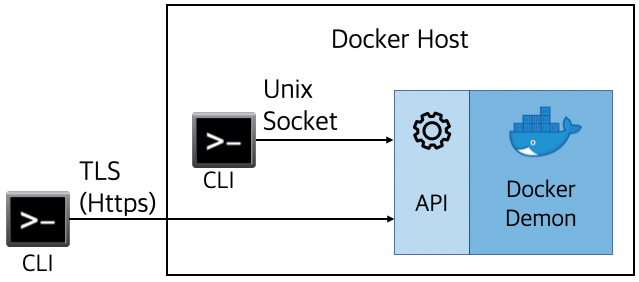
Unix socket communication and TLS communication
As shown in the diagram above, the communication method with the Docker daemon differs depending on whether the Docker CLI is on the Docker host or outside it.
When the Docker CLI is on the Docker host, it communicates with the Docker daemon using a Unix domain socket, hereafter called a Unix socket. A Unix socket is a mechanism that allows processes on the same system to communicate. Previously, we logged in to the Docker host with docker-machine ssh and ran Docker CLI commands on the Docker host, so Unix socket communication was used.
When the Docker CLI is outside the Docker host, it communicates with the Docker daemon using a TCP socket. For TCP sockets, it is recommended to apply some security measures rather than using HTTP as-is. One such measure is TLS. Docker Engine uses TLS to encrypt HTTP as HTTPS communication and can restrict both clients and servers to trusted ones.
To use TLS communication, various tasks such as creating certificates are required. However, when a Docker host is created with Docker Machine, those tasks are performed automatically. This section also uses Docker Machine’s automatic settings for TLS communication. The reason for using automatic settings is that they make it easy to experience TLS communication, not that they guarantee high security.
Preparation
Now let’s actually use Docker Engine and understand it more deeply. The flow is as follows.
- Preparation
- API calls with curl (Unix socket communication)
- “Hello World” through API calls (Unix socket communication)
- Docker CLI installation
- Remote connection from Docker CLI (TLS communication)
- Supplement: proxy and certificate regeneration
As before, prepare Windows 10, VirtualBox, and PowerShell.
Create a Docker host using Docker Machine as follows.
PS > docker-machine create myhost
When this create command is executed, the Docker version in the Docker host is the latest. However, the Docker version used by the author was v17.09.0-ce, so if your Docker version differs, the content introduced below may not work. In that case, specify the version with the --virtualbox-boot2docker-url option of the create command as follows.
PS> $url = 'https://github.com/boot2docker/boot2docker/releases/download/v17.09.0-ce/boot2docker.iso'
PS> docker-machine create --virtualbox-boot2docker-url $url myhost
After the Docker host is created, log in.
PS> docker-machine ssh myhost
After logging in, check that Docker CLI can run “Hello World”.
docker@myhost:~$ docker run hello-world
(middle omitted)
Hello from Docker!
This message shows that your installation appears to be working correctly.

To generate this message, Docker took the following steps:
 1. The Docker client contacted the Docker daemon.
 2. The Docker daemon pulled the "hello-world" image from the Docker Hub.
    (amd64)
 3. The Docker daemon created a new container from that image which runs the
    executable that produces the output you are currently reading.
 4. The Docker daemon streamed that output to the Docker client, which sent it
    to your terminal.
This is the same as before.
Reading the log again, it describes the processing of Docker CLI, or Docker client, and the Docker daemon in order. Although it is not written in the log, Docker CLI calls the Docker Engine API that interacts with the Docker daemon. The Docker Engine API can be called even without Docker CLI. So next, use curl to call the Docker Engine API.
API calls with curl (Unix socket communication)
curl is a widely known tool that can perform HTTP and many other kinds of communication. curl is installed on the Docker host by default, but check the curl version just in case.
docker@myhost:~$ curl --version
curl 7.49.1 (x86_64-pc-linux-gnu) libcurl/7.49.1 OpenSSL/1.0.2h zlib/1.2.8
Protocols: dict file ftp ftps gopher http https imap imaps pop3 pop3s rtsp smb smbs smtp smtps telnet tftp
Features: AsynchDNS Largefile NTLM NTLM_WB SSL libz TLS-SRP UnixSockets
curl version 7.40.0 or later is enough. Unix sockets can be used from curl 7.40.0. Call the Docker Engine API using a Unix socket as follows.
docker@myhost:~$ curl --unix-socket /var/run/docker.sock http:/version
{
    "Version":  "17.09.0-ce",
    "ApiVersion":  "1.32",
    "MinAPIVersion":  "1.12",
    "GitCommit":  "afdb6d4",
    "GoVersion":  "go1.8.3",
    "Os":  "linux",
    "Arch":  "amd64",
    "KernelVersion":  "4.4.89-boot2docker",
    "BuildTime":  "2017-09-26T22:45:38.000000000+00:00"
}
The /var/run/docker.sock specified in the --unix-socket option is the Docker socket path. http:/version is the API that obtains Docker version information. Version information is output in JSON format. "ApiVersion": "1.32" is the API version. The version 1.32 documentation explains many APIs with examples. Referring to those contents, let’s print “Hello World” next.
“Hello World” through API calls (Unix socket communication)
First, create a container.
curl --unix-socket /var/run/docker.sock \
    -H "Content-Type: application/json" \
    -d '{"Image": "hello-world", "Tty": true}' \
    -X POST http:/containers/create
{"Id":"469a115ce858fc7ae41639dc3ec7bf354e88015cc98b2540a4c8a7598e01445e","Warnings":null}
The image name is specified in JSON format, such as "hello-world" and -d '{"Image": "hello-world", .... -X POST means that the HTTP POST method is used. http:/containers/create is the API that creates a container.
The output {"Id":"469a11... is the ID of the created container. Use this ID to start the container.
docker@myhost:~$ curl --unix-socket /var/run/docker.sock \
    -X POST http:/containers/469a11/start
http:/containers/469a11/start is the API that starts the container. The container to start can be specified by the leading characters of the container ID, such as 469a11.
The container created from the hello-world image prints logs when it starts and then stops immediately. Check whether it stopped successfully.
docker@myhost:~$ curl --unix-socket /var/run/docker.sock -X POST http:/containers/469a11/wait
{"StatusCode":0}
http:/containers/469a11/wait is an API that waits until the container stops and returns the exit code as StatusCode. Since StatusCode is 0, the container processing succeeded.
Check the container logs.
docker@myhost:~$ curl --unix-socket /var/run/docker.sock http:/containers/469a11/logs?stdout=1

Hello from Docker!
This message shows that your installation appears to be working correctly.
(omitted below)
The same log as when running “Hello World” with the docker run command is printed. Although the called APIs differ slightly, the docker run command also interacts with the Docker daemon through the Docker Engine API in this way.
Install Docker CLI
Next, install Docker CLI on Windows so Docker CLI can perform remote connections, or TLS communication. Installation does not require Docker Machine; you only need to download the binary file and configure the Path.
The Windows 64-bit Docker CLI binary can be downloaded from here. If the link does not work, refer to the official documentation.
Match the Docker CLI version to the Docker host Docker version. If the versions differ, normal operation is unlikely. For version v17.09.0-ce, the file name is docker-17.09.0-ce.zip.
After downloading the zip file, extract it and add the included docker.exe file to the environment variable Path. For how to set Path in PowerShell, refer to the previous explanation.
After configuring Path, run the following command.
PS> docker version
Client:
 Version:      17.09.0-ce
 API version:  1.32
 Go version:   go1.8.3
 Git commit:   afdb6d4
 Built:        Tue Sep 26 22:40:09 2017
 OS/Arch:      windows/amd64
error during connect: Get https://%2F%2F.%2Fpipe%2Fdocker_engine/v1.32/version:
open //./pipe/docker_engine: The system cannot find the file specified.
In the default daemon configuration on Windows, the docker client must be run elevated to connect.
This error may also indicate that the docker daemon is not running.
If Docker CLI version information is printed under Client:, installation is complete.
An error message is printed at the bottom. By configuring remote connection next, Docker host-side information will also be printed there.
Remote connection from Docker CLI (TLS communication)
To connect remotely, you must configure target Docker host information. The following introduces two ways to configure it.
1. Configure docker options
Run the following Docker Machine command in PowerShell.
PS> docker-machine config myhost
--tlsverify
--tlscacert="C:\\Users\\Taro\\.docker\\machine\\machines\\myhost\\ca.pem"
--tlscert="C:\\Users\\Taro\\.docker\\machine\\machines\\myhost\\cert.pem"
--tlskey="C:\\Users\\Taro\\.docker\\machine\\machines\\myhost\\key.pem"
-H=tcp://192.168.99.100:2376
This config command prints Docker options for remote connection. Options starting with --tls specify paths to certificates automatically generated by Docker Machine. -H=tcp://192.168.99.100:2376 is the IP address and port number of myhost, which allows TLS communication.
Copy these options, add them to the docker version command as follows, and run it. The backticks at the end of each line are used in PowerShell when splitting a long command across multiple lines.
PS> docker --tlsverify `
--tlscacert="C:\\Users\\kimkc\\.docker\\machine\\machines\\myhost\\ca.pem" `
--tlscert="C:\\Users\\kimkc\\.docker\\machine\\machines\\myhost\\cert.pem" `
--tlskey="C:\\Users\\kimkc\\.docker\\machine\\machines\\myhost\\key.pem" `
-H=tcp://192.168.99.100:2376 version

Client:
 Version:      17.09.0-ce
 API version:  1.32
 Go version:   go1.8.3
 Git commit:   afdb6d4
 Built:        Tue Sep 26 22:40:09 2017
 OS/Arch:      windows/amd64

Server:
 Version:      17.09.0-ce
 API version:  1.32 (minimum version 1.12)
 Go version:   go1.8.3
 Git commit:   afdb6d4
 Built:        Tue Sep 26 22:45:38 2017
 OS/Arch:      linux/amd64
 Experimental: false
The remote connection succeeded and Server: information was printed.
However, adding the same long options every time you run the docker command is something you want to avoid if possible. Therefore, set environment variables as follows.
2. Configure environment variables
The environment variables required for remote connection can be configured in one line with Docker Machine and PowerShell.
PS> docker-machine env myhost | Invoke-Expression
After running this command, run docker version and docker run hello-world in the same PowerShell. Version information should be printed and “Hello World” should run.
What exactly does this command do? Let’s split it up.
First, run the command on the left side of the pipeline symbol |.
PS> docker-machine env myhost
$Env:DOCKER_TLS_VERIFY = "1"
$Env:DOCKER_HOST = "tcp://192.168.99.100:2376"
$Env:DOCKER_CERT_PATH = "C:\Users\kimkc\.docker\machine\machines\myhost"
$Env:DOCKER_MACHINE_NAME = "myhost"
$Env:COMPOSE_CONVERT_WINDOWS_PATHS = "true"
# Run this command to configure your shell:
# & "C:\Users\kimkc\Scripts\docker-machine.exe" env myhost | Invoke-Expression
Several lines beginning with $Env: are printed. $Env: is an environment variable in PowerShell, as mentioned earlier. From the variable names and values, you can see that these are environment variables for TLS communication. Docker Machine’s env command prints environment variables for the Docker host to connect to as strings.
However, the env command only prints strings. Unless the printed strings are executed as PowerShell commands, the environment variables are not set.
The PowerShell command that executes strings is Invoke-Expression, abbreviated as iex. In other words, docker-machine env myhost | Invoke-Expression executes the strings printed by Docker Machine’s env command with PowerShell’s Invoke-Expression command and sets the environment variables required for remote connection.
In this way, Docker CLI can switch connections through environment variables. Try creating multiple Docker hosts other than myhost and experiment.
Now Docker CLI can perform remote connections with TLS communication. The following sections introduce two additional troubleshooting methods for remote connection problems.
Supplement 1: Proxy
Even after setting environment variables with the env command, an error like the following may occur.
PS> docker-machine env myhost | Invoke-Expression
PS> docker version
(omitted)
error during connect: Get https://192.168.99.100:2376/v1.32/version: Service Unavailable
One possible cause is that a company or school HTTP proxy prevents access to the Docker host IP address, such as 192.168.99.100. In this case, add the --no-proxy option as follows.
PS> docker-machine env --no-proxy myhost
$Env:DOCKER_TLS_VERIFY = "1"
$Env:DOCKER_HOST = "tcp://192.168.99.100:2376"
$Env:DOCKER_CERT_PATH = "C:\Users\kimkc\.docker\machine\machines\myhost"
$Env:DOCKER_MACHINE_NAME = "myhost"
$Env:COMPOSE_CONVERT_WINDOWS_PATHS = "true"
$Env:NO_PROXY = "192.168.99.100"
# Run this command to configure your shell:
# & "C:\Users\kimkc\Scripts\docker-machine.exe" env --no-proxy myhost | Invoke-Expression
By adding the --no-proxy option, $Env:NO_PROXY = "192.168.99.100" is additionally printed on the third line from the bottom. $Env:NO_PROXY is an environment variable that configures IP addresses that should not go through a proxy. If you specify the IP address of myhost in $Env:NO_PROXY, Docker CLI attempts to connect remotely to myhost without going through the proxy.
Supplement 2: Regenerate certificates
If you continue using Docker Machine, the following error message may occasionally be printed.
PS> docker-machine env myhost | Invoke-Expression
Error checking TLS connection: Error checking and/or regenerating the certs:
There was an error validating certificates for host "192.168.99.101:2376":
x509: certificate is valid for 192.168.99.100, not 192.168.99.101
You can attempt to regenerate them using 'docker-machine regenerate-certs [name]'.
Be advised that this will trigger a Docker daemon restart which might stop running containers.
One possible cause is that the IP address used when the certificate was generated, meaning when the Docker host was created, differs from the IP address used when starting the Docker host this time. Docker Machine dynamically assigns IP addresses when starting Docker hosts, so this error often occurs when multiple Docker hosts are created.
In this case, regenerate the certificate with the regenerate-certs command shown in the error message.
PS> docker-machine regenerate-certs myhost
Regenerate TLS machine certs?  Warning: this is irreversible. (y/n): y
Regenerating TLS certificates
Waiting for SSH to be available...
Detecting the provisioner...
Copying certs to the local machine directory...
Copying certs to the remote machine...
Setting Docker configuration on the remote daemon...
You should now be able to connect remotely again.
Conclusion: Docker Engine and “assemble”
This section explained the structure of Docker Engine. Through API calls and remote connections, you should now have experienced the structure of Docker Engine, which can be described as a client-server model.
Finally, let’s briefly introduce recent trends at Docker Inc. and their relationship to Docker Engine.
The name Docker Engine was probably first used explicitly at DockerCon in June 2014. At that DockerCon, elements that became the origins of currently developed components, such as libcontainer and libswarm, were also announced. It seems that what had previously been collectively called “Docker” began to be gradually separated into clearer components around that time.
The three Docker Engine components introduced here have also taken clearer shape as components along with Docker’s evolution. Among them, the Docker daemon has been further divided into several components. For example, containerd extracts the container-related processing of the Docker daemon as a component. Today, containerd is developed as a project of the Cloud Native Computing Foundation (CNCF).
This trend toward componentization entered a new phase with the Moby project, announced at DockerCon 2017 in April 2017.
Moby is, in a sense, a framework for creating your own Docker. The Moby project homepage states:
An open framework to assemble specialized container systems without reinventing the wheel.
The word to note here is “assemble”. It means “collect” or “put together”. Moby is an open framework for assembling Docker-like container systems by gathering various components.
Docker Inc. intends to provide Moby as a means of “assembling” various container systems and to provide Docker as one of the container systems assembled well using Moby. Container technology centered on Docker changes rapidly and new products continue to appear. It may be easier to understand them by looking at whether they are components or results assembled from components.