JSP/Servlet | Creating a GAE Application | Creating a Project
Now we finally start creating a web application in Eclipse. In Eclipse, when developing a program, you first create something called a “project”. Let’s create one.
A project is a way to organize and manage the various things needed for the program you are making. When writing a program, many files are created, various settings are configured, required libraries are registered, and many kinds of information must be managed. Recording those things in scattered places and managing them manually is difficult, so a “project” lets you manage everything together. Now let’s follow the procedure.
-
From the [File] menu, select [Project …] from the [New] submenu.
-
A dialog named “Select a wizard” appears. Here, select the type of project to create. For Java development on GAE, use the “Web Application Project” item in the “Google” folder. Select it and click the “Next>” button.
-
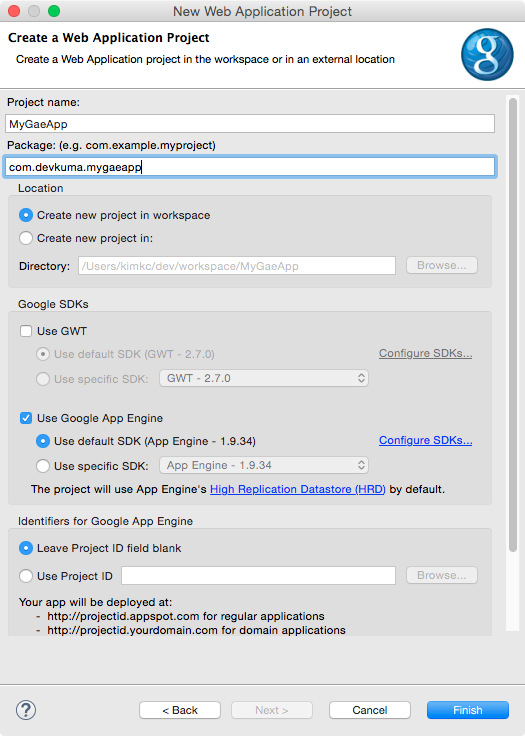
The “Create a Web Application Project” screen is displayed. Configure the project to be created here. This is important when creating the project, so check the contents carefully and set them.
-
Project name: This is the project name. It is not related to the application name created earlier on the GAE site. You can use any name you like. Here, we use “MyGaeApp”.
-
Package: This specifies the package used by the Java classes that will be generated. You can set this appropriately, but here we use “com.devkuma.mygaeapp”.
-
Location: This sets the location where the project is placed. By default, the “Create new project in workspace” radio button is selected. This stores the project in the workspace. Leave it as it is.
-
Google SDKs
-
Use GWT: This specifies whether to use Google’s “GWT (Google Web Toolkit)” framework. If this is ON, the application uses GWT. GWT uses Ajax-based interaction with the server, and because the file and program structure becomes complex, using it requires a certain level of knowledge. Since our goal here is to study the basics of server-side Java, turn this checkbox “OFF” and do not use GWT.
-
Use Google App Engine: This is for using “Google App Engine”. When this checkbox is ON, the project is created in a form that uses GAE. This must be “ON”.
-
Use default SDK: When “Use Google App Engine” is ON, this radio button appears below it. This uses the SDK configured as the default. Leave it as it is.
-
-
Identifiers for Google App Engine: This is where you enter the GAE site project identifier, that is, the ID. For now, leave “Leave Project ID field Blank” as it is.
-
Sample Code: This prepares some source code and files as samples from the beginning. When “Generate project sample code” is selected, those files are created. It is good to keep this “ON”.
After finishing the settings above, press the “Finish” button to create the project.