JSP/Servlet | JSP(Java Server Pages) | Creating Java Server Pages
When people hear “run Java on the server,” they may think it sounds conceptually unclear and much harder than ordinary Java. Serious Java server development does require a certain level of advanced knowledge, but that does not mean you cannot use server-side Java without advanced knowledge.
Java includes a way to easily run Java code on the server. That is “JSP (Java Server Pages)”.
JSP is a technology that lets you run Java code easily, in a way similar to PHP, which is often used for server development today. JSP does not require tasks such as writing Java source code and compiling it. The basic idea is to write Java code inside HTML tags displayed in the browser and execute it.
In any case, it is much easier to understand by trying it first, so let’s create a JSP file and run it.
-
From the [File] menu, select [Other …] under [New].
-
A dialog named “Select a wizard” appears. Select the item to create here. From the list, select “JSP File” under “Web” and proceed.
-
Move to the “JSP Create a new JSP File” screen. Enter the location and file name for the file to create. For the location, enter “MyGaeApp/war”. You can also set it by expanding the “MyGaeApp” project icon below and clicking the “war” folder inside it. For the file name, use “helo.jsp” here. JSP files use the “.jsp” extension like this.
-
Press the “Next>” button to continue, and the “Select JSP Template” screen appears. Select the template to use here. Select “New JSP File (html)”, the fourth item from the top of the list. This is the most common way to create a JSP. In practice, even if you select another one, you can edit the source code later, so it does not matter too much.
When you finish with the “Finish” button, a JSP file named “helo.jsp” is created in the “war” folder. If it is accidentally created somewhere else, you can drag the file icon as is into the “war” folder.
Editing the JSP file
First, edit the JSP you created and make a page. Before that, change the page encoding to UTF-8.
In Project Explorer, select “helo.jsp” and choose [Properties] from the [File] menu. A settings window for the helo.jsp file appears.
This window lists setting items on the left. When you select an item there, the detailed configuration appears on the right. Select “Resource” from this list. It is probably selected at the top by default.
The screen displays settings such as file properties. Look at “Text file encoding” near the bottom. The “Default” radio button should be selected. Change it to “Other” and select “UTF-8” from the combo box on the right. Press the “OK” button to close the dialog, and the file encoding changes.

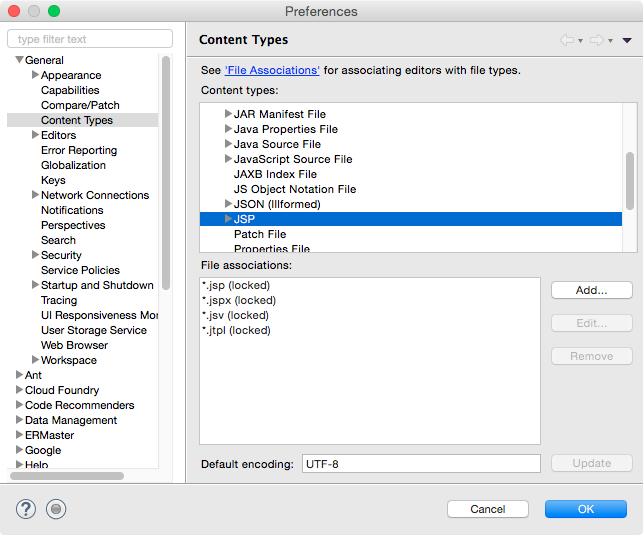
You can also change the “Default” encoding for all source code. First open Preferences. When the [Preferences] screen appears, select [Content Types] on the left and select the [JSP] item. If you change the file’s “Default encoding” to UTF-8 here, the default encoding changes to UTF-8.
Try using JSP tags
Now double-click helo.jsp to open it and modify the source code. Simple code is written by default, but it is not set to “UTF-8”, so it must be corrected in several places. Also, since nothing is actually displayed, let’s write something appropriate.
Write a simple example like the following.
<%@ page language="java" contentType="text/html; charset=UTF-8"
    pageEncoding="UTF-8"%>
<!DOCTYPE html>
<html>
<head>
    <meta http-equiv="Content-Type" content="text/html; charset=utf-8">
    <title>Sample jsp</title>
    <style>
    h1 {font-size:16pt; background:#AAFFAA; padding:5px; }
    </style>
</head>
<body>
    <h1>Sample jsp page</h1>
    <p>This page is a sample.</p>
    <p><%= java.util.Calendar.getInstance().getTime() %></p>
</body>
</html>
First, modify it as shown and save it. Two unfamiliar tags appear here. They are as follows.
page directive
<%@ page language="java" contentType="text/html; charset=UTF-8"
    pageEncoding="UTF-8"%>
The first one is a tag in the form <%@ ... %>. Tags that start with <%@ and end with %> are called “directives”. They are not Java code themselves, but are used to describe detailed settings related to the page.
Here, “page” follows immediately after it. This is called a “page directive”, and it describes various settings for the page. It has attributes such as language, contentType, and pageEncoding. language means the “language” being used, contentType means the “content type” and specifies the character encoding method for the HTTP response. This is set in the response header received by the browser. pageEncoding means the encoding of the JSP page itself. For now, remember that you must include this tag.
<%= %> tag
<%= java.util.Calendar.getInstance().getTime() %>
This is the part that actually runs Java code. A tag that starts with <%= and ends with %> executes the Java code written after the equals sign and writes the result at that location. Here, it outputs the result of java.util.Calendar.getInstance().getTime() to the page.
As you can confirm by actually trying it, this will not work as Calendar.getInstance().getTime(). You must specify it properly with the package, such as java.util.Calendar. Of course, there is also a way to specify packages. This will be explained later.