Kotlin Scope Functions | let, with, run, apply, also
Overview
Kotlin scope functions let you execute code inside a certain context. Here, “context” means that the object you want to work with is used inside the code as this or it. Kotlin’s standard library has five functions called “scope functions”: let, with, run, apply, and also. Using these functions can make code concise. However, to understand these functions, you first need to understand the “receiver object”, so let’s look at that first.
Receiver object
The term receiver object first appears in Kotlin extension functions. To understand receiver objects, you need to know about extension functions.
An extension function is declared outside a class, but can be called as if it were a member method of that class. For example, if you define an extension function for Kotlin’s built-in String class, you can use it like a new member method.
The example below defines an extension function for the String class.
// Define an extension function
fun String.lastChar(): Char = this[this.length - 1]
The standard String class does not have a function that returns the last character, but if you define an extension function as above, a String object can use the lastChar() function to retrieve one last character.
To define an extension function, take the syntax for defining a normal function and add the name of the class to extend, followed by a dot, between the fun keyword and the function name.
Now use this extension function.
// Use the extension function
val last: Char = "hello".lastChar()
println(last)
Output:
o
You can see that the last character of the String object is retrieved and printed by using the extension function.
There is a difference from normal functions in the example that defines the extension function above. Normally, this refers to the class where the current function is defined, or causes a compile error in a top-level function. However, in an extension function, this means the object of the extended class, that is, the object that uses the extension function. That object is the receiver object, and the type of the class being extended is the receiver type.
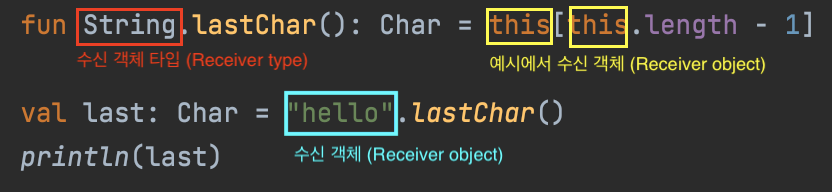
Then what does the receiver object receive? In “Kotlin in Action”, a receiver object is described as “the value (object) on which an extension function is called.” If “receive” is understood as receiving something, the object becomes the target for executing the extension function’s code, so you can think of it as “the object receives the code.” In short, think of it as the value or object on which the extension function runs.
If expressed as a normal function that we often use:
// Basic Kotlin function form
fun lastChar(str: String): Char = str[str.length - 1]
In the code above, you can think of str as the receiver object.
Lambda with receiver
A lambda with receiver is a lambda that can call methods of a specific object inside the lambda expression. It lets you call methods of another object inside the lambda body without explicitly specifying the receiver object.
About the name “scope functions”
The name comes from “scope functions” used in the following Kotlin official blog post.
What’s new in Standard Library M13 and M14
Prior to M13 there were two so-called scope functions in the Standard Library: let and with. We call them scope functions, because their only purpose is to modify scope of a function passed as the last parameter.
In other words, let and with are called “scope functions” because the purpose of the functions defined there is to change the scope of the function passed as a parameter.
Scope functions
When looking at the definitions below, it is helpful to remember the meanings of the generic abbreviations.
E: ElementK: KeyN: NumberT: TypeV: ValueR: Return Type
let
The basic definition is as follows.
inline fun <T, R> T.let(block: (T) -> R): R
As you can see, let is an extension function for any type.
Here is a simple example.
fun main() {
    val str = "devkuma".let { it.uppercase() }
    println(str)
}
Output:
DEVKUMA
In the example above, the String value "devkuma" becomes the receiver object. let receives this receiver object as a function parameter (it), converts it to uppercase, and returns it.
It is commonly used with Nullable variables, that is, when executing code only if the object is not null. It is a very useful scope function for preventing null pointer errors. In frequently used code, it plays roles similar to the following three methods of Java’s Optional.
mapflatMapifPresent
For example, if you want to get the uppercase version of a String? variable named foo, you can write:
fun main() {
    var foo: String? = null
    // var foo: String = "foo"
    val upperCase: String? = foo?.let { it.uppercase() }
}
If foo is null, let is not executed because of the ?. call and null is returned. If foo is not null, let executes it.uppercase() and returns foo converted to uppercase.
In this case, you can also write foo?.let(String::uppercase).
with
The basic definition of with is as follows.
inline fun <T, R> with(receiver: T, block: T.() -> R): R
Unlike let, with is not an extension function. It receives an arbitrary type T as its first argument. It also receives a function as the second argument, but that function is used as a method that receives T.
Here is a simple example.
fun main() {
    val str = with("devkuma") { this.uppercase() }
    println(str)
}
Output:
DEVKUMA
In the example above, this in { this.uppercase() } means "devkuma". Of course, this is optional, so you can write { uppercase() }.
It is mainly used to neatly write multiple operations on an object that cannot be null.
For example, you can print the values of an object as follows.
fun main() {
    val numbers = mutableListOf("one", "two", "three")
    with(numbers) {
        println("'with' is called with argument $this")
        println("It contains $size elements")
    }
}
Output:
'with' is called with argument [one, two, three]
It contains 3 elements
Another common case is creating an instance and configuring several settings.
import java.awt.Dimension
import javax.swing.JFrame

fun main() {
    val frame: JFrame = with(JFrame("My App")) {
        size = Dimension(600, 400)
        defaultCloseOperation = JFrame.EXIT_ON_CLOSE
        setVisible(true)
        this
    }
}
In the example above, the size property and setVisible method are members of JFrame. In this context, this is optional, so you do not need to repeat it.
Using let is not suitable in this case because you would have to write it every time you access size or setVisible, such as it.size and it.setVisible(true).
If you perform several operations on the instance passed to with and then return the instance itself, apply below may be more appropriate.
run
The basic definition of run is as follows.
inline fun <T, R> T.run(block: T.() -> R): R
It is defined like a combination of let and with. run is an extension function for every type T, and it receives a method that takes that T.
Here is a simple example.
fun main() {
    val str = "devkuma".run { uppercase() }
    println(str)
}
Output:
DEVKUMA
run is a combined version of let and with. It is used when executing functions contained in an object and returning the result. For example:
fun main() {
    val numbers = mutableListOf("one", "two", "three")
    val countEndsWithE = numbers.run {
        add("four")
        add("five")
        count { it.endsWith("e") }
    }
    println("numbers: $numbers")
    println("There are $countEndsWithE elements that end with e.")
}
Output:
numbers: [one, two, three, four, five]
There are 3 elements that end with e.
In the example above, the add functions included in the numbers list are executed inside run, and the last expression returns the number of strings ending with e to the countEndsWithE variable.
When creating an instance and configuring several settings, it can be written as follows.
import java.awt.Dimension
import javax.swing.JFrame

fun main() {
    val frame: JFrame? = frameOrNull()
    frame?.run {
        size = Dimension(600, 400)
        defaultCloseOperation = JFrame.EXIT_ON_CLOSE
        setVisible(true)
    }
}

fun frameOrNull(): JFrame? {
    // return null
    return JFrame("My App")
}
apply
The basic definition of apply is as follows.
inline fun <T> T.apply(block: T.() -> Unit): T
Here is a simple example.
fun main() {
    val str = "devkuma".apply { uppercase() }
    println(str)
}
Output:
devkuma
Unlike the previous examples, printing variable str displays the lowercase value. This is because apply executes the function passed as an argument and performs some action, but its return value is the receiver object.
It can be understood as the version to use when you want to return the receiver object from with. Compare it with code using with.
val frame: JFrame = JFrame("My App").apply {
  size = Dimension(600, 400)
  defaultCloseOperation = JFrame.EXIT_ON_CLOSE
  setVisible(true)
}
When using with, this was explicitly returned as the last return value of the argument function. Since apply returns the receiver object, you do not need to explicitly write this.
apply is also often used when applying property values to an object. If values cannot be set only with the constructor when declaring an object, apply lets you set them separately in a continuous style. The two pieces of code below produce the same result, but the version using apply is more explicit.
data class Person(val name: String) {
    var age: Int? = null
    var city: String? = null
}

fun main() {
    val person1 = Person("kimkc").apply {
        age = 21
        city = "Seoul"
    }

    val person2 = Person("kimkc")
    person2.age = 21
    person2.city = "Seoul"

    println(person1 == person2)
}
also
also is an extension function added to the standard library in version 1.1.
The basic definition of also is as follows.
inline fun <T> T.also(block: (T) -> Unit): T
As the definition shows, it is almost identical to apply. The difference is that the argument is not an extension function of the original receiver object, but a function that takes the original receiver object as an argument.
There are two advantages. First, you can give it a name. If you write the argument function as a lambda expression, you normally refer to the original receiver object as it, but if you want to give it a meaningful name, such as name or label, the code becomes more readable. The other advantage is that the meaning of this does not change inside and outside the lambda expression.
Here is a simple example using also.
fun main() {
    val str = "devkuma".also { it.uppercase() }
    println(str)
}
Output:
devkuma
Now compare it with apply. The code below is an Android example using apply.
val button = Button(this).apply {
  text = "Click me"
  setOnClickListener {
    startActivity(Intent(this@MainActivity, NextActivity::class.java))
    // Plain this causes an error     ^
  }
}
Here is the same code converted to use also.
val button = Button(this).also { button ->
  button.text = "Click me"
  button.setOnClickListener {
    startActivity(Intent(this, NextActivity::class.java))
  }
}
Finally, here is an example using let.
val button = Button(this).let { button ->
  button.text = "Click me"
  button.setOnClickListener {
    startActivity(Intent(this, NextActivity::class.java))
  }
  button // In the case of let, this code is required.
}
The difference from let, which also takes a “function that receives the original receiver object” as an argument, is that let lets you decide the return value yourself, while also returns the original receiver object.
References
- Scope functions | Kotlin
- let - Kotlin Programming Language
- with - Kotlin Programming Language
- run - Kotlin Programming Language
- apply - Kotlin Programming Language
- also - Kotlin Programming Language