Build a Simple Standard MCP Server (STDIO) with Spring and Kotlin
Getting Started
An MCP Server provides a standardized interface that lets an AI model connect to external resources such as tools, data, and APIs.
For the concept of an MCP server, see the document below.
AI Terms | MCP Server
This article explains how to build a simple MCP Server with Spring and connect to it from Claude.
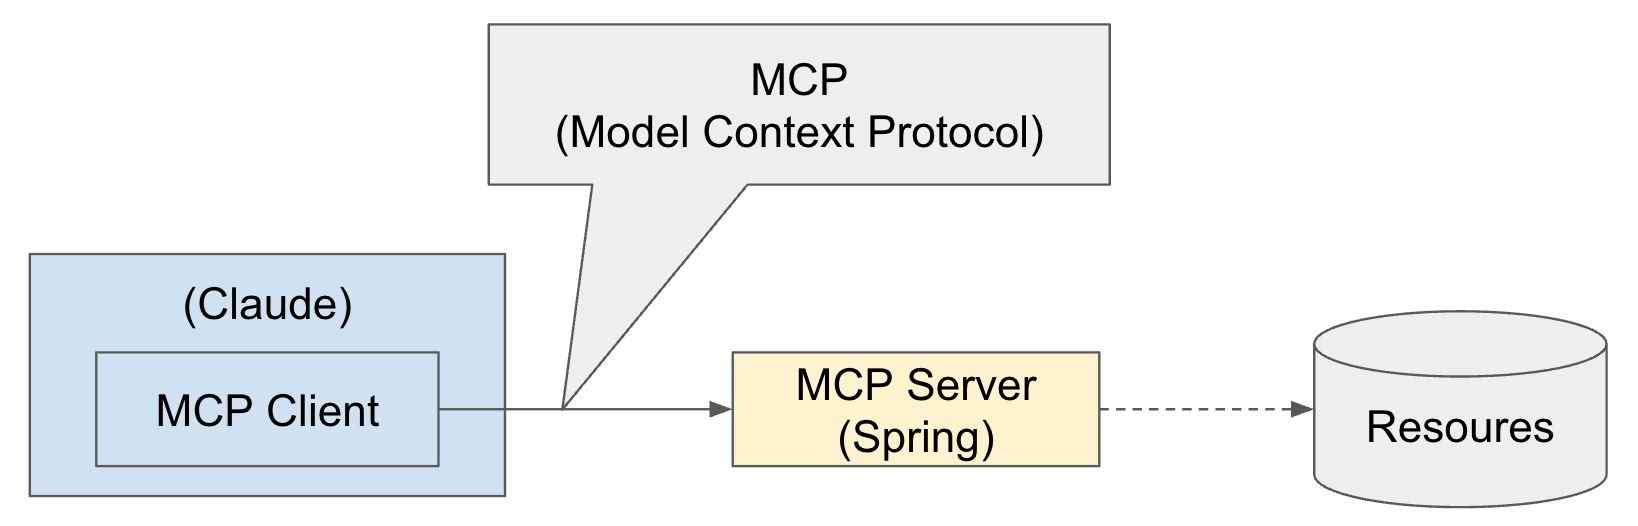
Of course, you can use AI tools other than Claude, and the MCP Server does not have to be built with Spring. This is possible because MCP, as the name implies, follows the Model Context Protocol.
Resources connected to an MCP Server can vary widely, such as databases or APIs. This article does not cover connecting those resources.
Spring AI’s MCP Server framework supports the following three starters depending on the server transport.
- Standard MCP Server
- Supports STDIO server transport
org.springframework.ai:spring-ai-starter-mcp-server
- WebMVC Server transport
- Supports Spring MVC-based SSE (Server-Sent Events) server transport and, optionally, STDIO transport
org.springframework.ai:spring-ai-starter-mcp-server-webmvc
- WebFlux Server transport
- Supports Spring WebFlux-based SSE (Server-Sent Events) server transport and, optionally, STDIO transport
org.springframework.ai:spring-ai-starter-mcp-server-webflux
Implementing an MCP Server with Spring
First, create a simple Standard MCP Server (STDIO) with Spring and Kotlin.
Create the Project
You can create the project with Spring Initializr.
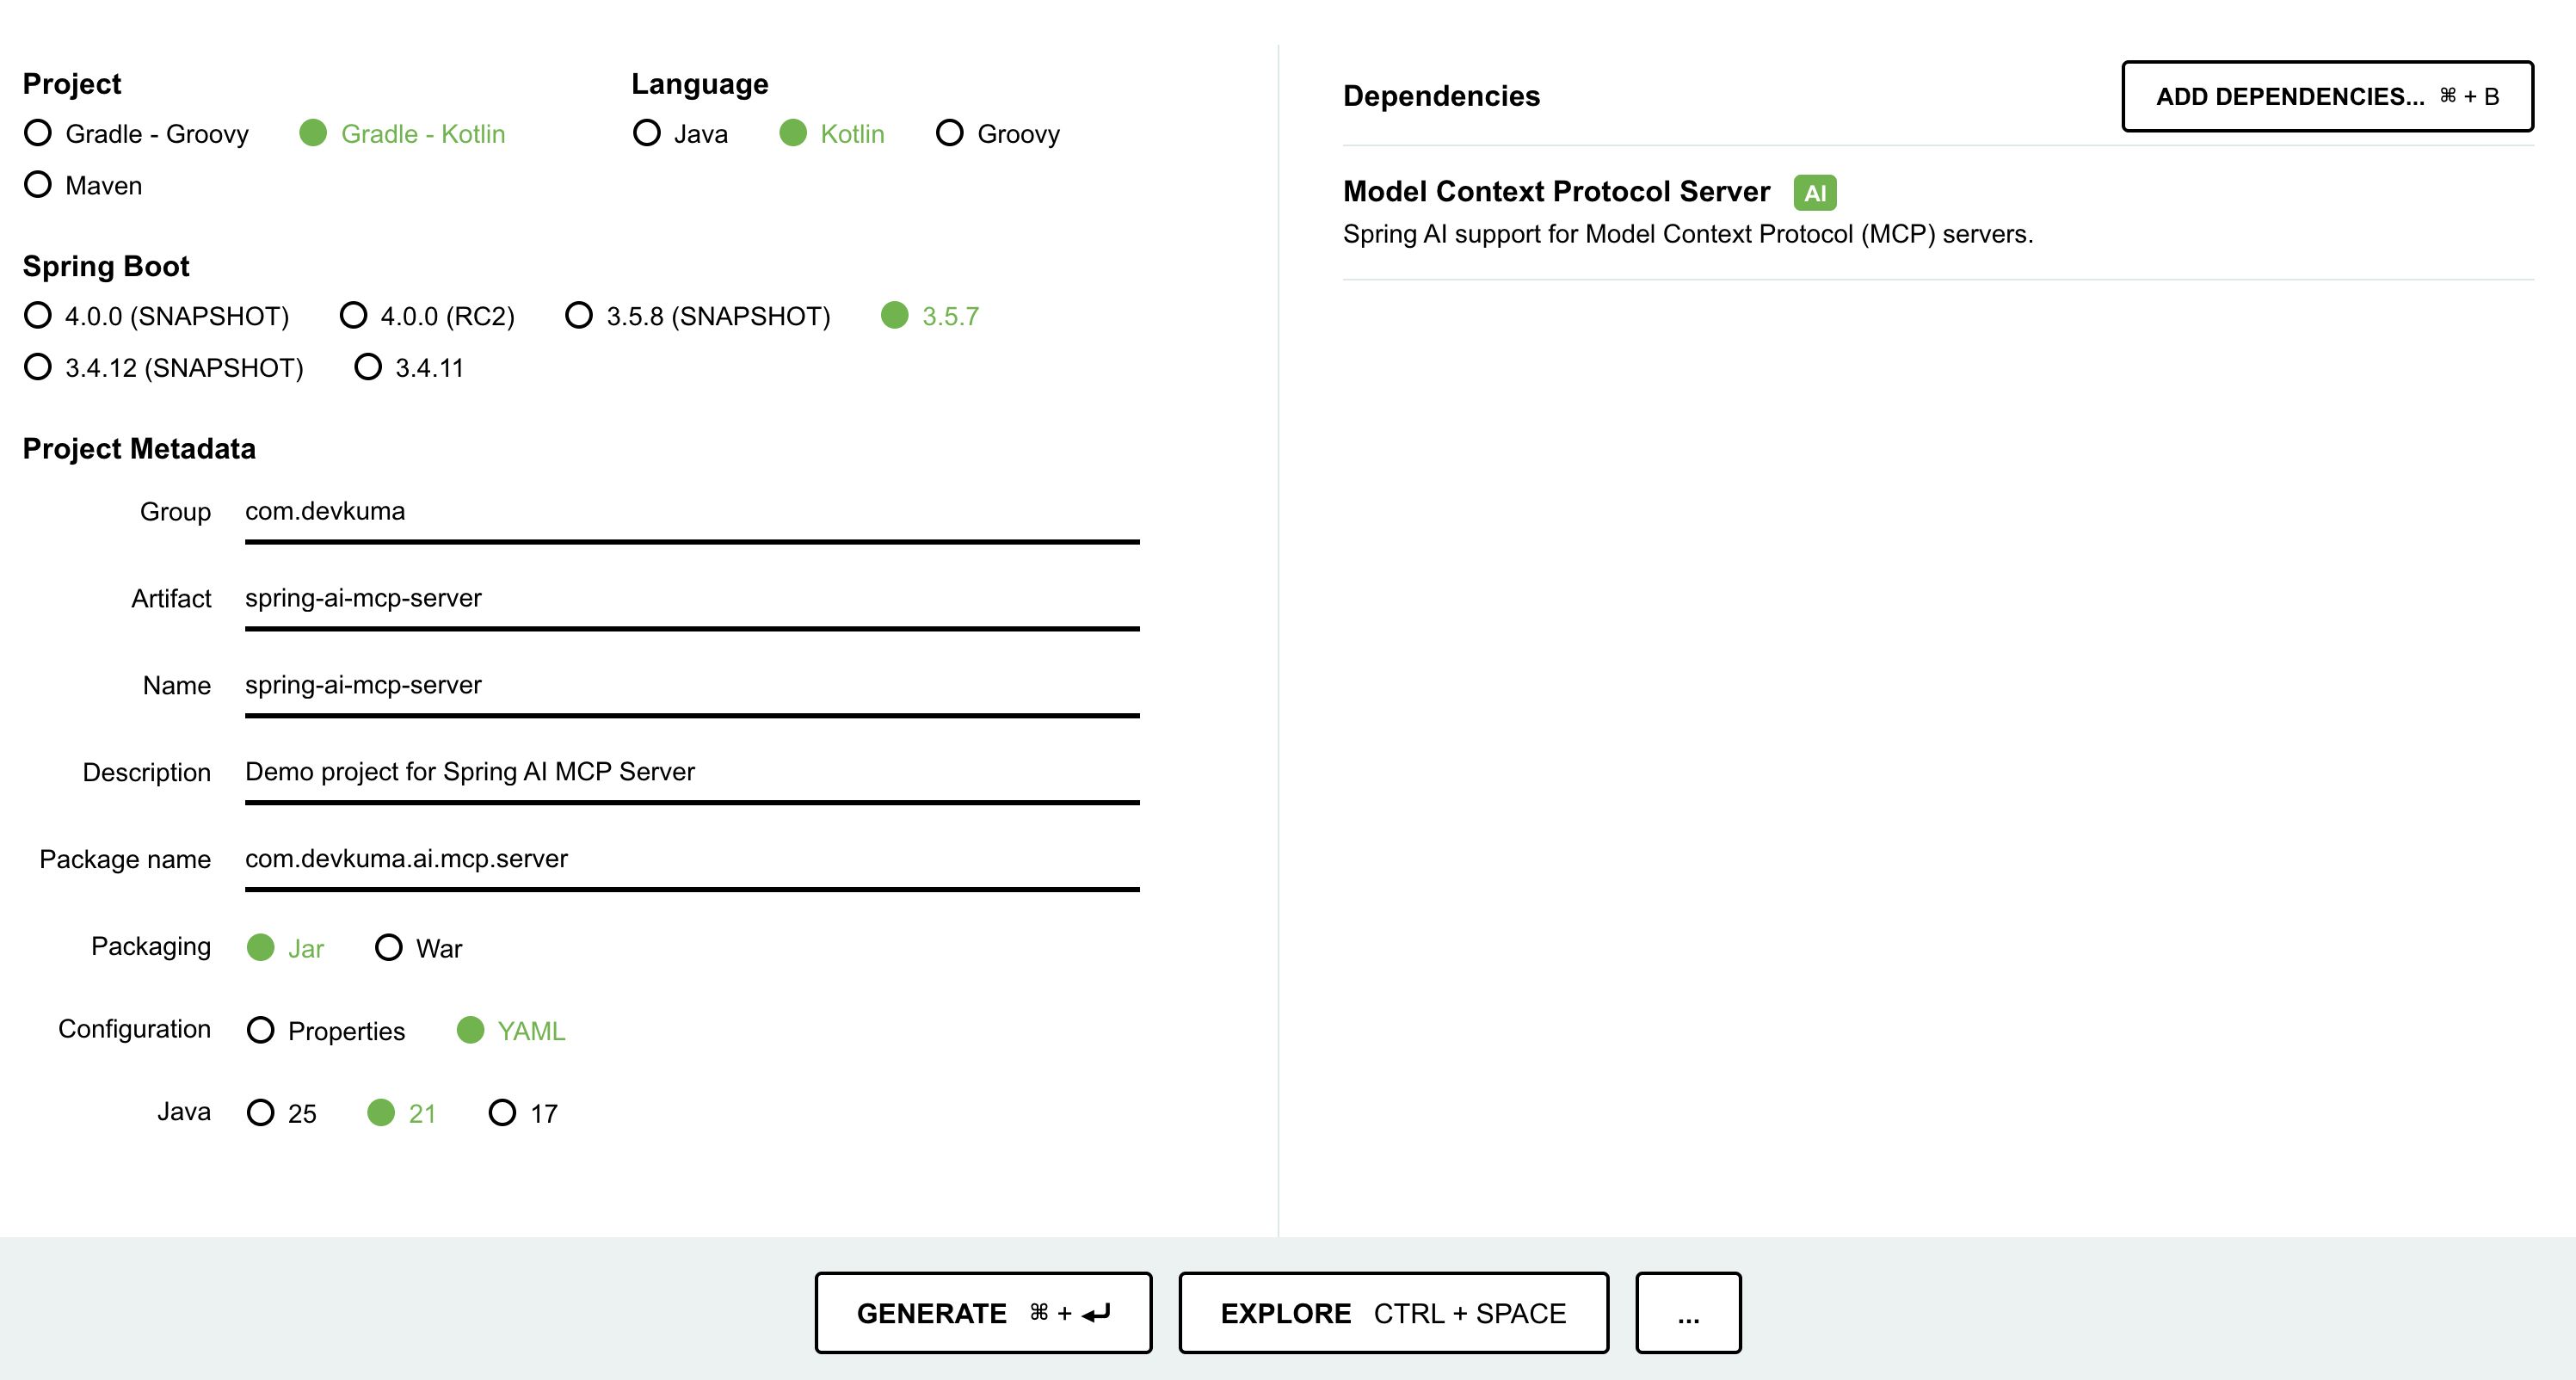
Press the “GENERATE” button near the bottom of the screen to download the configured project files.
Alternatively, you can create the initial Spring Boot project with the following curl command.
curl https://start.spring.io/starter.tgz \
-d bootVersion=3.5.7 \
-d dependencies=spring-ai-mcp-server \
-d baseDir=spring-ai-mcp-server \
-d groupId=com.devkuma \
-d artifactId=spring-ai-mcp-server \
-d packageName=com.devkuma.ai.mcp.server \
-d applicationName=McpServerApplication \
-d packaging=jar \
-d language=kotlin \
-d javaVersion=21 \
-d description="Demo project for Spring AI MCP Server" \
-d type=gradle-project-kotlin | tar -xzvf -
Check the Generated Project
Build Script
You can see that the dependency library includes the Spring MVC Server (spring-ai-starter-mcp-server) library.
/build.gradle.kts
dependencies {
	...
	implementation("org.springframework.ai:spring-ai-starter-mcp-server")
	...
}
If you do not change the Spring AI library version separately, an older default version is configured. In this example, change it to the latest version.
extra["springAiVersion"] = "1.1.0-M4"
Check the latest version here.
Create the Service Object
Create the service object that will be called from the MCP Client.
/src/main/kotlin/com/devkuma/ai/mcp/server/WeatherService.kt
package com.devkuma.ai.mcp.server

import org.springframework.ai.tool.annotation.Tool
import org.springframework.ai.tool.annotation.ToolParam
import org.springframework.stereotype.Service

@Service
class WeatherService {

    @Tool(name = "get_weather", description = "Return the weather of a given city.")
    fun getWeather(@ToolParam(description = "The city for which to get the weather") city: String): String {
        // Add logic that retrieves the actual weather information.
        // This example simply returns "Good".
        return "The weather in $city is good."
    }
}
- The
getWeather(..)function receives the city as a parameter and returns a fixed weather state of “good”.- This example uses a fixed response value, but in a real application you can retrieve the information from another resource such as a database or API.
- The tool description in
@Tooland the parameter description in@ToolParamcan later be shown to the MCP client when it connects to the server, so the client knows what tools exist and how to use them.
Create the MCP Server Configuration Object
Add the created service as an AI Tool in the Spring configuration.
/src/main/kotlin/com/devkuma/ai/mcp/server/McpConfig.kt
package com.devkuma.ai.mcp.server

import org.springframework.ai.tool.ToolCallbackProvider
import org.springframework.ai.tool.method.MethodToolCallbackProvider
import org.springframework.context.annotation.Bean
import org.springframework.context.annotation.Configuration

@Configuration
class McpConfig {

    @Bean
    fun weatherTools(weatherService: WeatherService): ToolCallbackProvider {
        return MethodToolCallbackProvider.builder().toolObjects(weatherService).build()
    }
}
Application Configuration File
Write application.yml as follows. If application.properties already exists, change it to a YAML file.
/src/main/resources/application.yml
spring:
  main:
    web-application-type: none
    # NOTE: You must disable the banner and the console logging to allow the STDIO transport to work !!!
    banner-mode: off
  ai:
    mcp:
      server:
        name: my-weather-server
        version: 0.0.1

logging:
  pattern:
    console:
  file:
    name: ./log/spring-ai-starter-mcp-server.log
- The important point here is that
banner-modemust be set tooff.
Build and Create the Executable File
After writing the code, build it and create a jar file. In IDEA, run bootJar with the Gradle build.
Or run the following command from the terminal.
% ./gradlew clean bootJar
Then the jar file is created at the following path.
build/libs/spring-ai-mcp-server-0.0.1-SNAPSHOT.jar
Implementing an MCP Client for Testing
The MCP Server is complete. Now implement a client.
Create a new StdioClient.kt file.
/test/kotlin/com/devkuma/ai/mcp/client/StdioClient.kt
package com.devkuma.ai.mcp.client

import io.modelcontextprotocol.client.McpClient
import io.modelcontextprotocol.client.transport.ServerParameters
import io.modelcontextprotocol.client.transport.StdioClientTransport
import io.modelcontextprotocol.json.McpJsonMapper
import io.modelcontextprotocol.spec.McpSchema.CallToolRequest

fun main() {

    val stdioParams = ServerParameters.builder("java")
        .args(
            "-Dspring.ai.mcp.server.stdio=true",
            "-Dspring.main.web-application-type=none",
            "-Dlogging.pattern.console=",
            "-jar",
            "build/libs/spring-ai-mcp-server-0.0.1-SNAPSHOT.jar"
        )
        .build()

    val transport = StdioClientTransport(stdioParams, McpJsonMapper.createDefault())
    val client = McpClient.sync(transport).build()

    client.initialize()

    // List and demonstrate tools
    val toolsList = client.listTools()
    println("Available Tools = $toolsList")

    val alertResult = client.callTool(CallToolRequest("get_weather", mapOf("city" to "seoul")))
    println("get_weather Response = $alertResult")

    client.closeGracefully()
}
- In the code,
stdioParamsis configured to run the jar with thejavacommand and is passed as an argument when creatingStdioClientTransport. - When you run the client, the MCP Server starts over STDIO.
Output:
... omitted ...

Available Tools = ListToolsResult[tools=[Tool[name=get_weather, title=null, description=Return the weather of a given city., inputSchema=JsonSchema[type=object, properties={city={type=string, description=The city for which to get the weather}}, required=[city], additionalProperties=false, defs=null, definitions=null], outputSchema=null, annotations=null, meta=null]], nextCursor=null, meta=null]
get_weather Response = CallToolResult[content=[TextContent[annotations=null, text="The weather in seoul is good.", meta=null]], isError=false, structuredContent=null, meta=null]

... omitted ...
- The execution output shows the list of available tools, and you can confirm that the
get_weathertool was called and returned a response.
Connect the MCP Server from Claude
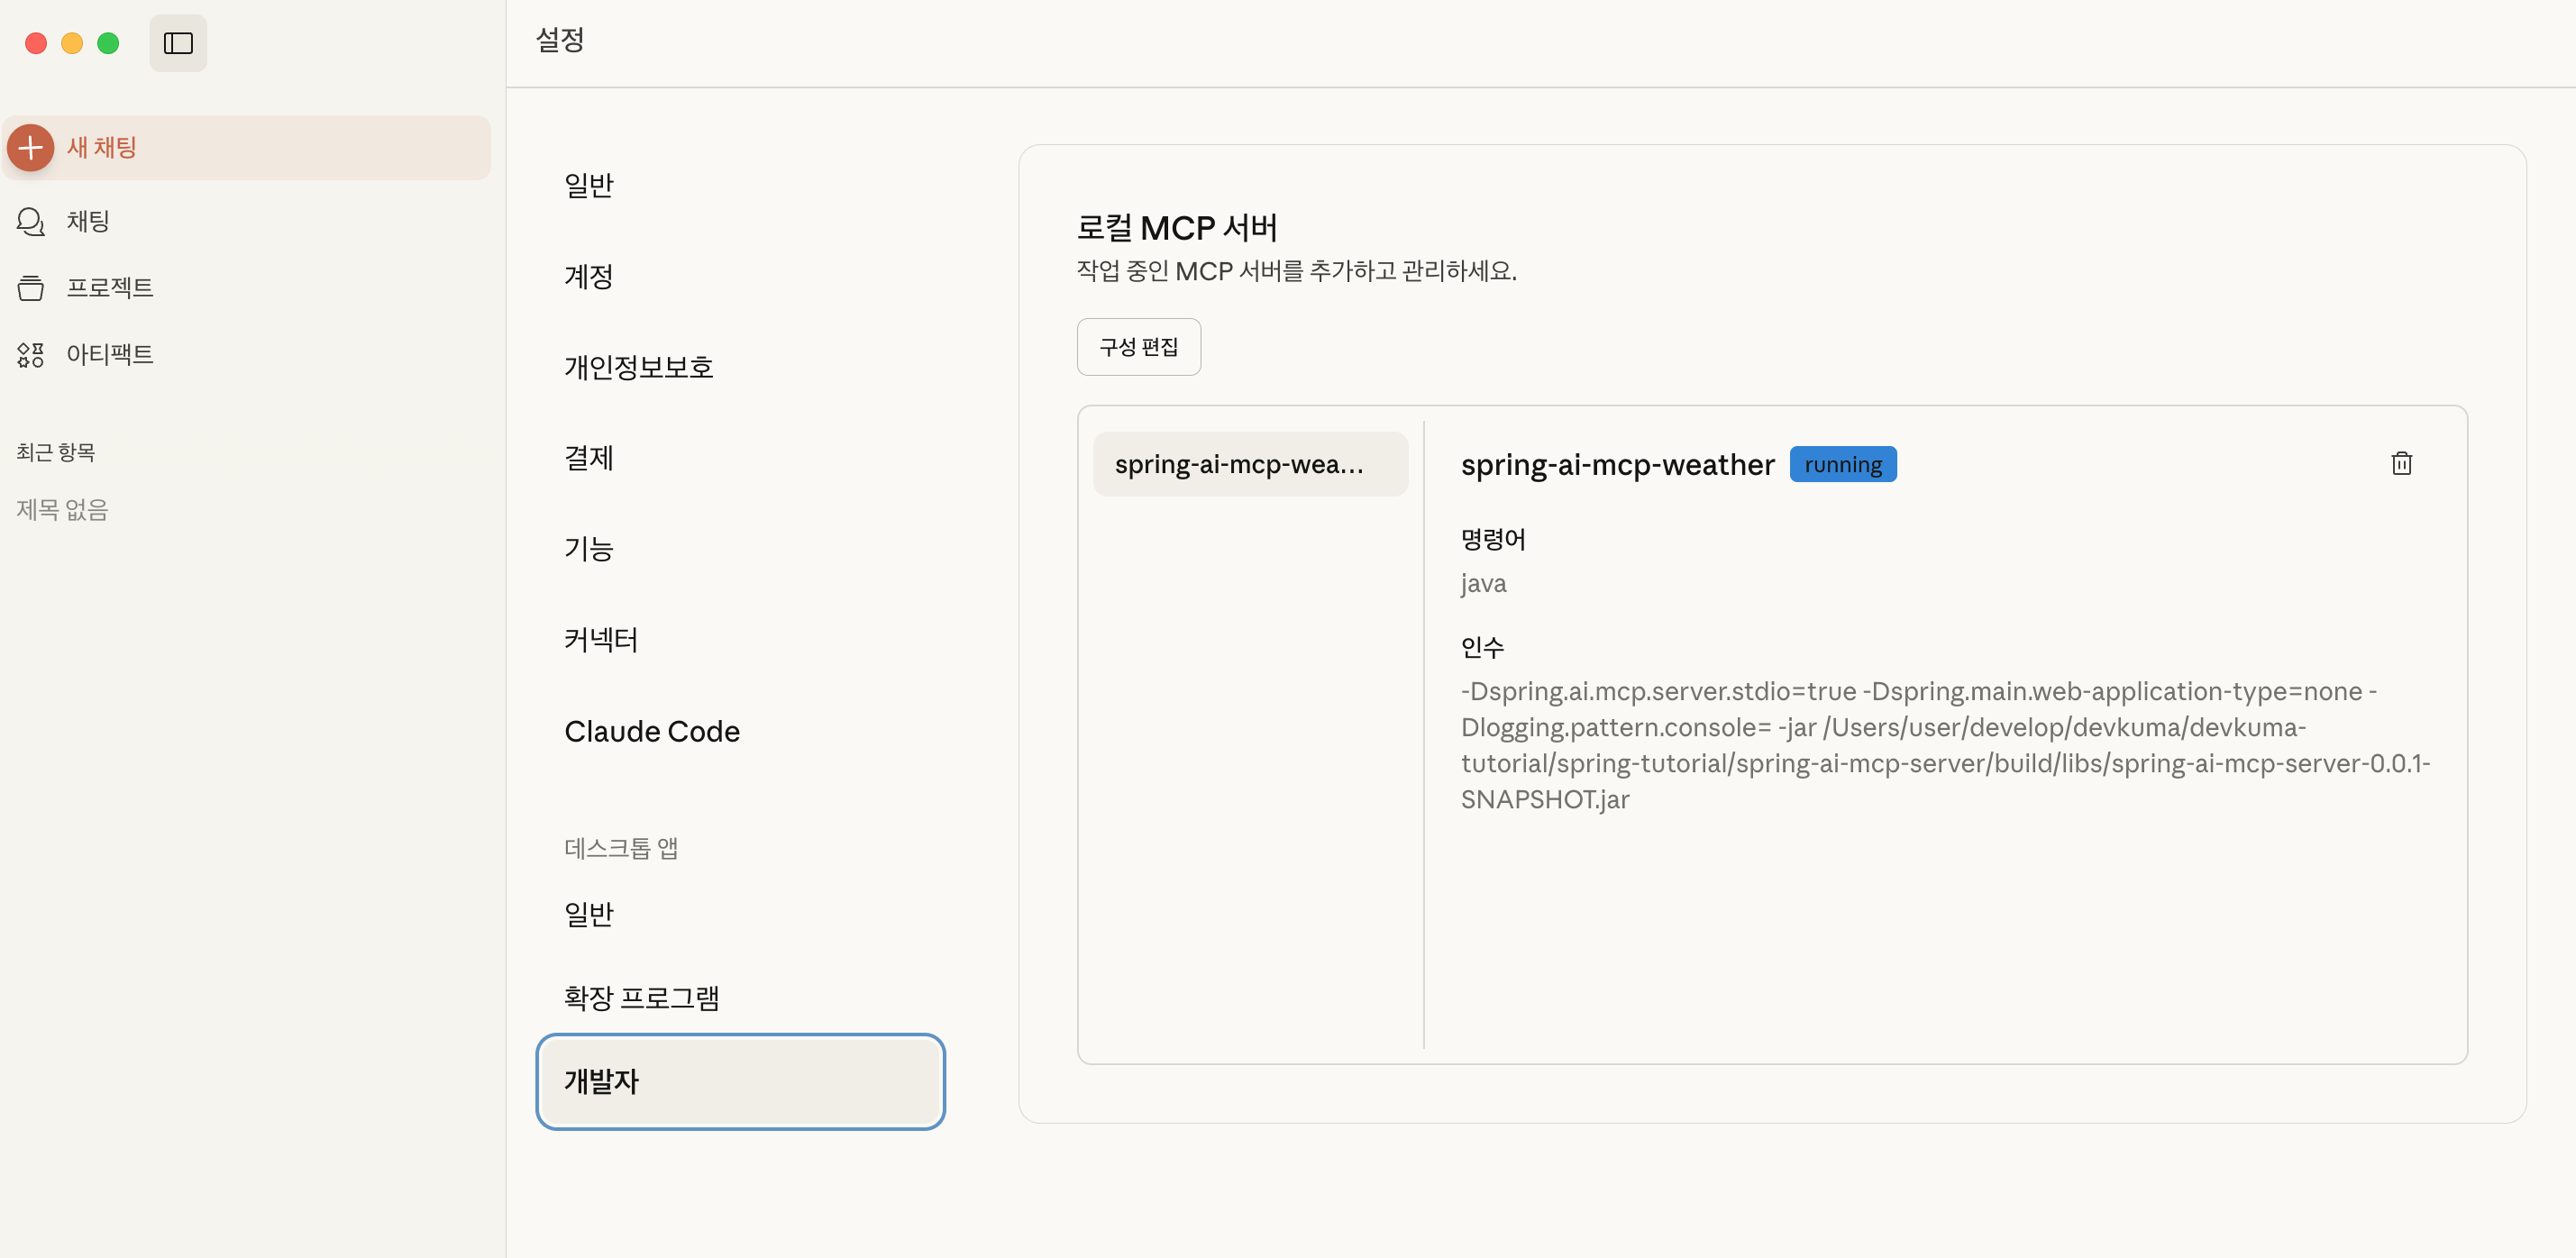
After completing the build, connect the MCP Server to Claude Desktop and verify that it is applied correctly.
Connection Configuration
The MCP Server connection settings must be registered in a JSON file.
On macOS, configure ~/Library/Application Support/Claude/claude_desktop_config.json. If the file does not exist, create it. If it already exists, add the following entry.
{
  "mcpServers": {
    "spring-ai-mcp-weather": {
      "command": "java",
      "args": [
        "-Dspring.ai.mcp.server.stdio=true",
        "-Dspring.main.web-application-type=none",
        "-Dlogging.pattern.console=",
        "-jar",
        "{{path to the project created earlier}}/spring-ai-mcp-server/build/libs/spring-ai-mcp-server-0.0.1-SNAPSHOT.jar"
      ]
    }
  }
}
The created application runs with the Java command, and the running server connects to Claude Desktop through stdio.
Verify the Connection Configuration
Run Claude and check “Claude > Settings > Developer” from the menu. You can confirm that the local MCP server has been added.
(If an error occurs here, a log button appears. Click that button to check the details.)
In the chat window, press the settings button and you can see that “spring-ai-mcp-wearther” is enabled.

Run Check
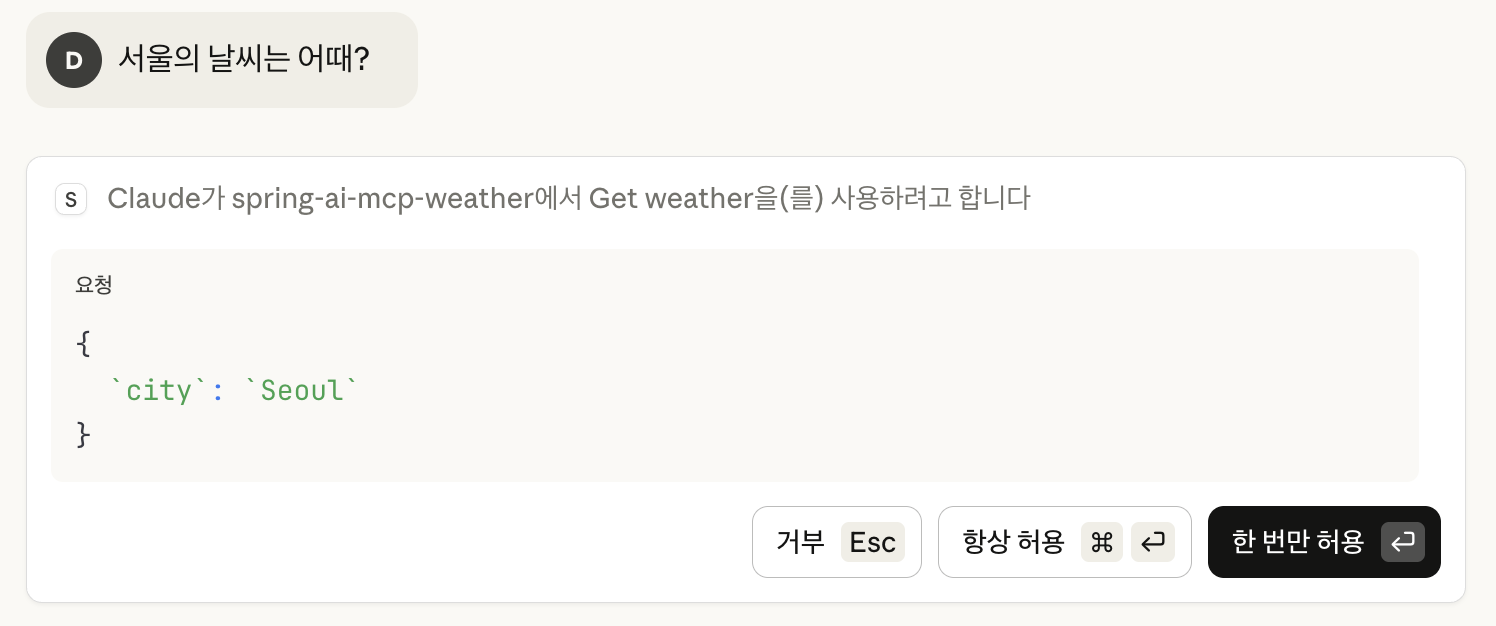
Now that the connection has been confirmed, enter a prompt.
In the window below, the prompt “What is the weather in Seoul?” was entered.
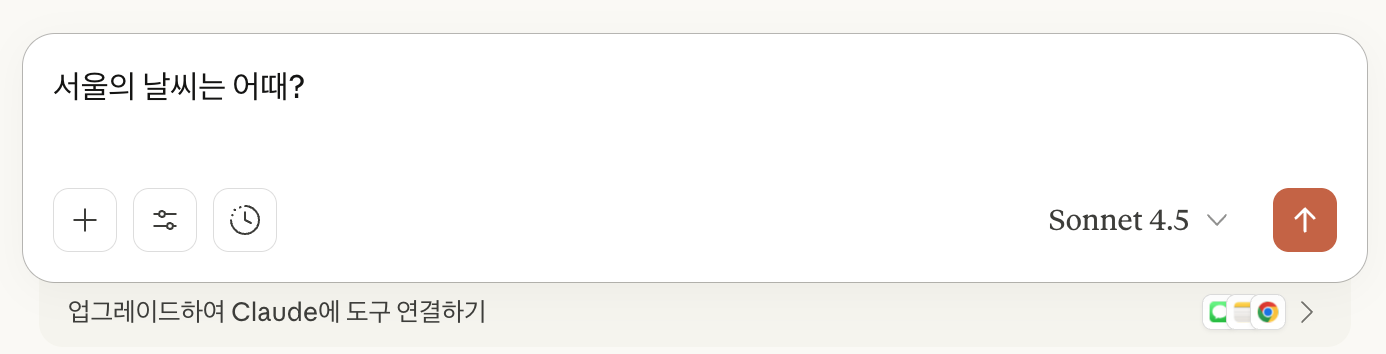
Then the message “Claude wants to use Get weather from spring-ai-mcp-weather” appears and asks whether to allow it.
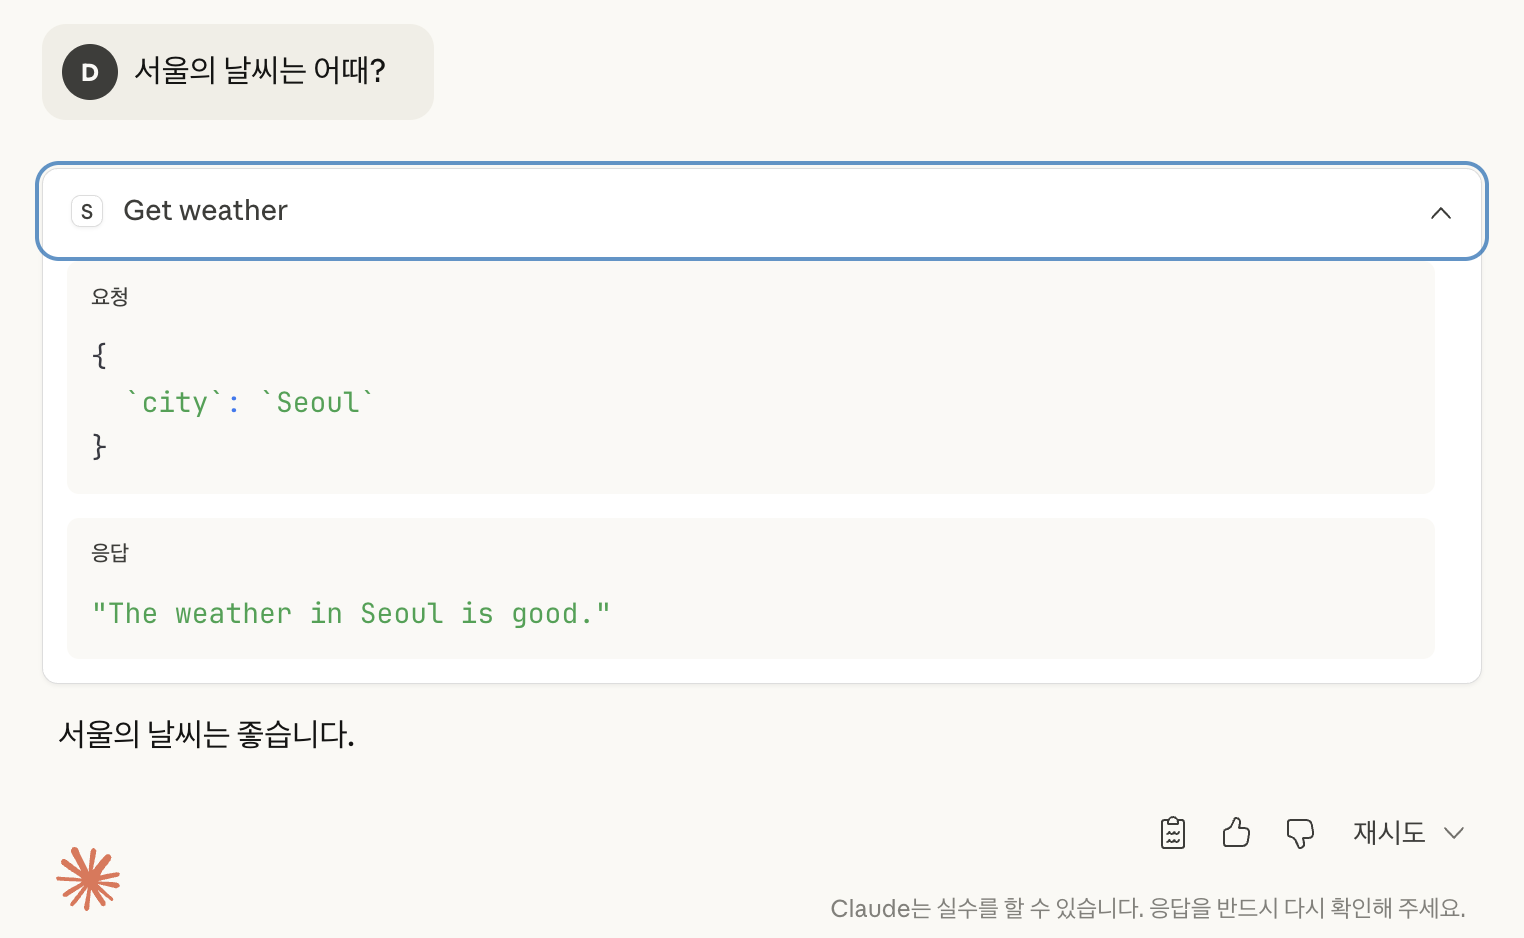
When you press the allow button, you can see the response “The weather in Seoul is good.”
If you press “Get weather”, you can also check the request and response.
References
- Cho Dae-hyup’s Blog: Tistory | MCP (Model Context Protocol) 2. Server Development
- Spring | Model Context Protocol (MCP)
- GitHub | spring-ai-examples | starter-stdio-server
The example code above is available on GitHub.