Creating a Spring Project
This article explains the basics of creating and running an Apache Maven project with the Spring Framework, including how to prepare a project and build it for deployment.
Spring Framework and STS
Most Java programmers have at least heard the name “Spring Framework”. However, even if they know that it is a powerful framework for server-side development, many people do not know the concrete details.
The biggest reason is the size of the Spring Framework. Spring Framework is not a single framework. It is a collection of many frameworks. Some provide the foundation for all other frameworks, some are general-purpose frameworks built on top of that foundation, and others act as bridges to specialized frameworks for Web applications, databases, and other use cases. Because of this, the overall picture can feel vague.
If you are going to learn Spring Framework, it is better to start with the technologies that form the foundation. After that, learn the frameworks you can immediately use in your own development, such as database access and MVC Web application development. Leave the rest for later and prioritize, otherwise it will be hard to remember everything.
When developing with Spring Framework, the first thing to prepare is a dedicated development tool.
Pivotal, the company behind Spring Framework at the time, provided a dedicated tool for Spring Framework development called “Spring Tool Suite (STS)”. It is based on Eclipse and includes dedicated plugins.
Programs that use Spring Framework require many libraries to be combined as needed. Preparing all of them manually is difficult, so projects are generally created and managed with Apache Maven, an open-source build tool. STS combines Maven with major project templates, making it possible to create projects with the required libraries included through simple configuration.
Therefore, unless there is a specific reason not to, use STS when working with Spring Framework. You can also create projects from the command line with Maven, but it is more cumbersome than using STS. Of course, if you are comfortable with Maven, you can continue development on a Maven basis. STS can be downloaded from the following page.
On Windows, the default download may be the 32-bit version. If you installed a 64-bit JDK, click the “See All Versions” link and download the 64-bit version of STS.
Create a Project with Maven
This section explains how to create a project that uses Spring. First, here is the method when using Maven. Open a command prompt or terminal, move to the location where you want to create the project with cd, and run the following command.
$ mvn archetype:generate
When it runs, a list of available archetypes is displayed. In the original example, 1,981 archetypes were shown as of September 2, 2017.
[INFO] Scanning for projects...
[INFO]
[INFO] ------------------------------------------------------------------------
[INFO] Building Maven Stub Project (No POM) 1
[INFO] ------------------------------------------------------------------------
[INFO]
[INFO] >>> maven-archetype-plugin:2.2:generate (default-cli) > generate-sources @ standalone-pom >>>
[INFO]
[INFO] <<< maven-archetype-plugin:2.2:generate (default-cli) < generate-sources @ standalone-pom <<<
[INFO]
[INFO] --- maven-archetype-plugin:2.2:generate (default-cli) @ standalone-pom ---
[INFO] Generating project in Interactive mode

[INFO] No archetype defined. Using maven-archetype-quickstart (org.apache.maven.archetypes:maven-archetype-quickstart:1.0)
Choose archetype:

... omitted ...

Choose a number or apply filter (format: [groupId:]artifactId, case sensitive contains): 1027:
Press Enter here.
Choose org.apache.maven.archetypes:maven-archetype-quickstart version:
1: 1.0-alpha-1
2: 1.0-alpha-2
3: 1.0-alpha-3
4: 1.0-alpha-4
5: 1.0
6: 1.1
Choose a number: 6:
The latest version is selected by default, so press Enter again.
Define value for property 'groupId': :
Specify the group ID. In this example, com.devkuma.spring is entered.
Define value for property 'artifactId': :
Specify the artifact ID. In this example, MySpringApp is entered.
Define value for property 'version': 1.0-SNAPSHOT: :
This is the version property. The default is fine, so press Enter.
Define value for property 'package': com.devkuma.spring: :
Specify the program package. Since the group ID has already been specified, leaving it as the default is usually fine.
The configured values are displayed. If there are no mistakes, press Enter. If there is a mistake, enter N, press Enter, and input the values again.
Choose a number or apply filter (format: [groupId:]artifactId, case sensitive contains): 1027:
Choose org.apache.maven.archetypes:maven-archetype-quickstart version:
1: 1.0-alpha-1
2: 1.0-alpha-2
3: 1.0-alpha-3
4: 1.0-alpha-4
5: 1.0
6: 1.1
Choose a number: 6:
Define value for property 'groupId': : com.devkuma.spring
Define value for property 'artifactId': : MySpringApp
Define value for property 'version':  1.0-SNAPSHOT: :
Define value for property 'package':  com.devkuma.spring: :
Confirm properties configuration:
groupId: com.devkuma.spring
artifactId: MySpringApp
version: 1.0-SNAPSHOT
package: com.devkuma.spring
 Y: :
[INFO] ----------------------------------------------------------------------------
[INFO] Using following parameters for creating project from Old (1.x) Archetype: maven-archetype-quickstart:1.1
[INFO] ----------------------------------------------------------------------------
[INFO] Parameter: basedir, Value: /Users/kimkc/dev
[INFO] Parameter: package, Value: com.devkuma.spring
[INFO] Parameter: groupId, Value: com.devkuma.spring
[INFO] Parameter: artifactId, Value: MySpringApp
[INFO] Parameter: packageName, Value: com.devkuma.spring
[INFO] Parameter: version, Value: 1.0-SNAPSHOT
[INFO] project created from Old (1.x) Archetype in dir: /Users/kimkc/dev/MySpringApp
[INFO] ------------------------------------------------------------------------
[INFO] BUILD SUCCESS
[INFO] ------------------------------------------------------------------------
[INFO] Total time: 20:35 min
[INFO] Finished at: 2017-09-02T23:39:12+09:00
[INFO] Final Memory: 13M/234M
[INFO] ------------------------------------------------------------------------
The project has now been created.
The Project and pom.xml
The generated project folder, MySpringApp in this example, contains the src folder and the pom.xml file.
The src folder stores project files. It contains the following folders.
- main folder: stores files used by the program.
- test folder: stores unit test source code used by the program.
Inside the main folder is a java folder, and inside that, following the package structure, an App.java source file is created. This is sample source code and is just a simple Java application unrelated to Spring Framework.
Another important file in every Maven project is pom.xml. This file describes information such as the libraries required by the project. Maven uses the information in this file to download the required files and create the project. In other words, if pom.xml is not written correctly, the project cannot be created correctly.
.
├── pom.xml
└── src
    ├── main
    │   └── java
    │       └── com
    │           └── devkuma
    │               └── spring
    │                   └── App.java
    └── test
        └── java
            └── com
                └── devkuma
                    └── spring
                        └── AppTest.java
The following is an example of a default pom.xml. A pom.xml file is composed of tags under the <project> tag.
<groupId>: The group ID is a unique name that can identify the project. It usually follows package naming rules, such as a reversed domain name. You can create as many subgroups as needed.<artifactId>: The artifact ID is the name of the jar file without version information. You can choose it freely, but use lowercase letters and avoid unusual special characters.<version>: Text representing the version.<packaging>: The package type. Examples includejar,war, andpom. Here it is set tojar, so packaging creates a jar file.<name>: The project name.<url>: A URL. Usuallyhttp://maven.apache.orgis specified.<properties>: A place to describe various properties. Here,<project.build.sourceEncoding>is specified to set the default encoding for the project.<dependencies>: Required libraries are described here using the<dependency>tag. By default, information about the JUnit library is described.
Writing these tags and configuring the required libraries is the basic way to create a project with Maven.
<project xmlns="http://maven.apache.org/POM/4.0.0" xmlns:xsi="http://www.w3.org/2001/XMLSchema-instance"
  xsi:schemaLocation="http://maven.apache.org/POM/4.0.0 http://maven.apache.org/xsd/maven-4.0.0.xsd">
  <modelVersion>4.0.0</modelVersion>

  <groupId>com.devkuma.spring</groupId>
  <artifactId>MySpringApp</artifactId>
  <version>1.0-SNAPSHOT</version>
  <packaging>jar</packaging>

  <name>MySpringApp</name>
  <url>http://maven.apache.org</url>

  <properties>
    <project.build.sourceEncoding>UTF-8</project.build.sourceEncoding>
  </properties>

  <dependencies>
    <dependency>
      <groupId>junit</groupId>
      <artifactId>junit</artifactId>
      <version>3.8.1</version>
      <scope>test</scope>
    </dependency>
  </dependencies>
</project>
Add the Spring Core Library to pom.xml
Now write a pom.xml for using Spring Framework. This time, include only the core library of Spring Framework.
In the modified pom.xml, the following tag is added inside the <dependencies> tag.
<dependency>
  <groupId>org.springframework</groupId>
  <artifactId>spring-context</artifactId>
  <version>4.3.10.RELEASE</version>
</dependency>
This adds the spring-context library. The version shown was the latest 4.x version at the time the article was written. When Maven is given the library groupId, artifactId, and version, it downloads that library and includes it in the project.
In this example, the JUnit library was removed to keep the required contents minimal. Because of that, the test folder under src should also be deleted. Since JUnit is not present, leaving unit test source files there would cause build errors.
When the project is built, required libraries are downloaded and a jar file is created. A target folder is generated, and inside it you should see MySpringApp-0.0.1-SNAPSHOT.jar. This is the built jar file.
To run it, move into the target folder with cd target and execute the following command.
java -classpath.; MySpringApp-0.0.1-SNAPSHOT.jar com.devkuma.spring.App
This specifies MySpringApp-0.0.1-SNAPSHOT.jar on the classpath and runs com.devkuma.spring.App. The main method of the App class is executed and the text Hello World! is displayed.
<project
    xmlns="http://maven.apache.org/POM/4.0.0"
    xmlns:xsi="http://www.w3.org/2001/XMLSchema-instance"
    xsi:schemaLocation="http://maven.apache.org/POM/4.0.0
    http://maven.apache.org/xsd/maven-4.0.0.xsd">

    <modelVersion>4.0.0</modelVersion>
    <groupId>org.devkuma.spring</groupId>
    <artifactId>MySpringApp</artifactId>
    <version>0.0.1-SNAPSHOT</version>

    <properties>
        <java.version>1.6</java.version>
        <project.build.sourceEncoding>UTF-8</project.build.sourceEncoding>
    </properties>

    <dependencies>
        <!-- Spring and Transactions -->
        <dependency>
            <groupId>org.springframework</groupId>
            <artifactId>spring-context</artifactId>
            <version>4.1.7.RELEASE</version>
        </dependency>

    </dependencies>
</project>
Create a Spring Project with STS
Next, let’s look at how to create a project with STS. STS provides several Spring Framework-related project templates. Broadly, they can be divided into “Spring Legacy Project” and “Spring Starter Project”.
Spring Legacy Project: A general Spring Framework project. Spring Framework libraries are included as needed.
Spring Starter Project: A project that uses Spring Boot, a framework for rapid application development. By adding simple libraries, the required frameworks can be included together.
To learn the basics of Spring Framework, use a “Spring project”. Spring Starter Project is for Spring Boot, so use it when working with Spring Boot.
Project Creation Steps
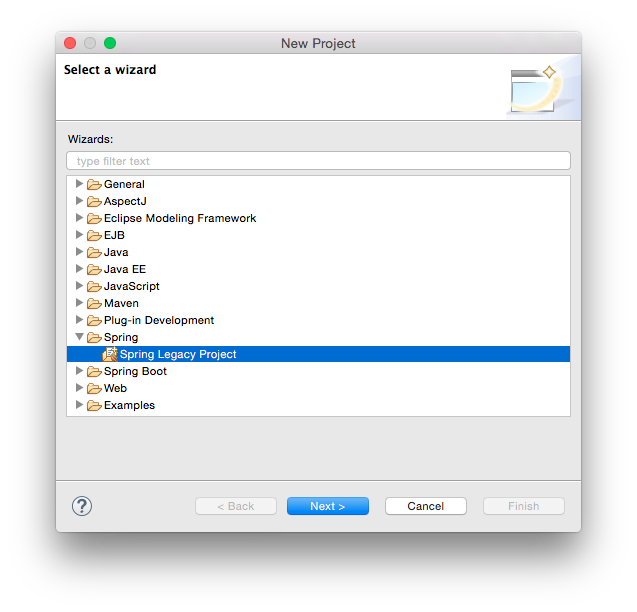
- Start STS and select [Spring Legacy Project] from the [New] menu under the [File] menu.
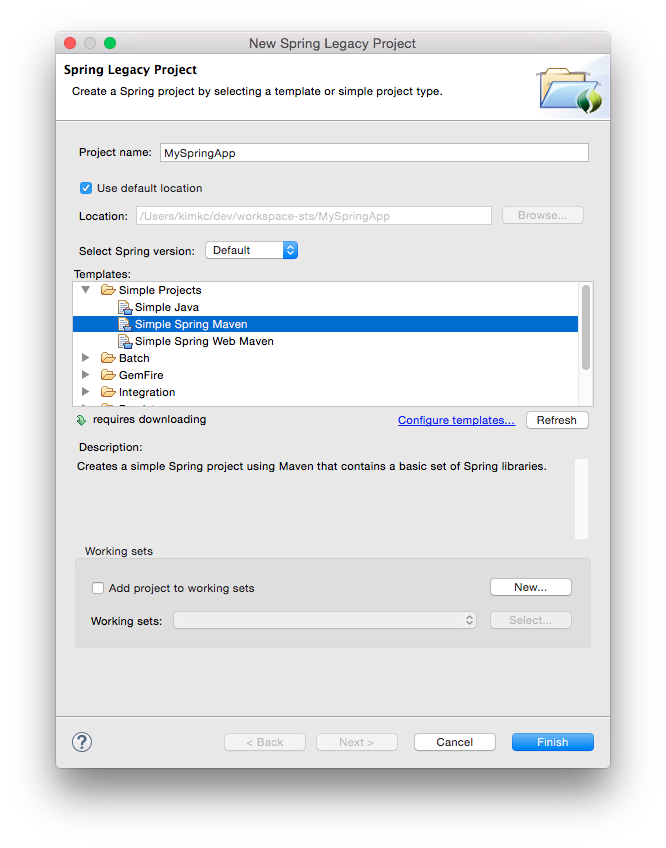
- In the displayed dialog, configure the following.
Project name: The project name. To use the same name as the Maven example above, enter MySpringApp.
Template: Select Simple Spring Maven under Simple Project.
Working sets: Since it is not used here, leave the checkbox off.
Press the “Finish” button to create the project. At this stage, no Java source code files are created, so create classes later as needed.
Tasks Required to Run
-
In the package explorer, select the project and choose [Maven Install] from [Run As] under the [Run] menu. This completes the build.
-
To run the application, select the source code file of the application class to run and choose [Java Application] from [Run As] under the [Run] menu.
- You can now create a project with STS and run it. Concrete Spring Framework programming will be covered from the next section onward.