Spring WebFluxの簡単な使い方
概要
ここでは、Spring WebFluxの簡単な使い方を紹介します。
Spring WebFluxは、Spring 5で追加された、ノンブロッキング(Non-Blocking)ランタイム上でリアクティブプログラミングを行える新しいWebフレームワークです。
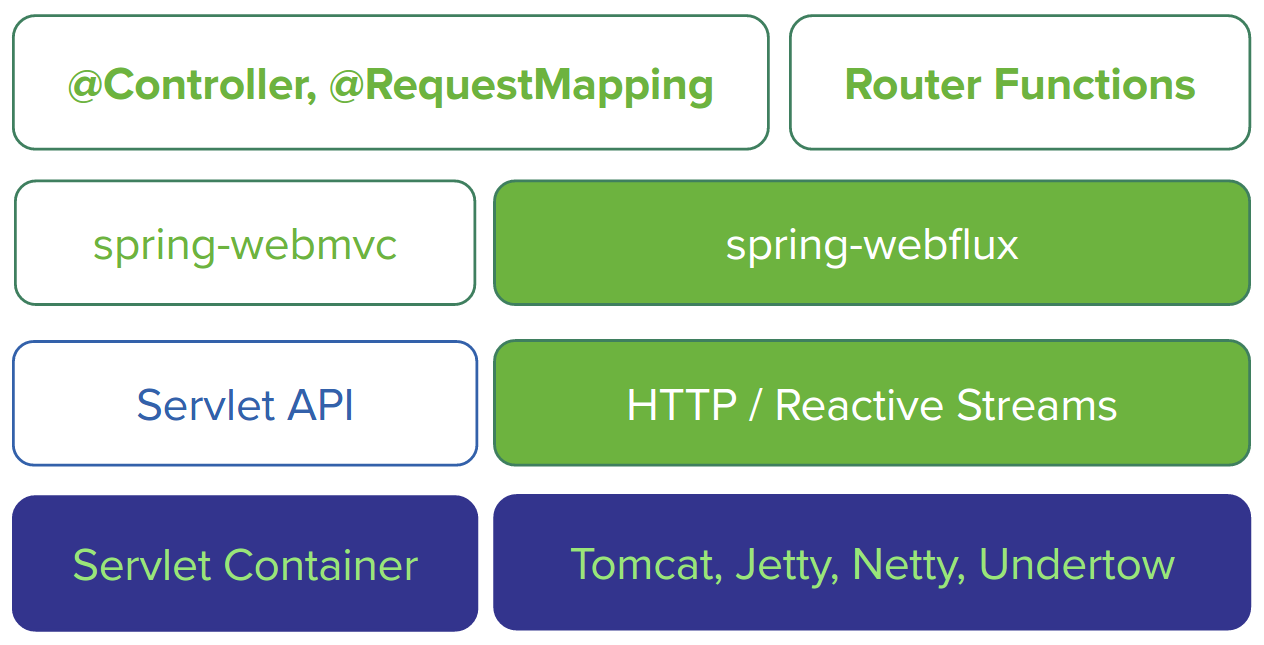
上の図からわかるように、これまでのSpring MVCコンポーネントもよく表現されています。Spring MVCはサーブレットコンテナ上でServlet APIを基盤とするフレームワークでしたが、Spring WebFluxはServlet APIを使用せず、Reactive Streamsとその実装であるReactorを基盤とする新しいHTTP APIで実装されています。ランタイムとしては、NettyやUndertow(サーブレットコンテナではない方向)などのWASをノンブロッキングで使用できます。また、Servlet 3.1で導入されたノンブロッキングAPIを使用するTomcatやJettyの実装も用意されています。
Spring WebFluxのプログラミングモデルとしては、次の2つのパターンが提供されています。
@Controlller- Router Functions
@Controlllerは、これまでSpring MVCで使ってきたアノテーションベースのController実装方法そのものです。つまり、ランタイムは変わりますが、Controllerのプログラミング方法は同じです。Router Functionsは、ラムダベースの新しいController実装方法です。Node.jsのExpressのようなものだと考えるとよいでしょう。
本文書では、この2つのパターンについて簡単に説明します。
プロジェクトの作成
まずプロジェクトを作成します。Spring Boot 2.0からSpring 5がサポートされています。
curlコマンドで簡単にプロジェクトを作成できます(Windowsの場合はBashで実行します)。
curl https://start.spring.io/starter.tgz  \
       -d bootVersion=2.4.4 \
       -d dependencies=webflux \
       -d baseDir=spring-webflux \
       -d artifactId=webflux \
       -d packageName=com.devkuma.webflux \
       -d applicationName=HelloWebFluxApplication \
       -d type=gradle-project | tar -xzvf -
実行が完了すると、spring-webfluxディレクトリが1つ作成されていることを確認できます。
以降、Streamと書いた場合は連続するデータを指し、Streamと書いた場合はJava 8のjava.util.stream.Streamを指します。
@Controllerモデル
まず、@ControllerモデルでHello Worldを作成してみましょう。
Hello World
src/main/java/com/devkuma/webflux/HelloController.javaを作成します。
package com.devkuma.webflux;

import org.springframework.web.bind.annotation.GetMapping;
import org.springframework.web.bind.annotation.RestController;

import reactor.core.publisher.Flux;

@RestController
public class HelloController {

    @GetMapping("/")
    Flux<String> hello() {
        return Flux.just("Hello", "World");
    }
}
Fluxに馴染みがない人もいるかもしれませんが、一見すると、これまで使ってきたSpring MVCのControllerと同じです。
com.devkuma.webflux.HelloWebFluxApplicationクラスのmainメソッドを実行すると、Spring WebFluxアプリケーションが起動します。
  .   ____          _            __ _ _
 /\\ / ___'_ __ _ _(_)_ __  __ _ \ \ \ \
( ( )\___ | '_ | '_| | '_ \/ _` | \ \ \ \
 \\/  ___)| |_)| | | | | || (_| |  ) ) ) )
  '  |____| .__|_| |_|_| |_\__, | / / / /
 =========|_|==============|___/=/_/_/_/
 :: Spring Boot ::                (v2.4.4)

2021-04-14 07:07:20.558  INFO 20344 --- [           main] c.d.webflux.HelloWebFluxApplication      : Starting HelloWebFluxApplication using Java 11.0.7 on DESKTOP-A67OEI1 with PID 20344 (D:\dev\spring-webflux--tutorial\build\classes\java\main started by kimkc in D:\dev\spring-webflux--tutorial)
2021-04-14 07:07:20.567  INFO 20344 --- [           main] c.d.webflux.HelloWebFluxApplication      : No active profile set, falling back to default profiles: default
2021-04-14 07:07:22.111  INFO 20344 --- [           main] o.s.b.web.embedded.netty.NettyWebServer  : Netty started on port 8080
2021-04-14 07:07:22.122  INFO 20344 --- [           main] c.d.webflux.HelloWebFluxApplication      : Started HelloWebFluxApplication in 2.103 seconds (JVM running for 3.381)
curlでlocalhost:8080にアクセスしてみましょう。
$ curl -i localhost:8080
  % Total    % Received % Xferd  Average Speed   Time    Time     Time  Current
                                 Dload  Upload   Total   Spent    Left  Speed
100    10    0    10    0     0    909      0 --:--:-- --:--:-- --:--:--  1000HTTP/1.1 200 OK
transfer-encoding: chunked
Content-Type: text/plain;charset=UTF-8

HelloWorld
HelloWorldが表示されることを確認できます。
Fluxは、Reactive StreamsのPublisherを実装した、N個の要素を持つストリームを表すReactorクラスです。デフォルトではtext/plainでレスポンスが返されましたが、次の形式でも返すことができます。
- Server-Sent Event
- JSON Stream
Server-Sent Eventとして返すために、Acceptヘッダーにtext/event-streamを指定して再度実行してみましょう。
$ curl -i localhost:8080 -H 'Accept: text/event-stream'
  % Total    % Received % Xferd  Average Speed   Time    Time     Time  Current
                                 Dload  Upload   Total   Spent    Left  Speed
100    24    0    24    0     0   1846      0 --:--:-- --:--:-- --:--:--  2000HTTP/1.1 200 OK
transfer-encoding: chunked
Content-Type: text/event-stream;charset=UTF-8

data:Hello

data:World
JSON Streamとして返すには、Acceptヘッダーにapplication/stream+jsonを指定します。ただし、この場合(文字列ストリーム)は、表示はtext/plainの場合と変わりません。
$ curl -i localhost:8080 -H 'Accept: application/stream+json'
  % Total    % Received % Xferd  Average Speed   Time    Time     Time  Current
                                 Dload  Upload   Total   Spent    Left  Speed
100    10    0    10    0     0    714      0 --:--:-- --:--:-- --:--:--   769HTTP/1.1 200 OK
transfer-encoding: chunked
Content-Type: application/stream+json;charset=UTF-8

HelloWorld
無限Stream
次は、もう少しStreamらしいレスポンスを受け取ってみましょう。
FluxはStreamから作成できます。
次に、streamメソッドを作成し、無限Streamを作成して、そのうち10件をFluxに変換して返してみます。
次のようにコードを修正し、com.example.HelloWebFluxApplicationクラスを再度実行します。
package com.devkuma.webflux;

import org.springframework.web.bind.annotation.GetMapping;
import org.springframework.web.bind.annotation.RestController;

import reactor.core.publisher.Flux;

import java.util.Collections;
import java.util.Map;
import java.util.stream.Stream;

@RestController
public class HelloController {

    @GetMapping("/")
    Flux<String> hello() {
        return Flux.just("Hello", "World");
    }

    @GetMapping("/stream")
    Flux<Map<String, Integer>> stream() {
        Stream<Integer> stream = Stream.iterate(0, i -> i + 1); // Java 8の無限Stream
        return Flux.fromStream(stream.limit(10))
                .map(i -> Collections.singletonMap("value", i));
    }
}
/streamに対する3種類のレスポンスは、それぞれ次のようになります。
通常のJSON
$ curl -i localhost:8080/stream
  % Total    % Received % Xferd  Average Speed   Time    Time     Time  Current
                                 Dload  Upload   Total   Spent    Left  Speed
100   121    0   121    0     0  11000      0 --:--:-- --:--:-- --:--:-- 12100HTTP/1.1 200 OK
transfer-encoding: chunked
Content-Type: application/json

[{"value":0},{"value":1},{"value":2},{"value":3},{"value":4},{"value":5},{"value":6},{"value":7},{"value":8},{"value":9}]
Server-Sent Event
$ curl -i localhost:8080/stream -H 'Accept: text/event-stream'
  % Total    % Received % Xferd  Average Speed   Time    Time     Time  Current
                                 Dload  Upload   Total   Spent    Left  Speed
100   180    0   180    0     0  12000      0 --:--:-- --:--:-- --:--:-- 12000HTTP/1.1 200 OK
transfer-encoding: chunked
Content-Type: text/event-stream;charset=UTF-8

data:{"value":0}

data:{"value":1}

data:{"value":2}

data:{"value":3}

data:{"value":4}

data:{"value":5}

data:{"value":6}

data:{"value":7}

data:{"value":8}

data:{"value":9}
JSON Stream
$ curl -i localhost:8080/stream -H 'Accept: application/stream+json'
  % Total    % Received % Xferd  Average Speed   Time    Time     Time  Current
                                 Dload  Upload   Total   Spent    Left  Speed
100   120    0   120    0     0   7500      0 --:--:-- --:--:-- --:--:--  7500HTTP/1.1 200 OK
transfer-encoding: chunked
Content-Type: application/stream+json

{"value":0}
{"value":1}
{"value":2}
{"value":3}
{"value":4}
{"value":5}
{"value":6}
{"value":7}
{"value":8}
{"value":9}
これで、通常のJSON(application/json)とJSON Stream(application/stream + json)の違いが見えるはずです。
実は、ここでlimitを付ける必要はなく、そのまま無限Streamを返すこともできます。通常のControllerでは、レスポンスは永遠に返ってこないでしょう。application/jsonの場合、レスポンスは返りません(Integerがオーバーフローすれば返るかもしれませんが)。そのため、まずはあえてlimitを付けました。Server-Sent EventとJSON Streamでは無限Streamを返すことができます。試してみましょう。
次のコードのようにlimitを除外して実行してみます。
package com.devkuma.webflux;

import org.springframework.web.bind.annotation.GetMapping;
import org.springframework.web.bind.annotation.RestController;

import reactor.core.publisher.Flux;

import java.util.Collections;
import java.util.Map;
import java.util.stream.Stream;

@RestController
public class HelloController {

    @GetMapping("/")
    Flux<String> hello() {
        return Flux.just("Hello", "World");
    }

    @GetMapping("/stream")
    Flux<Map<String, Integer>> stream() {
        Stream<Integer> stream = Stream.iterate(0, i -> i + 1); // Java 8の無限Stream
        return Flux.fromStream(stream) // Limitを除外
                .map(i -> Collections.singletonMap("value", i));
    }
}
Server-Sent EventもJSON Streamも次のように動作します。Ctrl+Cで止めるまで、非常に速いStream結果を見ることができます。
Server-Sent Event
$ curl -i localhost:8080/stream -H 'Accept: text/event-stream'
  % Total    % Received % Xferd  Average Speed   Time    Time     Time  Current
                                 Dload  Upload   Total   Spent    Left  Speed
  0     0    0     0    0     0      0      0 --:--:-- --:--:-- --:--:--     0HTTP/1.1 200 OK
transfer-encoding: chunked
Content-Type: text/event-stream;charset=UTF-8

data:{"value":0}

data:{"value":1}

data:{"value":2}

data:{"value":3}

data:{"value":4}

data:{"value":5}

data:{"value":6}

data:{"value":7}

data:{"value":8}

data:{"value":9}

data:{"value":10}

data:{"value":11}

data:{"value":12}

data:{"value":13}

... 以下省略 ...
JSON Stream
$ curl -i localhost:8080/stream -H 'Accept: application/stream+json'
  % Total    % Received % Xferd  Average Speed   Time    Time     Time  Current
                                 Dload  Upload   Total   Spent    Left  Speed
  0     0    0     0    0     0      0      0 --:--:-- --:--:-- --:--:--     0HTTP/1.1 200 OK
transfer-encoding: chunked
Content-Type: application/stream+json

{"value":0}
{"value":1}
{"value":2}
{"value":3}
{"value":4}
{"value":5}
{"value":6}
{"value":7}
{"value":8}
{"value":9}
{"value":10}
{"value":11}
{"value":12}
Streamをゆっくり返したい場合は、Flux.interval(Duration)とzipを指定してStreamの結果を確認してみましょう。
$ curl -i localhost:8080/stream -H 'Accept: application/stream+json'
  % Total    % Received % Xferd  Average Speed   Time    Time     Time  Current
                                 Dload  Upload   Total   Spent    Left  Speed
  0     0    0     0    0     0      0      0 --:--:-- --:--:-- --:--:--     0
kimkc@DESKTOP-A67OEI1 MINGW64 /d
$ curl -i localhost:8080/stream -H 'Accept: application/stream+json'
  % Total    % Received % Xferd  Average Speed   Time    Time     Time  Current
                                 Dload  Upload   Total   Spent    Left  Speed
100    96    0    96    0     0     10      0 --:--:--  0:00:09 --:--:--    11HTTP/1.1 200 OK
transfer-encoding: chunked
Content-Type: application/stream+json

{"value":0}
{"value":1}
{"value":2}
{"value":3}
{"value":4}
{"value":5}
{"value":6}
{"value":7}
POST
次に、POSTの場合も見てみましょう。
リクエスト本文の文字列を大文字にして返すechoメソッドを作成します。
package com.devkuma.webflux;

import org.springframework.web.bind.annotation.GetMapping;
import org.springframework.web.bind.annotation.PostMapping;
import org.springframework.web.bind.annotation.RequestBody;
import org.springframework.web.bind.annotation.RestController;

import reactor.core.publisher.Flux;
import reactor.core.publisher.Mono;

import java.time.Duration;
import java.util.Collections;
import java.util.Map;
import java.util.stream.Stream;

@RestController
public class HelloController {

    @GetMapping("/")
    Flux<String> hello() {
        return Flux.just("Hello", "World");
    }

    @GetMapping("/stream")
    Flux<Map<String, Integer>> stream() {
        Stream<Integer> stream = Stream.iterate(0, i -> i + 1);
        return Flux.fromStream(stream).zipWith(Flux.interval(Duration.ofSeconds(1)))
                .map(tuple -> Collections.singletonMap("value", tuple.getT1() /* タプルの最初の要素 = Stream<Integer>の要素 */));
    }

    @PostMapping("/echo")
    Mono<String> echo(@RequestBody Mono<String> body) {
        return body.map(String::toUpperCase);
    }
}
通常のControllerと同じように、@RequestBodyでリクエスト本文を受け取ることができます。Spring WebFluxでは、リクエスト本文(ここでは文字列)をMonoで包んで受け取ることで、非同期に処理をchain/composeできます。なお、Monoで包まずStringとして受け取った場合は、ノンブロッキングではなく同期的に処理されます。この場合、リクエスト本文を大文字に変換するmapの結果であるMonoをそのまま返します。Monoは1個または0個の要素を持つPublisherです。
$  curl -i localhost:8080/echo -H 'Content-Type: application/json' -d devkuma
  % Total    % Received % Xferd  Average Speed   Time    Time     Time  Current
                                 Dload  Upload   Total   Spent    Left  Speed
100    14  100     7  100     7   1166   1166 --:--:-- --:--:-- --:--:--  2800HTTP/1.1 200 OK
Content-Type: text/plain;charset=UTF-8
Content-Length: 7

DEVKUMA
Monoの部分をFluxに置き換えてみましょう。1件だけ処理すればよい場合は、Monoを使うほうが明示的です。逆に、複数件のStreamを処理したい場合はFluxにします。
次の例では、@PostMappingを宣言したstreamメソッドでStreamをFluxとして受け取り、キーがvalueの値を2倍して、その値をキーdoubleに入れたMapへ変換して返します。
$  curl -i localhost:8080/stream -d '{"value":1}{"value":2}{"value":3}' -H 'Content-Type: application/stream+json'  -H 'Accept: text/event-stream'
  % Total    % Received % Xferd  Average Speed   Time    Time     Time  Current
                                 Dload  Upload   Total   Spent    Left  Speed
100    90    0    57  100    33   4071   2357 --:--:-- --:--:-- --:--:--  6923HTTP/1.1 200 OK
transfer-encoding: chunked
Content-Type: text/event-stream;charset=UTF-8

data:{"double":2}

data:{"double":4}

data:{"double":6}
Router Functionsモデル
次に、もう1つのプログラミングモデルであるRouter Functionsについて見てみましょう。
Router Functionsは、POJOに@RestControllerや@GetMappingなどのアノテーションを宣言してルーティングを定義する代わりに、パスとハンドラー関数(ラムダ)の組み合わせでルーティングを定義します。
Spring Boot 2.0では、Router Functionsと@Controllerモデルは共存できないため(両方を使用すると@Controllerが無視されます)、先ほど作成したHelloControllerを削除します。
Hello World
@Controllerの場合と同じように、GET("/")でFluxの「Hello World」を返すRoutingを定義してみましょう。Spring Boot 2.0では、RouterFunction<ServerResponse>のBean定義があると、それはRouter Functionsのルーティング定義と見なされます。
まず、簡単にBean宣言でルーティングを定義してみます。
package com.devkuma.webflux;

import org.springframework.boot.SpringApplication;
import org.springframework.boot.autoconfigure.SpringBootApplication;
import org.springframework.context.annotation.Bean;
import org.springframework.web.reactive.function.server.RequestPredicates;
import org.springframework.web.reactive.function.server.RouterFunction;
import org.springframework.web.reactive.function.server.RouterFunctions;
import org.springframework.web.reactive.function.server.ServerResponse;
import reactor.core.publisher.Flux;

@SpringBootApplication
public class HelloWebFluxApplication {

    public static void main(String[] args) {
        SpringApplication.run(HelloWebFluxApplication.class, args);
    }

    @Bean
    RouterFunction<ServerResponse> routes() {
        return RouterFunctions.route(RequestPredicates.GET("/"), req -> ServerResponse
                .ok().body(Flux.just("Hello", "World!"), String.class));
    }
}
上のように書く方法もありますが、RouterFunctions.*、RequestPredicates.*、ServerResponse.*をstatic importする方法もあります。IntelliJ IDEAなら、ショートカット(Mac: Option + Enter、Windows: Alt+Enter)で「Add static import for …」を選択します。
static importすると、次のように書くことができます。
package com.devkuma.webflux;

import org.springframework.boot.SpringApplication;
import org.springframework.boot.autoconfigure.SpringBootApplication;
import org.springframework.context.annotation.Bean;
import org.springframework.web.reactive.function.server.RouterFunction;
import org.springframework.web.reactive.function.server.ServerResponse;
import reactor.core.publisher.Flux;

import static org.springframework.web.reactive.function.server.RequestPredicates.GET;
import static org.springframework.web.reactive.function.server.RouterFunctions.route;
import static org.springframework.web.reactive.function.server.ServerResponse.ok;

@SpringBootApplication
public class HelloWebFluxApplication {

    public static void main(String[] args) {
        SpringApplication.run(HelloWebFluxApplication.class, args);
    }

    @Bean
    RouterFunction<ServerResponse> routes() {
        return route(GET("/"),
                req -> ok().body(Flux.just("Hello", "World!"), String.class));
    }
}
HelloWebFluxApplicationを再起動し、curlでlocalhost:8080にアクセスしてみましょう。
$ curl -i localhost:8080
  % Total    % Received % Xferd  Average Speed   Time    Time     Time  Current
                                 Dload  Upload   Total   Spent    Left  Speed
100    11    0    11    0     0     59      0 --:--:-- --:--:-- --:--:--    59HTTP/1.1 200 OK
transfer-encoding: chunked
Content-Type: text/plain;charset=UTF-8

HelloWorld!
Map<String, Integer>のようにGenerics形式で返すには、BodyInserters.fromPublisher(P publisher, ParameterizedTypeReference<T> elementTypeRef)を使用します。
少し面倒に見えるかもしれません。
package com.devkuma.webflux;

import java.util.Collections;
import java.util.Map;
import java.util.stream.Stream;

import org.springframework.core.ParameterizedTypeReference;
import org.springframework.core.ResolvableType;
import org.springframework.http.MediaType;
import org.springframework.stereotype.Component;
import org.springframework.web.reactive.function.server.RouterFunction;
import org.springframework.web.reactive.function.server.ServerRequest;
import org.springframework.web.reactive.function.server.ServerResponse;

import reactor.core.publisher.Flux;
import reactor.core.publisher.Mono;

import static org.springframework.web.reactive.function.BodyInserters.fromPublisher;
import static org.springframework.web.reactive.function.server.RequestPredicates.GET;
import static org.springframework.web.reactive.function.server.RouterFunctions.route;
import static org.springframework.web.reactive.function.server.ServerResponse.ok;

@Component
public class HelloHandler {

    public RouterFunction<ServerResponse> routes() {
        return route(GET("/"), this::hello).andRoute(GET("/stream"), this::stream);
    }

    public Mono<ServerResponse> hello(ServerRequest req) {
        return ok().body(Flux.just("Hello", "World!"), String.class);
    }

    public Mono<ServerResponse> stream(ServerRequest req) {
        Stream<Integer> stream = Stream.iterate(0, i -> i + 1);
        Flux<Map<String, Integer>> flux = Flux.fromStream(stream)
                .map(i -> Collections.singletonMap("value", i));
        return ok().contentType(MediaType.APPLICATION_NDJSON)
                .body(fromPublisher(flux, new ParameterizedTypeReference<Map<String, Integer>>(){}));
    }
}
HelloWebFluxApplicationクラスを再起動して/streamにアクセスすると、無限JSON Streamが返されます。
$ curl -i localhost:8080/stream
  % Total    % Received % Xferd  Average Speed   Time    Time     Time  Current
                                 Dload  Upload   Total   Spent    Left  Speed
  0     0    0     0    0     0      0      0 --:--:-- --:--:-- --:--:--     0HTTP/1.1 200 OK
transfer-encoding: chunked
Content-Type: application/x-ndjson

{"value":0}
{"value":1}
{"value":2}
{"value":3}
{"value":4}
{"value":5}
{"value":6}
{"value":7}
{"value":8}
{"value":9}
{"value":10}

... 以下省略 ...
POST
POSTの場合は、RequestPredicates.POSTを使用してルーティングを定義し、レスポンス本文にはServerRequest.bodyToMonoまたはServerRequest.bodyToFluxを使用すればよく、これまで説明した内容と特に異なる点はありません。
package com.devkuma.webflux;

import java.util.Collections;
import java.util.Map;
import java.util.stream.Stream;

import org.springframework.core.ParameterizedTypeReference;
import org.springframework.core.ResolvableType;
import org.springframework.http.MediaType;
import org.springframework.stereotype.Component;
import org.springframework.web.reactive.function.server.RouterFunction;
import org.springframework.web.reactive.function.server.ServerRequest;
import org.springframework.web.reactive.function.server.ServerResponse;

import reactor.core.publisher.Flux;
import reactor.core.publisher.Mono;

import static org.springframework.web.reactive.function.BodyInserters.fromPublisher;
import static org.springframework.web.reactive.function.server.RequestPredicates.GET;
import static org.springframework.web.reactive.function.server.RequestPredicates.POST;
import static org.springframework.web.reactive.function.server.RouterFunctions.route;
import static org.springframework.web.reactive.function.server.ServerResponse.ok;

@Component
public class HelloHandler {

    public RouterFunction<ServerResponse> routes() {
        return route(GET("/"), this::hello)
                .andRoute(GET("/stream"), this::stream)
                .andRoute(POST("/echo"), this::echo);
    }

    public Mono<ServerResponse> hello(ServerRequest req) {
        return ok().body(Flux.just("Hello", "World!"), String.class);
    }

    public Mono<ServerResponse> stream(ServerRequest req) {
        Stream<Integer> stream = Stream.iterate(0, i -> i + 1);
        Flux<Map<String, Integer>> flux = Flux.fromStream(stream)
                .map(i -> Collections.singletonMap("value", i));
        return ok().contentType(MediaType.APPLICATION_NDJSON)
                .body(fromPublisher(flux, new ParameterizedTypeReference<Map<String, Integer>>(){}));
    }

    public Mono<ServerResponse> echo(ServerRequest req) {
        Mono<String> body = req.bodyToMono(String.class).map(String::toUpperCase);
        return ok().body(body, String.class);
    }
}
POST /streamも同様ですが、Request BodyをGenerics形式のPublisherとして受け取る場合は、ServerRequest.bodyToFluxではなくServerRequest.bodyメソッドに、BodyInsertersと反対の概念であるBodyExtractorsを渡します。
package com.devkuma.webflux;

import java.util.Collections;
import java.util.Map;
import java.util.stream.Stream;

import org.springframework.core.ParameterizedTypeReference;
import org.springframework.core.ResolvableType;
import org.springframework.http.MediaType;
import org.springframework.stereotype.Component;
import org.springframework.web.reactive.function.server.RouterFunction;
import org.springframework.web.reactive.function.server.ServerRequest;
import org.springframework.web.reactive.function.server.ServerResponse;

import reactor.core.publisher.Flux;
import reactor.core.publisher.Mono;

import static org.springframework.web.reactive.function.BodyExtractors.toFlux;
import static org.springframework.web.reactive.function.BodyInserters.fromPublisher;
import static org.springframework.web.reactive.function.server.RequestPredicates.GET;
import static org.springframework.web.reactive.function.server.RequestPredicates.POST;
import static org.springframework.web.reactive.function.server.RouterFunctions.route;
import static org.springframework.web.reactive.function.server.ServerResponse.ok;

@Component
public class HelloHandler {

    public RouterFunction<ServerResponse> routes() {
        return route(GET("/"), this::hello)
                .andRoute(GET("/stream"), this::stream)
                .andRoute(POST("/echo"), this::echo)
                .andRoute(POST("/stream"), this::postStream);
    }

    public Mono<ServerResponse> hello(ServerRequest req) {
        return ok().body(Flux.just("Hello", "World!"), String.class);
    }

    public Mono<ServerResponse> stream(ServerRequest req) {
        Stream<Integer> stream = Stream.iterate(0, i -> i + 1);
        Flux<Map<String, Integer>> flux = Flux.fromStream(stream)
                .map(i -> Collections.singletonMap("value", i));
        return ok().contentType(MediaType.APPLICATION_NDJSON)
                .body(fromPublisher(flux, new ParameterizedTypeReference<Map<String, Integer>>(){}));
    }

    public Mono<ServerResponse> echo(ServerRequest req) {
        Mono<String> body = req.bodyToMono(String.class).map(String::toUpperCase);
        return ok().body(body, String.class);
    }

    public Mono<ServerResponse> postStream(ServerRequest req) {
        Flux<Map<String, Integer>> body = req.body(toFlux( // BodyExtractors.toFluxをstatic importする必要がある。
                new ParameterizedTypeReference<Map<String, Integer>>(){}));

        return ok().contentType(MediaType.TEXT_EVENT_STREAM)
                .body(fromPublisher(body.map(m -> Collections.singletonMap("double", m.get("value") * 2)),
                        new ParameterizedTypeReference<Map<String, Integer>>(){}));
    }
}
これで、HelloControllerと同じ動作をするHelloHandlerクラスが完成しました。
RequestPredicates.GETとRequestPredicates.POSTは@GetMapping、@PostMappingに対応し、HTTPメソッドのない@RequestMappingに対応するのはRequestPredicates.pathです。そして、これらはFunctional Interfaceなので、次のようにラムダ式でリクエストマッチングルールを選択的に書くことができます。