Spring WebFlux의 간단한 사용법
개요
여기서는 Spring WebFlux의 간단한 사용법에 대해 소개하겠다.
Spring WebFlux는 Spring 5에서 추가된 논블로킹(Non-Blocking) 런타임에서 리액티브 프로그래밍을 할 수 있는 새로운 Web 프레임워크이다.
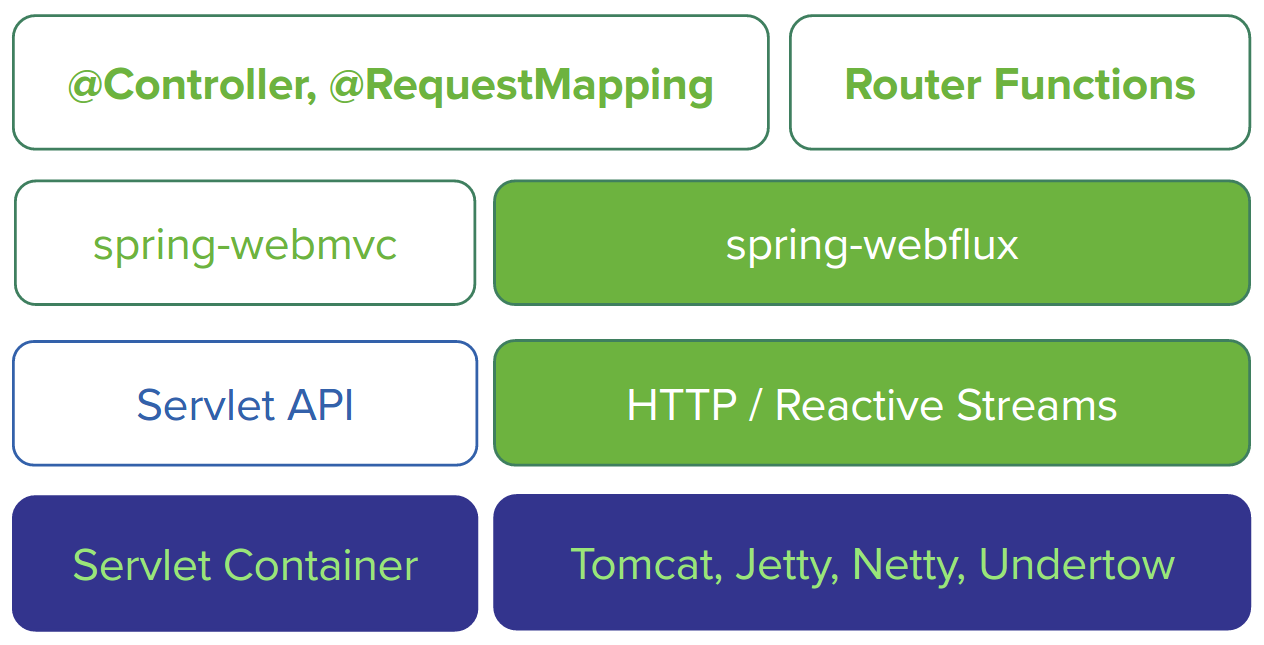
위의 그림에서 알 수 있듯이 지금까지 Spring MVC 컨포넌트가 잘 표현되어 있다. 지금까지 Spring MVC는 서블릿 컨테이너에 Servlet API를 기반으로 한 프레임워크이었지만, Spring WebFlux는 Servlet API를 사용하지 않고 Reactive Streams와 그 구현체인 Reactor를 기반으로 한 새로운 HTTP API로 구현되어 있다. 런타임으로서 Netty, Undertow(서블릿 컨테이너가 아닌 방향)와 같은 WAS로 논블로킹을 사용할 수 있다. 또한 Servlet 3.1에서 도입된 논블로킹 API를 사용하여 Tomcat, Jetty 구현체도 준비되어 있다.
Spring WebFlux의 프로그래밍 모델로는 2가지 패턴이 아래와 같이 제공된다.
@Controlller- Router Functions
@Controlller는 지금까지 Spring MVC에서 사용해 왔던 어노테이션 기반의 Contoller 구현 방법 그 자체이다. 즉, 런타임은 변화하지만 Controller의 프로그래밍 방법은 동일하다. Router Functions는 람다 기반의 새로운 Controller의 구현 방법이다. Node.js의 Express 같은 거라고 생각하면 될 거 같다.
본 문서에서는 두 패턴에 대해 간단히 설명하겠다.
프로젝트 생성
우선 프로젝트를 만든다. Spring Boot 2.0부터는 Spring 5을 지원하고 있다.
curl 명령으로 간단히 프로젝트를 만들 수 있다. (Windows의 경우는 Bash에서 실행하면 된다.)
curl https://start.spring.io/starter.tgz  \
       -d bootVersion=2.4.4 \
       -d dependencies=webflux \
       -d baseDir=spring-webflux \
       -d artifactId=webflux \
       -d packageName=com.devkuma.webflux \
       -d applicationName=HelloWebFluxApplication \
       -d type=gradle-project | tar -xzvf -
실행이 완료 되면 spring-webflux 디렉터리가 하나 생성된 것을 확인 할 수 있다.
이제부터는 Stream라고 하면 연속하는 데이터이고, Stream라고 하면 Java8의 java.util.stream.Stream을 뜻한다.
@Controller 모델
먼저 @Controller 모델에서 Hello World를 만들어 보자.
Hello World
src/main/java/com/devkuma/webflux/HelloController.java을 작성한다.
package com.devkuma.webflux;

import org.springframework.web.bind.annotation.GetMapping;
import org.springframework.web.bind.annotation.RestController;

import reactor.core.publisher.Flux;

@RestController
public class HelloController {

    @GetMapping("/")
    Flux<String> hello() {
        return Flux.just("Hello", "World");
    }
}
Flux가 생소한 사람이 있을 수 있는데, 얼핏보기 지금까지 써 왔던 Spring MVC의 Controller와 동일하다.
com.devkuma.webflux.HelloWebFluxApplication 클래스의 main 메소드를 실행하면 Spring WebFlux 응용 프로그램이 실행될 것이다.
  .   ____          _            __ _ _
 /\\ / ___'_ __ _ _(_)_ __  __ _ \ \ \ \
( ( )\___ | '_ | '_| | '_ \/ _` | \ \ \ \
 \\/  ___)| |_)| | | | | || (_| |  ) ) ) )
  '  |____| .__|_| |_|_| |_\__, | / / / /
 =========|_|==============|___/=/_/_/_/
 :: Spring Boot ::                (v2.4.4)

2021-04-14 07:07:20.558  INFO 20344 --- [           main] c.d.webflux.HelloWebFluxApplication      : Starting HelloWebFluxApplication using Java 11.0.7 on DESKTOP-A67OEI1 with PID 20344 (D:\dev\spring-webflux--tutorial\build\classes\java\main started by kimkc in D:\dev\spring-webflux--tutorial)
2021-04-14 07:07:20.567  INFO 20344 --- [           main] c.d.webflux.HelloWebFluxApplication      : No active profile set, falling back to default profiles: default
2021-04-14 07:07:22.111  INFO 20344 --- [           main] o.s.b.web.embedded.netty.NettyWebServer  : Netty started on port 8080
2021-04-14 07:07:22.122  INFO 20344 --- [           main] c.d.webflux.HelloWebFluxApplication      : Started HelloWebFluxApplication in 2.103 seconds (JVM running for 3.381)
curl으로 localhost:8080에 접속을 해보자.
$ curl -i localhost:8080
  % Total    % Received % Xferd  Average Speed   Time    Time     Time  Current
                                 Dload  Upload   Total   Spent    Left  Speed
100    10    0    10    0     0    909      0 --:--:-- --:--:-- --:--:--  1000HTTP/1.1 200 OK
transfer-encoding: chunked
Content-Type: text/plain;charset=UTF-8

HelloWorld
“HellWorld"가 표시가 되는 것을 확인 할 수 있다.
Flux는 Reactive Streams의 Publisher를 구현한 N 요소의 스트림을 표현하는 Reactor 클래스이다. 기본적으로 text/plain으로 응답이 반환되었지만, 아래와 반환할 수도 있다.
- Server-Sent Event
- JSON Stream
Server-Sent Event으로 반환해 보기 위해, Accept 헤더에 text/event-stream을 지정하여 다시 실행해 보자.
$ curl -i localhost:8080 -H 'Accept: text/event-stream'
  % Total    % Received % Xferd  Average Speed   Time    Time     Time  Current
                                 Dload  Upload   Total   Spent    Left  Speed
100    24    0    24    0     0   1846      0 --:--:-- --:--:-- --:--:--  2000HTTP/1.1 200 OK
transfer-encoding: chunked
Content-Type: text/event-stream;charset=UTF-8

data:Hello

data:World
JSON Stream으로 반환하려면, Accept 헤더에 application/stream+json을 지정하면 되지만, 이런 경우(문자열 스트림)으로는 표시가 text/plain일 경우와 다르지 않다.
$ curl -i localhost:8080 -H 'Accept: application/stream+json'
  % Total    % Received % Xferd  Average Speed   Time    Time     Time  Current
                                 Dload  Upload   Total   Spent    Left  Speed
100    10    0    10    0     0    714      0 --:--:-- --:--:-- --:--:--   769HTTP/1.1 200 OK
transfer-encoding: chunked
Content-Type: application/stream+json;charset=UTF-8

HelloWorld
무한 Stream
다음은 좀 더 Stream스러운 응답을 받아 보자.
Flux는 Stream에서 생성할 수 있다.
다음은 stream 메소드를 작성하여, 무한 Stream을 작성하고, 그 중에 10건을 Flux로 변환하여 반환해 보도록 하겠다.
아래 같이 코드를 수정하여 com.example.HelloWebFluxApplication 클래스를 다시 실행한다.
package com.devkuma.webflux;

import org.springframework.web.bind.annotation.GetMapping;
import org.springframework.web.bind.annotation.RestController;

import reactor.core.publisher.Flux;

import java.util.Collections;
import java.util.Map;
import java.util.stream.Stream;

@RestController
public class HelloController {

    @GetMapping("/")
    Flux<String> hello() {
        return Flux.just("Hello", "World");
    }

    @GetMapping("/stream")
    Flux<Map<String, Integer>> stream() {
        Stream<Integer> stream = Stream.iterate(0, i -> i + 1); // Java8의 무한Stream
        return Flux.fromStream(stream.limit(10))
                .map(i -> Collections.singletonMap("value", i));
    }
}
/stream에 대한 세 가지 응답은 각각와 아래와 같다.
일반 JSON
$ curl -i localhost:8080/stream
  % Total    % Received % Xferd  Average Speed   Time    Time     Time  Current
                                 Dload  Upload   Total   Spent    Left  Speed
100   121    0   121    0     0  11000      0 --:--:-- --:--:-- --:--:-- 12100HTTP/1.1 200 OK
transfer-encoding: chunked
Content-Type: application/json

[{"value":0},{"value":1},{"value":2},{"value":3},{"value":4},{"value":5},{"value":6},{"value":7},{"value":8},{"value":9}]
Server-Sent Event
$ curl -i localhost:8080/stream -H 'Accept: text/event-stream'
  % Total    % Received % Xferd  Average Speed   Time    Time     Time  Current
                                 Dload  Upload   Total   Spent    Left  Speed
100   180    0   180    0     0  12000      0 --:--:-- --:--:-- --:--:-- 12000HTTP/1.1 200 OK
transfer-encoding: chunked
Content-Type: text/event-stream;charset=UTF-8

data:{"value":0}

data:{"value":1}

data:{"value":2}

data:{"value":3}

data:{"value":4}

data:{"value":5}

data:{"value":6}

data:{"value":7}

data:{"value":8}

data:{"value":9}
JSON Stream
$ curl -i localhost:8080/stream -H 'Accept: application/stream+json'
  % Total    % Received % Xferd  Average Speed   Time    Time     Time  Current
                                 Dload  Upload   Total   Spent    Left  Speed
100   120    0   120    0     0   7500      0 --:--:-- --:--:-- --:--:--  7500HTTP/1.1 200 OK
transfer-encoding: chunked
Content-Type: application/stream+json

{"value":0}
{"value":1}
{"value":2}
{"value":3}
{"value":4}
{"value":5}
{"value":6}
{"value":7}
{"value":8}
{"value":9}
이제는 일반 JSON(application/json)과 JSON Stream(application/stream + json)의 차이가 보일 것이다.
실은 여기서 limit를 붙일 필요 없이, 그대로 무한 Stream을 반환 할 수 있다. 이는 보통의 Controller으로는 영원히 응답이 되돌아 오지 않을 것이다. application/json의 경우 응답이 반환되지 않는다(Integer가 오버플로우되면 반환지도?). 그래서 우선은 굳이 limit을 붙였다. Server-Sent Event와 JSON Stream은 무한 Stream을 반환 할 수 있다. 해 보도록 하자.
아래 코드에서와 같이 limt를 제외하고 실행해 본다.
package com.devkuma.webflux;

import org.springframework.web.bind.annotation.GetMapping;
import org.springframework.web.bind.annotation.RestController;

import reactor.core.publisher.Flux;

import java.util.Collections;
import java.util.Map;
import java.util.stream.Stream;

@RestController
public class HelloController {

    @GetMapping("/")
    Flux<String> hello() {
        return Flux.just("Hello", "World");
    }

    @GetMapping("/stream")
    Flux<Map<String, Integer>> stream() {
        Stream<Integer> stream = Stream.iterate(0, i -> i + 1); // Java8의 무한 Stream
        return Flux.fromStream(stream) // Limit 제외
                .map(i -> Collections.singletonMap("value", i));
    }
}
Server-Sent Event도 JSON Stream도 다음과 같이 돌아간다. Ctrl+C를 눌려 멈출 때까지 엄청난 속도의 Stream 결과를 볼 수 있다.
Server-Sent Event
$ curl -i localhost:8080/stream -H 'Accept: text/event-stream'
  % Total    % Received % Xferd  Average Speed   Time    Time     Time  Current
                                 Dload  Upload   Total   Spent    Left  Speed
  0     0    0     0    0     0      0      0 --:--:-- --:--:-- --:--:--     0HTTP/1.1 200 OK
transfer-encoding: chunked
Content-Type: text/event-stream;charset=UTF-8

data:{"value":0}

data:{"value":1}

data:{"value":2}

data:{"value":3}

data:{"value":4}

data:{"value":5}

data:{"value":6}

data:{"value":7}

data:{"value":8}

data:{"value":9}

data:{"value":10}

data:{"value":11}

data:{"value":12}

data:{"value":13}

... 이하 생략...
JSON Stream
$ curl -i localhost:8080/stream -H 'Accept: application/stream+json'
  % Total    % Received % Xferd  Average Speed   Time    Time     Time  Current
                                 Dload  Upload   Total   Spent    Left  Speed
  0     0    0     0    0     0      0      0 --:--:-- --:--:-- --:--:--     0HTTP/1.1 200 OK
transfer-encoding: chunked
Content-Type: application/stream+json

{"value":0}
{"value":1}
{"value":2}
{"value":3}
{"value":4}
{"value":5}
{"value":6}
{"value":7}
{"value":8}
{"value":9}
{"value":10}
{"value":11}
{"value":12}
Stream을 천천히 반환되도록 하고 싶다면, Flux.interval(Duration)와 zip을 지정하여 Stream 결과를 확인해 보자.
$ curl -i localhost:8080/stream -H 'Accept: application/stream+json'
  % Total    % Received % Xferd  Average Speed   Time    Time     Time  Current
                                 Dload  Upload   Total   Spent    Left  Speed
  0     0    0     0    0     0      0      0 --:--:-- --:--:-- --:--:--     0
kimkc@DESKTOP-A67OEI1 MINGW64 /d
$ curl -i localhost:8080/stream -H 'Accept: application/stream+json'
  % Total    % Received % Xferd  Average Speed   Time    Time     Time  Current
                                 Dload  Upload   Total   Spent    Left  Speed
100    96    0    96    0     0     10      0 --:--:--  0:00:09 --:--:--    11HTTP/1.1 200 OK
transfer-encoding: chunked
Content-Type: application/stream+json

{"value":0}
{"value":1}
{"value":2}
{"value":3}
{"value":4}
{"value":5}
{"value":6}
{"value":7}
POST
다음은 POST의 경우도 알아보도록 하자.
요청 본문의 문자열을 대문자로 반환 echo 메소드를 만든다.
package com.devkuma.webflux;

import org.springframework.web.bind.annotation.GetMapping;
import org.springframework.web.bind.annotation.PostMapping;
import org.springframework.web.bind.annotation.RequestBody;
import org.springframework.web.bind.annotation.RestController;

import reactor.core.publisher.Flux;
import reactor.core.publisher.Mono;

import java.time.Duration;
import java.util.Collections;
import java.util.Map;
import java.util.stream.Stream;

@RestController
public class HelloController {

    @GetMapping("/")
    Flux<String> hello() {
        return Flux.just("Hello", "World");
    }

    @GetMapping("/stream")
    Flux<Map<String, Integer>> stream() {
        Stream<Integer> stream = Stream.iterate(0, i -> i + 1);
        return Flux.fromStream(stream).zipWith(Flux.interval(Duration.ofSeconds(1)))
                .map(tuple -> Collections.singletonMap("value", tuple.getT1() /* 튜플의 첫 번째 요소 = Stream<Integer> 요소 */));
    }

    @PostMapping("/echo")
    Mono<String> echo(@RequestBody Mono<String> body) {
        return body.map(String::toUpperCase);
    }
}
보통의 Controller과 동일하게 @RequestBody으로 요청 본문을 받을 수 있다. Spring WebFlux는 요청 본문(여기서는 문자열)을 Mono에 감싸서 받도록 해서, 비동기적으로 처리를 chain/compose으로 할 수 있다. (참고로 Mono에서 감싸지 않고 String으로 받은 경우는 논블러킹으로 동기화 처리된다.) 이 경우 요청 본문을 대문자로 변환하는 map의 결과 Mono를 그대로 반환한다. Mono는 1 또는 0 요소의 Publisher이다.
$  curl -i localhost:8080/echo -H 'Content-Type: application/json' -d devkuma
  % Total    % Received % Xferd  Average Speed   Time    Time     Time  Current
                                 Dload  Upload   Total   Spent    Left  Speed
100    14  100     7  100     7   1166   1166 --:--:-- --:--:-- --:--:--  2800HTTP/1.1 200 OK
Content-Type: text/plain;charset=UTF-8
Content-Length: 7

DEVKUMA
Mono 부분을 Flux로 바꿔보도록 하자. 1건만 처리해야 한다면 Mono를 사용하는 것이 명시적이다. 반대로 여러 건수의 Stream을 처리하고 싶다면 Flux로 해야 한다.
다음 예제에서는 @PostMapping을 선언한 stream 메소드에 Stream을 Flux로 받아서 키가 value인 값을 2배 곱하여 그 값을 키 double에 넣어 Map으로 변환하여 반환한다.
$  curl -i localhost:8080/stream -d '{"value":1}{"value":2}{"value":3}' -H 'Content-Type: application/stream+json'  -H 'Accept: text/event-stream'
  % Total    % Received % Xferd  Average Speed   Time    Time     Time  Current
                                 Dload  Upload   Total   Spent    Left  Speed
100    90    0    57  100    33   4071   2357 --:--:-- --:--:-- --:--:--  6923HTTP/1.1 200 OK
transfer-encoding: chunked
Content-Type: text/event-stream;charset=UTF-8

data:{"double":2}

data:{"double":4}

data:{"double":6}
Router Functions 모델
다음은 또 다른 프로그래밍 모델인 Router Functions에 대해 알아보도록 하자.
Route Functions는 POJO에 @RestController과 @GetMapping 등의 어노테이션을 선언하여 라우팅을 정의하는 대신에 경로와 핸들러 함수(람다)의 조합으로 라우팅을 정의한다.
Spring Boot 2.0에서는 Router Functions와 @Controller 모델은 공존할 수 없기 때문에(모두 사용하게 되면 @Controller가 무시된다), 앞에서 만든 HelloController를 제거한다.
Hello World
@Controller의 경우와 마찬가지로 GET("/")으로 Flux의 “Hello World"를 반환하는 Routing 정의해 보자. Spring Boot 2.0에는 RouterFunction<ServerResponse>의 Bean 정의가 있으면, 이는 Router Functions의 라우팅 정의로 간주한다.
우선 간단히 Bean 선언으로 라우팅 정의해 보겠다.
package com.devkuma.webflux;

import org.springframework.boot.SpringApplication;
import org.springframework.boot.autoconfigure.SpringBootApplication;
import org.springframework.context.annotation.Bean;
import org.springframework.web.reactive.function.server.RequestPredicates;
import org.springframework.web.reactive.function.server.RouterFunction;
import org.springframework.web.reactive.function.server.RouterFunctions;
import org.springframework.web.reactive.function.server.ServerResponse;
import reactor.core.publisher.Flux;

@SpringBootApplication
public class HelloWebFluxApplication {

    public static void main(String[] args) {
        SpringApplication.run(HelloWebFluxApplication.class, args);
    }

    @Bean
    RouterFunction<ServerResponse> routes() {
        return RouterFunctions.route(RequestPredicates.GET("/"), req -> ServerResponse
                .ok().body(Flux.just("Hello", "World!"), String.class));
    }
}
위와 같이 작성하는 방법도 있지만, RouterFunctions. *, RequestPredicates. *, ServerResponse.*를 static import하는 방법도 있다. IntelliJ IDEA라면 단축키(맥:Option + Enter, 윈도우: Alt+Enter)으로 “Add static import for …“를 선택한다.
static import하면 다음과 같이 작성할 수 있다.
package com.devkuma.webflux;

import org.springframework.boot.SpringApplication;
import org.springframework.boot.autoconfigure.SpringBootApplication;
import org.springframework.context.annotation.Bean;
import org.springframework.web.reactive.function.server.RouterFunction;
import org.springframework.web.reactive.function.server.ServerResponse;
import reactor.core.publisher.Flux;

import static org.springframework.web.reactive.function.server.RequestPredicates.GET;
import static org.springframework.web.reactive.function.server.RouterFunctions.route;
import static org.springframework.web.reactive.function.server.ServerResponse.ok;

@SpringBootApplication
public class HelloWebFluxApplication {

    public static void main(String[] args) {
        SpringApplication.run(HelloWebFluxApplication.class, args);
    }

    @Bean
    RouterFunction<ServerResponse> routes() {
        return route(GET("/"),
                req -> ok().body(Flux.just("Hello", "World!"), String.class));
    }
}
HelloWebFluxApplication를 다시 시작하여 curl에서 localhost : 8080에 접속해 보자.
$ curl -i localhost:8080
  % Total    % Received % Xferd  Average Speed   Time    Time     Time  Current
                                 Dload  Upload   Total   Spent    Left  Speed
100    11    0    11    0     0     59      0 --:--:-- --:--:-- --:--:--    59HTTP/1.1 200 OK
transfer-encoding: chunked
Content-Type: text/plain;charset=UTF-8

HelloWorld!
Map<String, Integer>와 같이 Generics 형태로 반환하려면, BodyInserters.fromPublisher(P publisher, ParameterizedTypeReference<T> elementTypeRef)를 사용한다.
조금 귀찮아 보일지도 모른다.
package com.devkuma.webflux;

import java.util.Collections;
import java.util.Map;
import java.util.stream.Stream;

import org.springframework.core.ParameterizedTypeReference;
import org.springframework.core.ResolvableType;
import org.springframework.http.MediaType;
import org.springframework.stereotype.Component;
import org.springframework.web.reactive.function.server.RouterFunction;
import org.springframework.web.reactive.function.server.ServerRequest;
import org.springframework.web.reactive.function.server.ServerResponse;

import reactor.core.publisher.Flux;
import reactor.core.publisher.Mono;

import static org.springframework.web.reactive.function.BodyInserters.fromPublisher;
import static org.springframework.web.reactive.function.server.RequestPredicates.GET;
import static org.springframework.web.reactive.function.server.RouterFunctions.route;
import static org.springframework.web.reactive.function.server.ServerResponse.ok;

@Component
public class HelloHandler {

    public RouterFunction<ServerResponse> routes() {
        return route(GET("/"), this::hello).andRoute(GET("/stream"), this::stream);
    }

    public Mono<ServerResponse> hello(ServerRequest req) {
        return ok().body(Flux.just("Hello", "World!"), String.class);
    }

    public Mono<ServerResponse> stream(ServerRequest req) {
        Stream<Integer> stream = Stream.iterate(0, i -> i + 1);
        Flux<Map<String, Integer>> flux = Flux.fromStream(stream)
                .map(i -> Collections.singletonMap("value", i));
        return ok().contentType(MediaType.APPLICATION_NDJSON)
                .body(fromPublisher(flux, new ParameterizedTypeReference<Map<String, Integer>>(){}));
    }
}
HelloWebFluxApplication 클래스를 다시 시작하고 /stream에 접속해 보면 무한 JSON Stream이 반환된다.
$ curl -i localhost:8080/stream
  % Total    % Received % Xferd  Average Speed   Time    Time     Time  Current
                                 Dload  Upload   Total   Spent    Left  Speed
  0     0    0     0    0     0      0      0 --:--:-- --:--:-- --:--:--     0HTTP/1.1 200 OK
transfer-encoding: chunked
Content-Type: application/x-ndjson

{"value":0}
{"value":1}
{"value":2}
{"value":3}
{"value":4}
{"value":5}
{"value":6}
{"value":7}
{"value":8}
{"value":9}
{"value":10}

... 이하 생략 ...
POST
POST의 경우는 RequestPredicates.POST를 사용하여 라우팅을 정의하는 것과 응답 본문을 ServerRequest.bodyToMono 또는 ServerRequest.bodyToFlux을 사용하면 지금까지 설명한 내용과 특별히 다른 점은 없다.
package com.devkuma.webflux;

import java.util.Collections;
import java.util.Map;
import java.util.stream.Stream;

import org.springframework.core.ParameterizedTypeReference;
import org.springframework.core.ResolvableType;
import org.springframework.http.MediaType;
import org.springframework.stereotype.Component;
import org.springframework.web.reactive.function.server.RouterFunction;
import org.springframework.web.reactive.function.server.ServerRequest;
import org.springframework.web.reactive.function.server.ServerResponse;

import reactor.core.publisher.Flux;
import reactor.core.publisher.Mono;

import static org.springframework.web.reactive.function.BodyInserters.fromPublisher;
import static org.springframework.web.reactive.function.server.RequestPredicates.GET;
import static org.springframework.web.reactive.function.server.RequestPredicates.POST;
import static org.springframework.web.reactive.function.server.RouterFunctions.route;
import static org.springframework.web.reactive.function.server.ServerResponse.ok;

@Component
public class HelloHandler {

    public RouterFunction<ServerResponse> routes() {
        return route(GET("/"), this::hello)
                .andRoute(GET("/stream"), this::stream)
                .andRoute(POST("/echo"), this::echo);
    }

    public Mono<ServerResponse> hello(ServerRequest req) {
        return ok().body(Flux.just("Hello", "World!"), String.class);
    }

    public Mono<ServerResponse> stream(ServerRequest req) {
        Stream<Integer> stream = Stream.iterate(0, i -> i + 1);
        Flux<Map<String, Integer>> flux = Flux.fromStream(stream)
                .map(i -> Collections.singletonMap("value", i));
        return ok().contentType(MediaType.APPLICATION_NDJSON)
                .body(fromPublisher(flux, new ParameterizedTypeReference<Map<String, Integer>>(){}));
    }

    public Mono<ServerResponse> echo(ServerRequest req) {
        Mono<String> body = req.bodyToMono(String.class).map(String::toUpperCase);
        return ok().body(body, String.class);
    }
}
POST /stream도 동일하지만 Request Body를 Generics 형태의 Publisher으로 받을 경우는 ServerRequest.bodyToFlux가 아닌 ServerRequest.body 메소드에 BodyInserters와 반대의 개념인 BodyExtractors을 전달한다.
package com.devkuma.webflux;

import java.util.Collections;
import java.util.Map;
import java.util.stream.Stream;

import org.springframework.core.ParameterizedTypeReference;
import org.springframework.core.ResolvableType;
import org.springframework.http.MediaType;
import org.springframework.stereotype.Component;
import org.springframework.web.reactive.function.server.RouterFunction;
import org.springframework.web.reactive.function.server.ServerRequest;
import org.springframework.web.reactive.function.server.ServerResponse;

import reactor.core.publisher.Flux;
import reactor.core.publisher.Mono;

import static org.springframework.web.reactive.function.BodyExtractors.toFlux;
import static org.springframework.web.reactive.function.BodyInserters.fromPublisher;
import static org.springframework.web.reactive.function.server.RequestPredicates.GET;
import static org.springframework.web.reactive.function.server.RequestPredicates.POST;
import static org.springframework.web.reactive.function.server.RouterFunctions.route;
import static org.springframework.web.reactive.function.server.ServerResponse.ok;

@Component
public class HelloHandler {

    public RouterFunction<ServerResponse> routes() {
        return route(GET("/"), this::hello)
                .andRoute(GET("/stream"), this::stream)
                .andRoute(POST("/echo"), this::echo)
                .andRoute(POST("/stream"), this::postStream);
    }

    public Mono<ServerResponse> hello(ServerRequest req) {
        return ok().body(Flux.just("Hello", "World!"), String.class);
    }

    public Mono<ServerResponse> stream(ServerRequest req) {
        Stream<Integer> stream = Stream.iterate(0, i -> i + 1);
        Flux<Map<String, Integer>> flux = Flux.fromStream(stream)
                .map(i -> Collections.singletonMap("value", i));
        return ok().contentType(MediaType.APPLICATION_NDJSON)
                .body(fromPublisher(flux, new ParameterizedTypeReference<Map<String, Integer>>(){}));
    }

    public Mono<ServerResponse> echo(ServerRequest req) {
        Mono<String> body = req.bodyToMono(String.class).map(String::toUpperCase);
        return ok().body(body, String.class);
    }

    public Mono<ServerResponse> postStream(ServerRequest req) {
        Flux<Map<String, Integer>> body = req.body(toFlux( // BodyExtractors.toFlux을 static import해야 한다.
                new ParameterizedTypeReference<Map<String, Integer>>(){}));

        return ok().contentType(MediaType.TEXT_EVENT_STREAM)
                .body(fromPublisher(body.map(m -> Collections.singletonMap("double", m.get("value") * 2)),
                        new ParameterizedTypeReference<Map<String, Integer>>(){}));
    }
}
이것으로 HelloController와 동일한 동작을 하는 HelloHandler 클래스가 완성되었다.
RequestPredicates.GET와RequestPredicates.POST는@GetMapping,@PostMapping에 대응되고, HTTP 메소드가 없는@RequestMapping에 대응하는 것은RequestPredicates.path이다.그리고 이것들은 Functional Interface이므로 다음과 같이, 람다 식으로 요청 매칭 규칙을 선택적으로 쓸 수 있다.