Spring Security | Spring Security이란? | Hello World
먼저, 간단한 예제를 만들어 보자.
아래와 같이 파일 구성을 만들고, 각 파일을 생성한다. 파일 작성할 수 있는 도구라면 어떤 것을 사용해도 상관 없다.
파일 구조
.
├── build.gradle
└── src
    └── main
        └── webapp
            ├── WEB-INF
            │   ├── applicationContext.xml
            │   └── web.xml
            └── index.jsp
빌드 스크립트에서의 의존 관계
빌드 스크립트 파일을 만든다.
build.gradle
apply plugin: 'war'

sourceCompatibility = '1.8'
targetCompatibility = '1.8'
compileJava.options.encoding = 'UTF-8'

repositories {
    mavenCentral()
}

dependencies {
    providedCompile 'javax.servlet:javax.servlet-api:3.1.0'
    compile 'javax.servlet:jstl:1.2'
    compile 'org.springframework.security:spring-security-web:4.2.1.RELEASE'
    compile 'org.springframework.security:spring-security-config:4.2.1.RELEASE'
}

war.baseName = 'spring-security-sample'
최소 구성으로 spring-security-web과 spring-security-config를 의존에 추가되었다.
    compile 'org.springframework.security:spring-security-web:4.2.1.RELEASE'
    compile 'org.springframework.security:spring-security-config:4.2.1.RELEASE'
spring-security-web
Filter이나 Web 응용 프로그램 관련 코드가 포함되어 있다. Web 인증 기능과 URL 기반 액세스 제어가 필요한 경우에는 이 모듈이 필요하다. 메인 패키지는 org.springframework.security.web 이다.
spring-security-config
xml로 정의를 작성할 때 사용하는 namespace를 분석하는 코드나 Java 구성을 위한 코드가 포함되어 있다. XML 기반의 설정 및 Java 구성을 사용하는 경우는 이 모듈이 필요하다. 메인 패키지는 org.springframework.security.config 이다. 여기에 포함된 클래스를 응용 프로그램에 직접 사용되는 것은 아니다.
Spring 컨테이너의 초기화
Java 기존 웹 설정파일을 만든다.
src/main/webapp/WEB-INF/web.xml
<?xml version="1.0" encoding="UTF-8"?>
<web-app xmlns="http://xmlns.jcp.org/xml/ns/javaee"
         xmlns:xsi="http://www.w3.org/2001/XMLSchema-instance"
         xsi:schemaLocation="http://xmlns.jcp.org/xml/ns/javaee
         http://xmlns.jcp.org/xml/ns/javaee/web-app_3_1.xsd"
         version="3.1">
    <filter>
        <filter-name>springSecurityFilterChain</filter-name>
        <filter-class>org.springframework.web.filter.DelegatingFilterProxy</filter-class>
    </filter>

    <filter-mapping>
        <filter-name>springSecurityFilterChain</filter-name>
        <url-pattern>/*</url-pattern>
    </filter-mapping>

    <listener>
        <listener-class>org.springframework.web.context.ContextLoaderListener</listener-class>
    </listener>
</web-app>
Spring 컨테이너의 초기화는 아래와 같이 한다.
    <listener>
        <listener-class>org.springframework.web.context.ContextLoaderListener</listener-class>
    </listener>
ContextLoaderListener를 리스너로 등록하여, Spring 컨테이너(ApplicationContext)가 초기화된다.
ApplicationContext 클래스에 무엇을 사용하는지 명시하지 않으면 기본적으로 XmlWebApplicationContext가 사용된다.
spring-web-x.x.x.RELEASE.jar의 org/springframework/web/context/ContextLoader.properties에 다음과 같이 정의되어 있고, 서블릿 컨테이너가 초기화 될 때에 ContextLoaderListener가 로드된다.
# Default WebApplicationContext implementation class for ContextLoader.
# Used as fallback when no explicit context implementation has been specified as context-param.
# Not meant to be customized by application developers.

org.springframework.web.context.WebApplicationContext=org.springframework.web.context.support.XmlWebApplicationContext
XmlWebApplicationContext는 기본적으로 WEB-INF/applicationContext.xml을 설정 파일로 읽어 들인다.
Spring Security를 애플리케이션에 적용
DelegatingFilterProxy를 서블릿 필터로 web.xml에 정의한다. 이 때, <filter-name>을 “springSecurityFilterChain"을 정의한다. 여기서 <filter-mapping>에 정의된 URL에 액세스가 있으면 Spring Security가 적용된다.
DelegatingFilterProxy는 자체의 <filter-name>에 설정된 이름을 사용하여 Spring 컨테이너에서 javax.servlet.Filter를 구현 Bean를 얻는다. 그리고 그 Bean에 처리를 위양 할뿐만 서블릿 필터가있다.
여기에서는 <filter-name>에 “springSecurityFilterChain"를 지정하고 있다. 이 이름은 뒤에 나올applicationContext.xml에 <http> 태그를 사용하면 컨테이너에 자동으로 등록되는 FilterChainProxy의 Bean 이름과 일치한다.
즉, DelegatingFilterProxy 서블릿 필터와 Spring Security(FilterChainProxy)의 중개를 하는 것이 역할이다.
Spring Security 설정
src/main/webapp/WEB-INF/applicationContext.xml
<?xml version="1.0" encoding="UTF-8"?>
<beans xmlns="http://www.springframework.org/schema/beans"
       xmlns:sec="http://www.springframework.org/schema/security"
       xmlns:xsi="http://www.w3.org/2001/XMLSchema-instance"
       xsi:schemaLocation="
         http://www.springframework.org/schema/beans
         http://www.springframework.org/schema/beans/spring-beans-3.0.xsd
         http://www.springframework.org/schema/security
         http://www.springframework.org/schema/security/spring-security.xsd">

    <sec:http>
        <sec:intercept-url pattern="/login" access="permitAll" />
        <sec:intercept-url pattern="/**" access="isAuthenticated()" />
        <sec:form-login />
        <sec:logout />
    </sec:http>

    <sec:authentication-manager>
        <sec:authentication-provider>
            <sec:user-service>
                <sec:user name="devkuma" password="1234" authorities="ROLE_USER" />
            </sec:user-service>
        </sec:authentication-provider>
    </sec:authentication-manager>
</beans>
applicationContext.xml는 Spring의 Bean 정의를 위한 표준 설정 파일로 Spring Security에 대한 특별한 설정 파일은 아니다.
xmlns으로 http://www.springframework.org/schema/security을 읽어 오기에, Spring Security 용 태그를 사용할 수 있게 된다(참조로, 이 Spring Security 전용 태그를 사용하는 것을 namespace라고 부른다). 이 태그를 사용하여 Spring Security 설정을 이 파일에서 할 수 있다.
위의 설정은 요약하는 아래와 같은 내용으로 정의되어 있다.
/login에 액세스 누구라도 접근할 수 있다(permitAll).- 다른 모든 경로에 대한 액세스(
/**) 인증되어 있을 필요가 있다(isAuthenticated()) - 로그인 방법은 Form 로그인이다.
- 로그 아웃할 있다. 사용자 정보로 이름은 “devkama, 암호는 “1234"이고 ROLE_USER라는 역할을 가진 사용자를 정의한다.
다음 각 태그에 대해 조금 자세히 설명하겠다.
<http>
<http> 태그를 정의하면 자동으로 컨테이너에 몇개의 Bean이 등록된다. 그 중에서도 중요한 Bean으로는 다음 2가지 종류가 있다.
- FilterChainProxy
- SecurityFilterChain
FilterChainProxy는 “springSecurityFilterChain"라는 Bean 이름으로 컨테이너에 등록된다. 이 클래스는 Spring Security 처리의 진입점이 된다.
SecurityFilterChain은 그 자체가 단순한 인터페이스로 구현 클래스로 DefaultSecurityFilterChain가 컨테이너에 등록된다. SecurityFilterChain는 이름 그대로 보안 기능을 가진 javax.servlet.Filter를 체인(사슬)을 거는 것으로 여러 Filter를 내부에 보유한다. Spring Security는 Filter를 이용하여 보안 기능을 제공하고 있다.
FilterChainProxy는 Proxy라고 이름에 붙어 있는 것에서도 알 수 있듯이, 이 클래스 자체는 처리하지 않는다. 구체적인 처리는 SecurityFilterChain이 있는 Filter 회사에 위임한다.
<intercept-url>
URL 패턴에 대해 액세스에 필요한 조건(액세스 제어)를 정의하고 있다.
pattern 속성은 ant 경로의 형식으로 기술할 수 있다.
access 속성에는 pattern 속성으로 지정한 URL에 액세스하는데 필요한 조건을 지정한다. permitAll은, 모든 액세스에 대한 허용(인증 불필요)을 의미한다. 그리고 isAuthenticated()는 인증(로그인 된)이면 액세스를 허용하는 것을 의미한다.
access 속성은 Spring Expression Language (SpEL)라는 Spring 자체 수식 언어를 사용하여 기술한다.
<form-login>
Form 인증이 필요한 것을 정의하고 있다.
인증 오류의 경우는 기본적으로 /login으로 리디렉션하게 된다.
디폴트인 경우, /login에 액세스하면 Spring Security가 제공하는 간단한 로그인 페이지가 표시된다.
이 기본 로그인 페이지는 spring-security-web-x.x.x.RELEASE.jar 안에 DefaultLoginPageGeneratingFilter에 의해 생성된다.
<logout>
이 태그를 추가하여 로그 아웃할 수 있게 된다.
디폴트로 /logout에 대하여 POST 요청을 실행하면 로그 아웃이 이루어 지도록 되어있다.
<authentication-manager>
AuthenticationManager를 Bean으로 정의한다. AuthenticationManager는 인증 처리를 수행하는 클래스에서 반드시 정의해야 한다.
AuthenticationManager 자체는 인터페이스에서 구현 클래스는 ProviderManager가 사용된다. ProviderManager 자체는 구체적인 인증 처리는 실시하지 않고, 후에 작성하는 AuthenticationProvider에 인증 처리를 위임한다.
<authentication-manager>
AuthenticationManager를 Bean으로 정의한다. AuthenticationManager는 인증 처리를 수행하는 클래스에서 반드시 정의해야한다.
AuthenticationManager 자체는 인터페이스에서 구현 클래스는 ProviderManager가 사용된다. ProviderManager 자체는 구체적인 인증 처리는 실시하지 않고, 후술하는 AuthenticationProvider 인증 처리를 위임한다.
<authentication-provider>
AutheticationProvider를 Bean으로 정의한다. 이 인터페이스는 인증의 종류에 따라 구체적인 인증 처리를 제공한다.
예를 들어, LDAP 인증 프로세스를 제공하는 클래스는 LdapAuthenticationProvider 이다.
이 태그를 선언한 경우 DaoAuthenticationProvider이 컨테이너에 등록된다. 이 클래스는 UserDetailsService에서 사용자의 정보를 얻어서 인증 처리를 한다.
<user-service>
UserDetailsService를 Bean으로 등록한다. 이 인터페이스는 사용자의 상세 정보(UserDetails)를 가져 오는 기능을 제공한다.
이 태그를 선언하면 InMemoryUserDetailsManager가 컨테이너에 등록된다. 이 클래스는 이름 그대로 메모리에 사용자 정보를 보존할 수 있게 된다. 보통 동작 확인용으로 구현된다.
<user>
UserDetails 인스턴스를 정의한다. 이 인터페이스에는 사용자의 상세 정보에 액세스하기 위한 Getter 메소드 등이 정의되어 있다.
이 태그를 선언하면 User라는 클래스의 인스턴스가 생성된다.
name, password, authorities 속성으로 사용자를 식별하는 이름, 암호 및 권한을 지정할 수 있다.
표시 화면
src/main/webapp/index.jsp
<%@taglib prefix="c" uri="http://java.sun.com/jsp/jstl/core" %>
<%@page contentType="text/html" pageEncoding="UTF-8"%>
<!DOCTYPE html>
<html>
    <head>
        <meta charset="utf-8" />
        <title>Hello Spring Security!!</title>
    </head>
    <body>
        <h1>Hello Spring Security!!</h1>

        <c:url var="logoutUrl" value="/logout" />
        <form action="${logoutUrl}" method="post">
            <input type="submit" value="logout" />
            <input type="hidden" name="${_csrf.parameterName}" value="${_csrf.token}" />
        </form>
    </body>
</html>
CSRF(Cross-site request forgery:크로스 사이트 요청 위조)
디폴트로 CSRF 대응 설정은 true이다. 따라서 요청을 보낼 때는 CSRF 대응으로 토큰을 전달해야 한다.
토큰 값이나 매개 변수 이름은 요청 범위(request scope)에 _csrf라는 이름으로 저장되어 있다.
CSRF 대응에 대한 자세한 설명은 나중에 다시 설명하겠다.
동작 확인
gradle war 명령으로 war 파일(spring-security-sample.war)을 생성하고 Tomcat에 배포한다.
배포는 {tomcat 설치 경로}/webapps에 war를 넣기면 하면 된다.
파일을 넣었다면 브라우저에서 http://localhost:8080/spring-security-sample 에 접근해 본다.
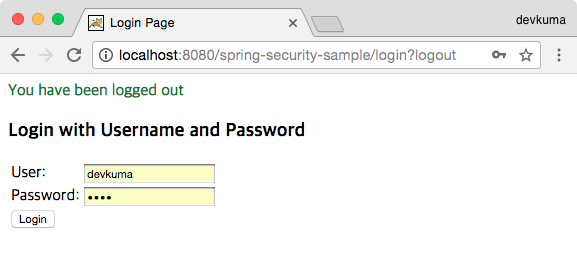
로그인 화면이 표시되면, User, Password로 각각 devkuma, 1234 입력하고 Login 버튼을 클릭한다.
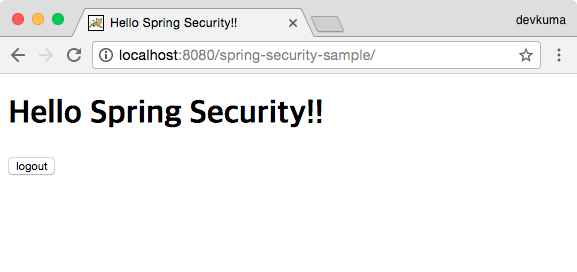
index.jsp 내용이 표시된다. 그러고 로그 아웃 버튼 클릭한다.
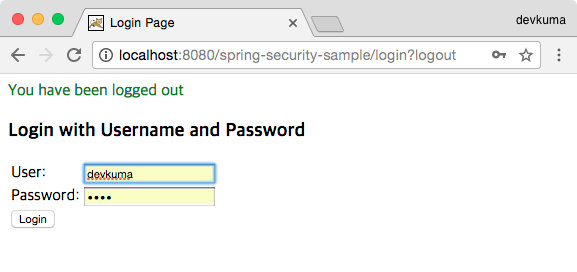
로그 아웃이 완료되고, 로그인 페이지로 돌아간다.
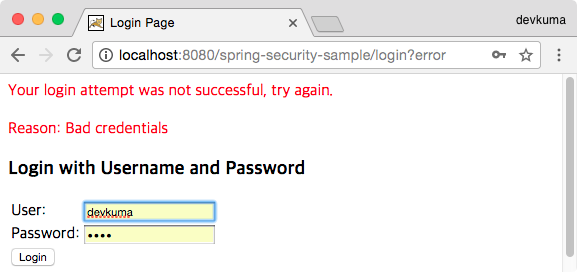
혹시, 로그인을 실패하면 위와 같이 에러메시지가 빨간색 글씨로 표시된다.