Spring Security | Spring Securityとは | Hello World
まず、簡単な例を作成してみましょう。
次のようにファイル構成を作成し、各ファイルを作成します。ファイルを作成できるツールであれば、どれを使用してもかまいません。
ファイル構成
.
├── build.gradle
└── src
    └── main
        └── webapp
            ├── WEB-INF
            │   ├── applicationContext.xml
            │   └── web.xml
            └── index.jsp
ビルドスクリプトでの依存関係
ビルドスクリプトファイルを作成します。
build.gradle
apply plugin: 'war'

sourceCompatibility = '1.8'
targetCompatibility = '1.8'
compileJava.options.encoding = 'UTF-8'

repositories {
    mavenCentral()
}

dependencies {
    providedCompile 'javax.servlet:javax.servlet-api:3.1.0'
    compile 'javax.servlet:jstl:1.2'
    compile 'org.springframework.security:spring-security-web:4.2.1.RELEASE'
    compile 'org.springframework.security:spring-security-config:4.2.1.RELEASE'
}

war.baseName = 'spring-security-sample'
最小構成として、spring-security-webとspring-security-configを依存関係に追加しています。
    compile 'org.springframework.security:spring-security-web:4.2.1.RELEASE'
    compile 'org.springframework.security:spring-security-config:4.2.1.RELEASE'
spring-security-web
FilterやWebアプリケーション関連のコードが含まれています。Web認証機能とURLベースのアクセス制御が必要な場合は、このモジュールが必要です。メインパッケージはorg.springframework.security.webです。
spring-security-config
XMLで定義を書くときに使用するnamespaceを解析するコードや、Java設定のためのコードが含まれています。XMLベースの設定およびJava設定を使用する場合は、このモジュールが必要です。 メインパッケージはorg.springframework.security.configです。ここに含まれるクラスをアプリケーションで直接使用するわけではありません。
Springコンテナの初期化
Javaの従来型Web設定ファイルを作成します。
src/main/webapp/WEB-INF/web.xml
<?xml version="1.0" encoding="UTF-8"?>
<web-app xmlns="http://xmlns.jcp.org/xml/ns/javaee"
         xmlns:xsi="http://www.w3.org/2001/XMLSchema-instance"
         xsi:schemaLocation="http://xmlns.jcp.org/xml/ns/javaee
         http://xmlns.jcp.org/xml/ns/javaee/web-app_3_1.xsd"
         version="3.1">
    <filter>
        <filter-name>springSecurityFilterChain</filter-name>
        <filter-class>org.springframework.web.filter.DelegatingFilterProxy</filter-class>
    </filter>

    <filter-mapping>
        <filter-name>springSecurityFilterChain</filter-name>
        <url-pattern>/*</url-pattern>
    </filter-mapping>

    <listener>
        <listener-class>org.springframework.web.context.ContextLoaderListener</listener-class>
    </listener>
</web-app>
Springコンテナの初期化は次のように行います。
    <listener>
        <listener-class>org.springframework.web.context.ContextLoaderListener</listener-class>
    </listener>
ContextLoaderListenerをリスナーとして登録することで、Springコンテナ、つまりApplicationContextが初期化されます。
どのApplicationContextクラスを使用するかを明示しない場合、デフォルトではXmlWebApplicationContextが使用されます。
spring-web-x.x.x.RELEASE.jar内のorg/springframework/web/context/ContextLoader.propertiesには次のように定義されており、サーブレットコンテナが初期化されるときにContextLoaderListenerがロードされます。
# Default WebApplicationContext implementation class for ContextLoader.
# Used as fallback when no explicit context implementation has been specified as context-param.
# Not meant to be customized by application developers.

org.springframework.web.context.WebApplicationContext=org.springframework.web.context.support.XmlWebApplicationContext
XmlWebApplicationContextは、デフォルトでWEB-INF/applicationContext.xmlを設定ファイルとして読み込みます。
Spring Securityをアプリケーションへ適用
DelegatingFilterProxyをサーブレットフィルターとしてweb.xmlに定義します。このとき、<filter-name>をspringSecurityFilterChainとして定義します。ここで<filter-mapping>に定義されたURLへアクセスがあると、Spring Securityが適用されます。
DelegatingFilterProxyは、自身の<filter-name>に設定された名前を使用して、Springコンテナからjavax.servlet.Filterを実装したBeanを取得します。そして、そのBeanへ処理を委譲するだけのサーブレットフィルターです。
ここでは<filter-name>にspringSecurityFilterChainを指定しています。この名前は、後で出てくるapplicationContext.xmlで<http>タグを使用するとコンテナに自動登録されるFilterChainProxyのBean名と一致します。
つまり、DelegatingFilterProxyはサーブレットフィルターとSpring Security、つまりFilterChainProxyを仲介する役割を持ちます。
Spring Security設定
src/main/webapp/WEB-INF/applicationContext.xml
<?xml version="1.0" encoding="UTF-8"?>
<beans xmlns="http://www.springframework.org/schema/beans"
       xmlns:sec="http://www.springframework.org/schema/security"
       xmlns:xsi="http://www.w3.org/2001/XMLSchema-instance"
       xsi:schemaLocation="
         http://www.springframework.org/schema/beans
         http://www.springframework.org/schema/beans/spring-beans-3.0.xsd
         http://www.springframework.org/schema/security
         http://www.springframework.org/schema/security/spring-security.xsd">

    <sec:http>
        <sec:intercept-url pattern="/login" access="permitAll" />
        <sec:intercept-url pattern="/**" access="isAuthenticated()" />
        <sec:form-login />
        <sec:logout />
    </sec:http>

    <sec:authentication-manager>
        <sec:authentication-provider>
            <sec:user-service>
                <sec:user name="devkuma" password="1234" authorities="ROLE_USER" />
            </sec:user-service>
        </sec:authentication-provider>
    </sec:authentication-manager>
</beans>
applicationContext.xmlはSpringのBean定義のための標準設定ファイルであり、Spring Security専用の特別な設定ファイルではありません。
xmlnsでhttp://www.springframework.org/schema/securityを読み込むため、Spring Security用のタグを使用できるようになります。参考までに、このSpring Security専用タグを使用することをnamespaceの使用と呼びます。このタグを使用して、このファイル内でSpring Securityを設定できます。
上記の設定を要約すると、次のような内容です。
/loginには誰でもアクセスできます(permitAll)。- その他すべてのパス(
/**)へのアクセスには認証済みである必要があります(isAuthenticated())。 - ログイン方法はフォームログインです。
- ログアウトできます。
ユーザー情報として、名前は
devkuma、パスワードは1234、ROLE_USERというロールを持つユーザーを定義しています。
次に、各タグについて少し詳しく説明します。
<http>
<http>タグを定義すると、いくつかのBeanが自動的にコンテナへ登録されます。その中でも重要なBeanは次の2種類です。
- FilterChainProxy
- SecurityFilterChain
FilterChainProxyは、springSecurityFilterChainというBean名でコンテナに登録されます。このクラスはSpring Security処理の入口になります。
SecurityFilterChain自体は単純なインターフェースで、実装クラスとしてDefaultSecurityFilterChainがコンテナに登録されます。SecurityFilterChainは名前のとおり、セキュリティ機能を持つjavax.servlet.Filterをチェーンとしてつなぎ、複数のFilterを内部に保持します。Spring SecurityはFilterを利用してセキュリティ機能を提供しています。
FilterChainProxyは名前にProxyと付いていることからもわかるように、このクラス自体は処理を行いません。具体的な処理は、SecurityFilterChainが保持するFilter群へ委譲します。
<intercept-url>
URLパターンに対して、アクセスに必要な条件、つまりアクセス制御を定義します。
pattern属性はAntパス形式で記述できます。
access属性には、pattern属性で指定したURLへアクセスするために必要な条件を指定します。permitAllは、すべてのアクセスを許可すること、つまり認証不要を意味します。そしてisAuthenticated()は、認証済み、つまりログイン済みであればアクセスを許可することを意味します。
access属性は、Spring Expression Language(SpEL)というSpring独自の式言語を使用して記述します。
<form-login>
フォーム認証が必要であることを定義します。
認証エラーの場合、デフォルトでは/loginへリダイレクトされます。
デフォルトの場合、/loginへアクセスするとSpring Securityが提供する簡単なログインページが表示されます。
このデフォルトログインページは、spring-security-web-x.x.x.RELEASE.jar内のDefaultLoginPageGeneratingFilterによって生成されます。
<logout>
このタグを追加することで、ログアウトできるようになります。
デフォルトでは、/logoutに対してPOSTリクエストを実行するとログアウトが行われます。
<authentication-manager>
AuthenticationManagerをBeanとして定義します。AuthenticationManagerは、認証処理を実行するクラスで必ず定義する必要があります。
AuthenticationManager自体はインターフェースで、実装クラスにはProviderManagerが使用されます。
ProviderManager自体は具体的な認証処理を行わず、後で作成するAuthenticationProviderへ認証処理を委譲します。
<authentication-manager>
AuthenticationManagerをBeanとして定義します。
AuthenticationManagerは、認証処理を実行するクラスで必ず定義する必要があります。
AuthenticationManager自体はインターフェースで、実装クラスにはProviderManagerが使用されます。
ProviderManager自体は具体的な認証処理を行わず、後述するAuthenticationProviderへ認証処理を委譲します。
<authentication-provider>
AuthenticationProviderをBeanとして定義します。このインターフェースは、認証の種類に応じた具体的な認証処理を提供します。
例えば、LDAP認証プロセスを提供するクラスはLdapAuthenticationProviderです。
このタグを宣言した場合、DaoAuthenticationProviderがコンテナに登録されます。このクラスはUserDetailsServiceからユーザー情報を取得し、認証処理を行います。
<user-service>
UserDetailsServiceをBeanとして登録します。このインターフェースは、ユーザーの詳細情報、つまりUserDetailsを取得する機能を提供します。
このタグを宣言すると、InMemoryUserDetailsManagerがコンテナに登録されます。
このクラスは名前のとおり、メモリ上にユーザー情報を保持できます。通常は動作確認用として実装されます。
<user>
UserDetailsインスタンスを定義します。このインターフェースには、ユーザーの詳細情報へアクセスするためのGetterメソッドなどが定義されています。
このタグを宣言すると、Userクラスのインスタンスが生成されます。
name、password、authorities属性で、ユーザーを識別する名前、パスワード、権限を指定できます。
表示画面
src/main/webapp/index.jsp
<%@taglib prefix="c" uri="http://java.sun.com/jsp/jstl/core" %>
<%@page contentType="text/html" pageEncoding="UTF-8"%>
<!DOCTYPE html>
<html>
    <head>
        <meta charset="utf-8" />
        <title>Hello Spring Security!!</title>
    </head>
    <body>
        <h1>Hello Spring Security!!</h1>

        <c:url var="logoutUrl" value="/logout" />
        <form action="${logoutUrl}" method="post">
            <input type="submit" value="logout" />
            <input type="hidden" name="${_csrf.parameterName}" value="${_csrf.token}" />
        </form>
    </body>
</html>
CSRF(Cross-site request forgery: クロスサイトリクエストフォージェリ)
デフォルトでは、CSRF対策設定はtrueです。そのため、リクエストを送信するときはCSRF対策としてトークンを渡す必要があります。
トークン値やパラメータ名は、リクエストスコープに_csrfという名前で保存されています。
CSRF対策についての詳しい説明は、後で改めて説明します。
動作確認
gradle warコマンドでWARファイル(spring-security-sample.war)を作成し、Tomcatへデプロイします。
デプロイは、{Tomcatインストールパス}/webappsへWARファイルを置くだけです。
ファイルを置いたら、ブラウザでhttp://localhost:8080/spring-security-sampleへアクセスしてみます。
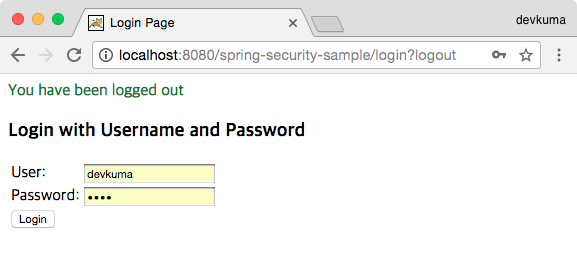
ログイン画面が表示されたら、UserとPasswordにそれぞれdevkuma、1234を入力し、Loginボタンをクリックします。
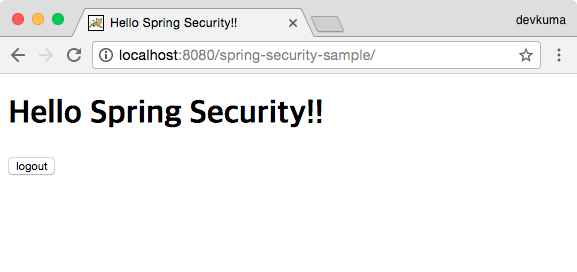
index.jspの内容が表示されます。その後、ログアウトボタンをクリックします。
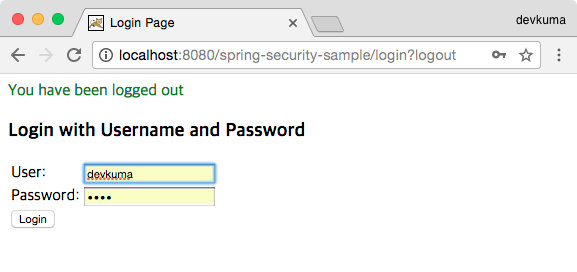
ログアウトが完了し、ログインページへ戻ります。
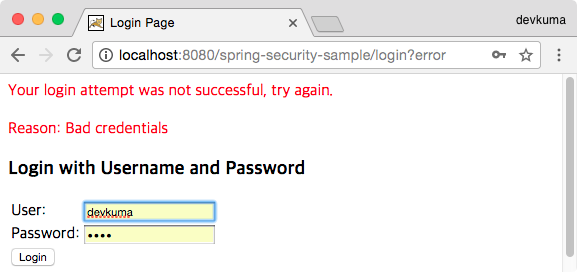
もしログインに失敗すると、上記のようにエラーメッセージが赤い文字で表示されます。