Spring, Kotlin를 활용하여 간단한 Standard MCP Server(STDIO) 만들기
시작하기
MCP Server는 AI 모델이 외부 리소스(도구, 데이터, API 등)에 접근할 수 있도록 연결해주는 표준화된 인터페이스를 제공하는 역할을 한다.
MCP 서버에 대한 개념은 아래의 문서를 참고 바란다.
AI 용어 | MCP Server
이 문서에서는 Spring를 활용하여 간단한 MCP Server를 만들고, Claude에서 MCP Server에 연결하는 방법에 대해서 설명한다.
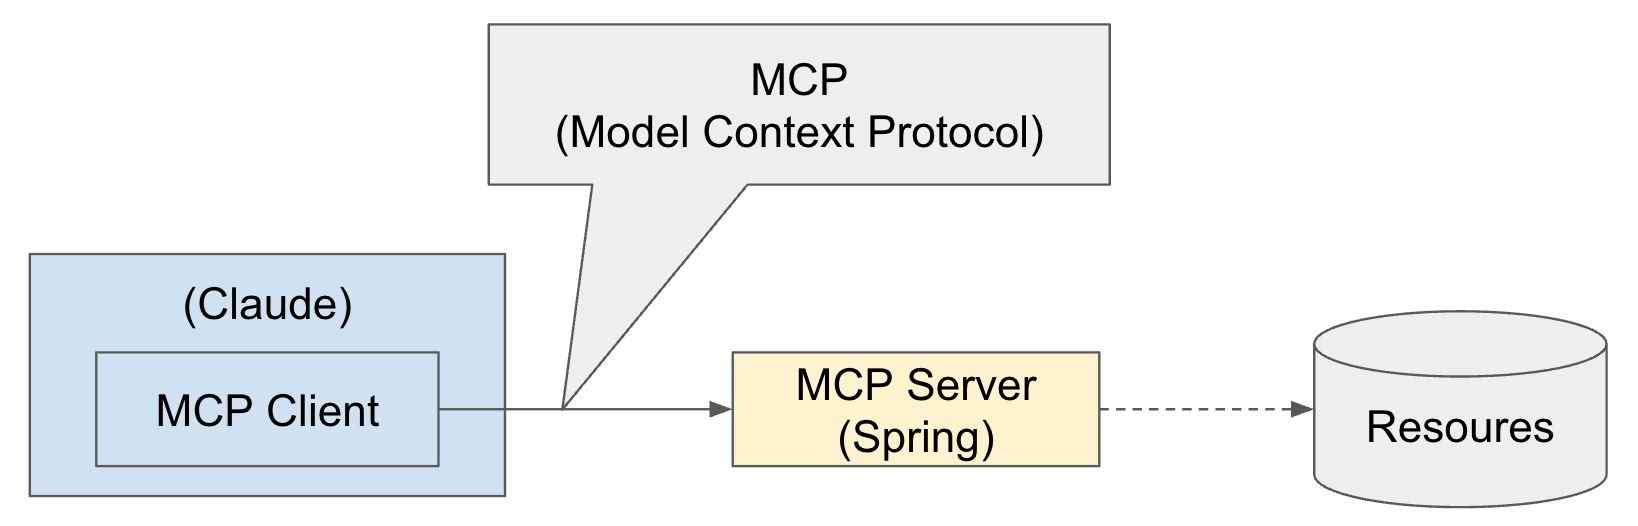
물론, Claude 외에 다른 AI 도구를 활용할 수도 있고, MCP Server도 Spring이 아니어도 된다. MCP는 단어 그대로 Model Content Protocol(모델 컨텐츠 규약)으로 이를 따르고 있어서 가능한 것이다.
MCP Server에서 연결되는 Resoures는 DB, API 등 다양하게 활용될 수 있다. 여기 문서에서는 Resoures는 연결까지는 다루지 않았다.
Spring-AI의 MCP Server 프레임워크는 서버 전송에 따라 아래 3가지 스타타터를 지원한다.
- Standard MCP Server
- STDIO서버 전송을 지원
org.springframework.ai:spring-ai-starter-mcp-server
- WebMVC Server 전송
- Spring MVC 기반 SSE(Server-Sent Events) 서버 전송과 옵션으로 STDIO 전송을 지원
org.springframework.ai:spring-ai-starter-mcp-server-webmvc
- WebFlux Server 표준
- Spring WebFlux 기반 SSE(Server-Sent Events) 서버 전송과 옵션으로 STDIO 전송을 지원
org.springframework.ai:spring-ai-starter-mcp-server-webflux
Spring을 활용한 MCP Server 구현
먼저 Spring와 Kotlin를 활용한 간단한 Standard MCP Server(STDIO)를 생성해 보겠다.
프로젝트 생성
프로젝트 생성은 Spirng ininitializr으로 생성할 수 있다.
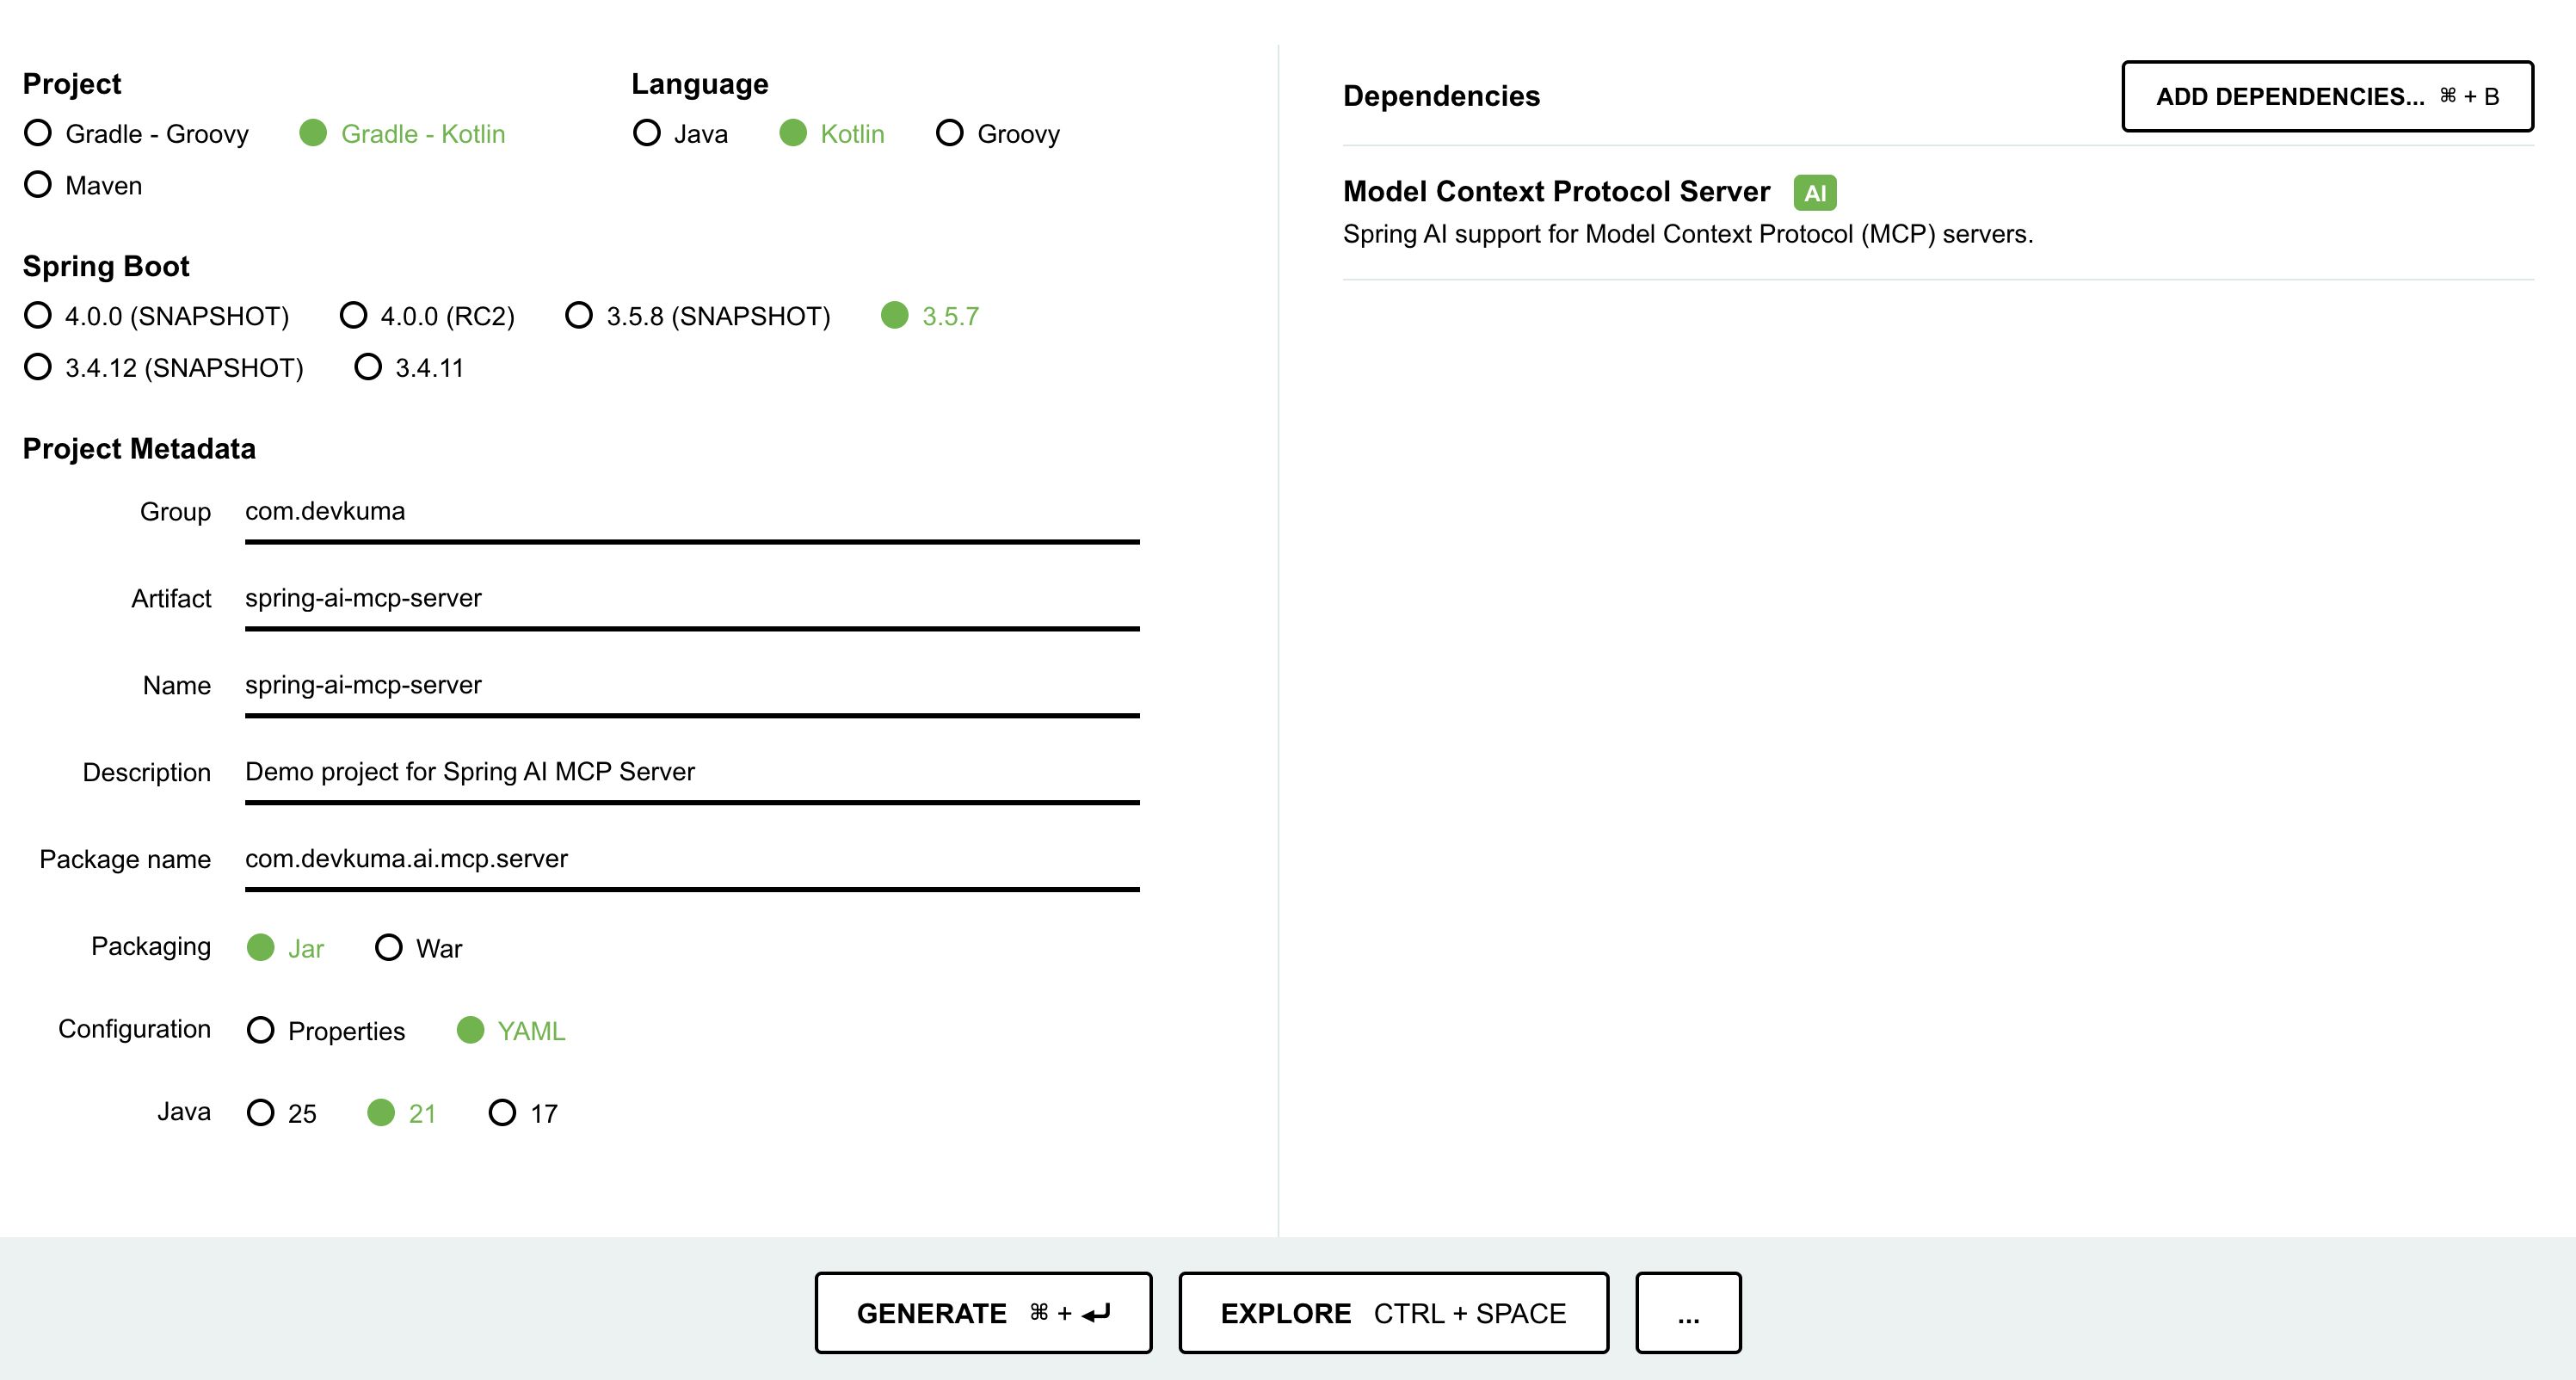
화면 아래 부근에 “GENERATE” 버튼을 누르면, 설정한 프로젝트 파일을 다운로드를 받을 수 있다.
또는, 다음과 같이 curl 명령어를 사용하여 Spring Boot 초기 프로젝트를 생성할 수도 있다.
curl https://start.spring.io/starter.tgz \
-d bootVersion=3.5.7 \
-d dependencies=spring-ai-mcp-server \
-d baseDir=spring-ai-mcp-server \
-d groupId=com.devkuma \
-d artifactId=spring-ai-mcp-server \
-d packageName=com.devkuma.ai.mcp.server \
-d applicationName=McpServerApplication \
-d packaging=jar \
-d language=kotlin \
-d javaVersion=21 \
-d description="Demo project for Spring AI MCP Server" \
-d type=gradle-project-kotlin | tar -xzvf -
생성된 프로젝트 확인
빌드 스크립트
의존성 라이브러리에 Spring MVC Server(spring-ai-starter-mcp-server) 라이브러리가 포함되어 있는 것을 볼 수 있다.
/build.gradle.kts
dependencies {
	...
	implementation("org.springframework.ai:spring-ai-starter-mcp-server")
	...
}
Spring AI 라이브러리 버전은 따로 변경하지 않으면 디폴트로 예전 버전이 설정되는데, 여기서는 최신 버전으로 수정한다.
extra["springAiVersion"] = "1.1.0-M4"
최신 버전은 여기에서 확인하면 된다.
Service 객체 생성
MCP Client에서 호출을 하게 되는 서비스 객체를 생성한다.
/src/main/kotlin/com/devkuma/ai/mcp/server/WeatherService.kt
package com.devkuma.ai.mcp.server

import org.springframework.ai.tool.annotation.Tool
import org.springframework.ai.tool.annotation.ToolParam
import org.springframework.stereotype.Service

@Service
class WeatherService {

    @Tool(name = "get_weather", description = "Return the weather of a given city.")
    fun getWeather(@ToolParam(description = "The city for which to get the weather") city: String): String {
        // 실제 날씨 정보를 가져오는 로직을 추가한다.
        // 여기서는 간단히 "Good"을 반환한다.
        return "The weather in $city is good."
    }
}
- getWeather(..) 함수에서는 페리미터로 도시(city)를 전달 받고, 날씨의 상태를 고정으로 “good"이라고 응답하도록 만들었다.
- 여기에서는 응답값을 고정으로 넣었지만, 실제로는 다른 리소스(DB, API 등)에서 정보를 가져와서 응답하게 하면 된다.
@Tool에 넣는 Tool에 대한 설명과@ToolParam에 넣은 페라미터 설명은 나중에 MCP 클라이언트가 서버에 접속을 했을 때, 어떤 도구가 있고 사용 방법은 어떻게 되는지 클라이언트에서 알려줄 수 있다.
MCP 서버 설정 객체 생성
생성된 Service를 Spring 설정으로 AI Tool로 추가한다.
/src/main/kotlin/com/devkuma/ai/mcp/server/McpConfig.kt
package com.devkuma.ai.mcp.server

import org.springframework.ai.tool.ToolCallbackProvider
import org.springframework.ai.tool.method.MethodToolCallbackProvider
import org.springframework.context.annotation.Bean
import org.springframework.context.annotation.Configuration

@Configuration
class McpConfig {

    @Bean
    fun weatherTools(weatherService: WeatherService): ToolCallbackProvider {
        return MethodToolCallbackProvider.builder().toolObjects(weatherService).build()
    }
}
어플리케이션 설정 파일
application.yml를 다음과 같이 작성한다. (기존에 application.properties은 있다면 yml 파일로 변경한다.)
/src/main/resources/application.yml
spring:
  main:
    web-application-type: none
    # NOTE: You must disable the banner and the console logging to allow the STDIO transport to work !!!
    banner-mode: off
  ai:
    mcp:
      server:
        name: my-weather-server
        version: 0.0.1

logging:
  pattern:
    console:
  file:
    name: ./log/spring-ai-starter-mcp-server.log
- 여기서 주의점은
banner-mode를off로 설정해야 한다.
빌드 및 실행 파일 생성
코드 작성이 완료되었다면 빌드하고 jar 파일을 생성을 해야 하는데, IDEA로 gradle 빌드로 boorJar를 실행한다.
또는, 다음과 같이 터미널에서 명령어로 다음과 같이 실행한다.
% ./gradlew clean bootJar
그러면, jar 파일이 아래 경로에 생성된다.
build/libs/spring-ai-mcp-server-0.0.1-SNAPSHOT.jar
테스트를 위한 MCP Client 구현
MCP Server는 완성이 되었고, 이제 클라이언트를 구현해 보겠다.
신규로 StdioClient.kt 파일을 생성한다.
/test/kotlin/com/devkuma/ai/mcp/client/StdioClient.kt
package com.devkuma.ai.mcp.client

import io.modelcontextprotocol.client.McpClient
import io.modelcontextprotocol.client.transport.ServerParameters
import io.modelcontextprotocol.client.transport.StdioClientTransport
import io.modelcontextprotocol.json.McpJsonMapper
import io.modelcontextprotocol.spec.McpSchema.CallToolRequest

fun main() {

    val stdioParams = ServerParameters.builder("java")
        .args(
            "-Dspring.ai.mcp.server.stdio=true",
            "-Dspring.main.web-application-type=none",
            "-Dlogging.pattern.console=",
            "-jar",
            "build/libs/spring-ai-mcp-server-0.0.1-SNAPSHOT.jar"
        )
        .build()

    val transport = StdioClientTransport(stdioParams, McpJsonMapper.createDefault())
    val client = McpClient.sync(transport).build()

    client.initialize()

    // List and demonstrate tools
    val toolsList = client.listTools()
    println("Available Tools = $toolsList")

    val alertResult = client.callTool(CallToolRequest("get_weather", mapOf("city" to "seoul")))
    println("get_weather Response = $alertResult")

    client.closeGracefully()
}
- 코드 내용을 보면
java명령어로 jar를 실행하는stdioParams를 설정하여,StdioClientTransport생성시에 인자로 넣도 있다. - 클라이언트를 하면 STDIO로 MCP Sever가 실행이 된다.
Output:
... 생략 ...

Available Tools = ListToolsResult[tools=[Tool[name=get_weather, title=null, description=Return the weather of a given city., inputSchema=JsonSchema[type=object, properties={city={type=string, description=The city for which to get the weather}}, required=[city], additionalProperties=false, defs=null, definitions=null], outputSchema=null, annotations=null, meta=null]], nextCursor=null, meta=null]
get_weather Response = CallToolResult[content=[TextContent[annotations=null, text="The weather in seoul is good.", meta=null]], isError=false, structuredContent=null, meta=null]

... 생략 ...
- 실행 결과 출력에는 사용 가능한 Tool 목록이 표시되고,
get_weather도구를 호출하여 응답을 받은 값을 표시되는 것을 확인할 수 있다.
Claude에서 MCP Server에 연결
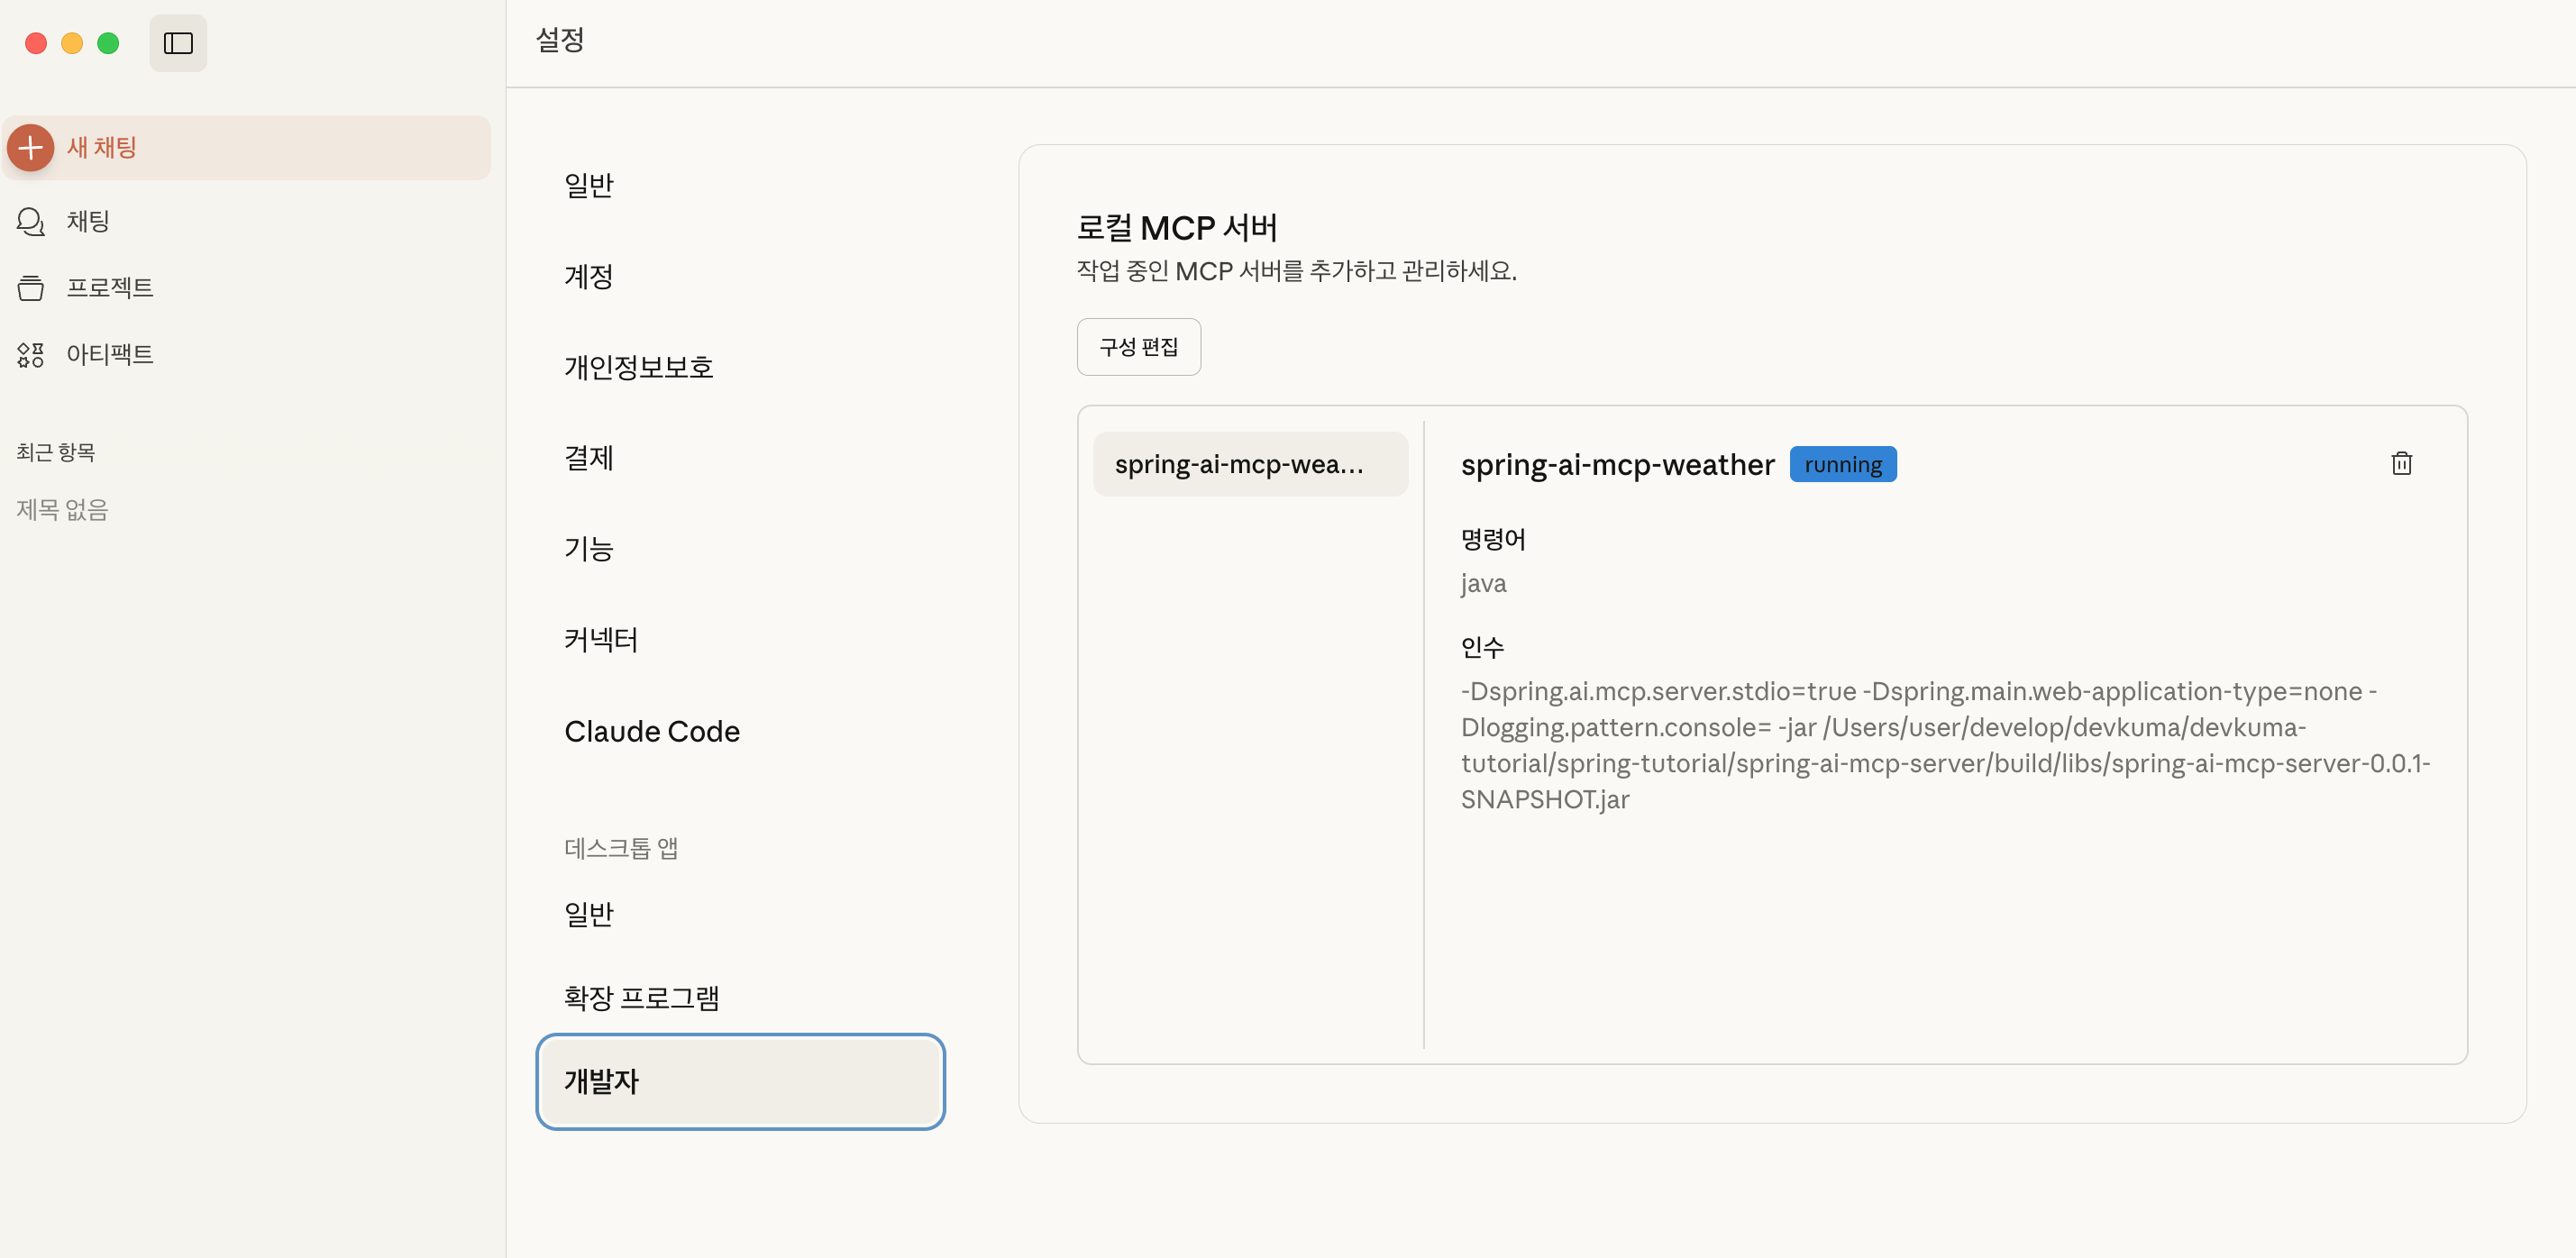
빌드까지 완료가 되었다면 클로드 데스크탑에 MCP Server에 연결해 보고, 적용이 잘되어 있는지 확인해보도록 하겠다.
연결 설정
MCP Server 연결 설정은 json 파일에 등록해야 한다.
MacOS인 경우에는 ~/Library/Application Support/Claude/claude_desktop_config.json에 설정을 하면된다. (파일이 없다면 새로 생성을 하고, 이미 있다면 추가한다.)
{
  "mcpServers": {
    "spring-ai-mcp-weather": {
      "command": "java",
      "args": [
        "-Dspring.ai.mcp.server.stdio=true",
        "-Dspring.main.web-application-type=none",
        "-Dlogging.pattern.console=",
        "-jar",
        "{{앞에서 만든 프로젝트의 경로}}/spring-ai-mcp-server/build/libs/spring-ai-mcp-server-0.0.1-SNAPSHOT.jar"
      ]
    }
  }
}
생성한 어플리케이션은 java 명령어로 실행이 되고, 실행된 서버는 stdio를 통해서 클로드 데스크탑과 연결이 된다.
연결 설정 확인
Claude를 실행하고 메뉴에서 “Claude > 설정 > 개발자"을 확인해 보면, 로컬 MCP 서버가 추가되어 있는 것을 확인 할 수 있다.
(혹시 여기서 에러가 발생한다면 로그 버튼이 보이는데, 그 버튼을 클릭해서 내용을 확인하면 된다.)
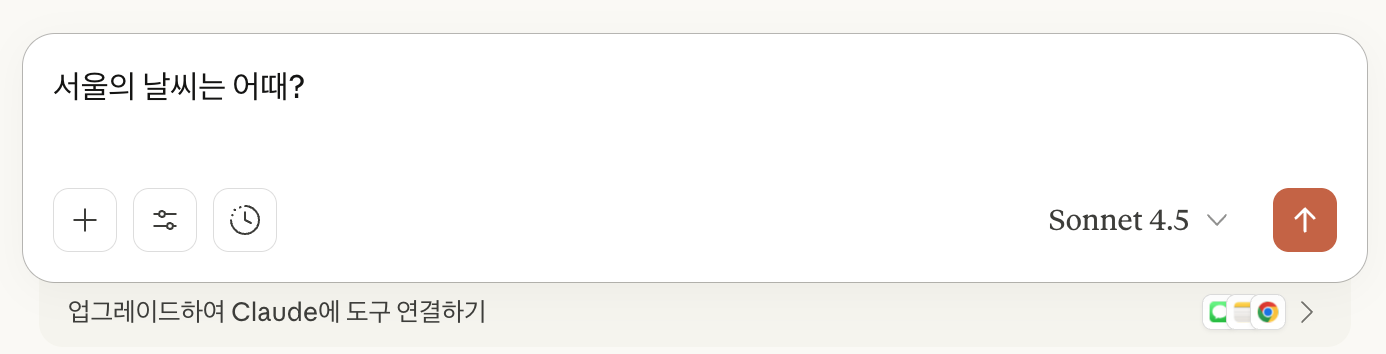
채팅 창에서는 설정 버튼을 누르면 “spring-ai-mcp-wearther"가 활성화 되어 있는 것을 볼 수 있다.

실행 확인
이제 연결이 잘 된 것을 확인했으니, 입력을 해보도로 하겠다.
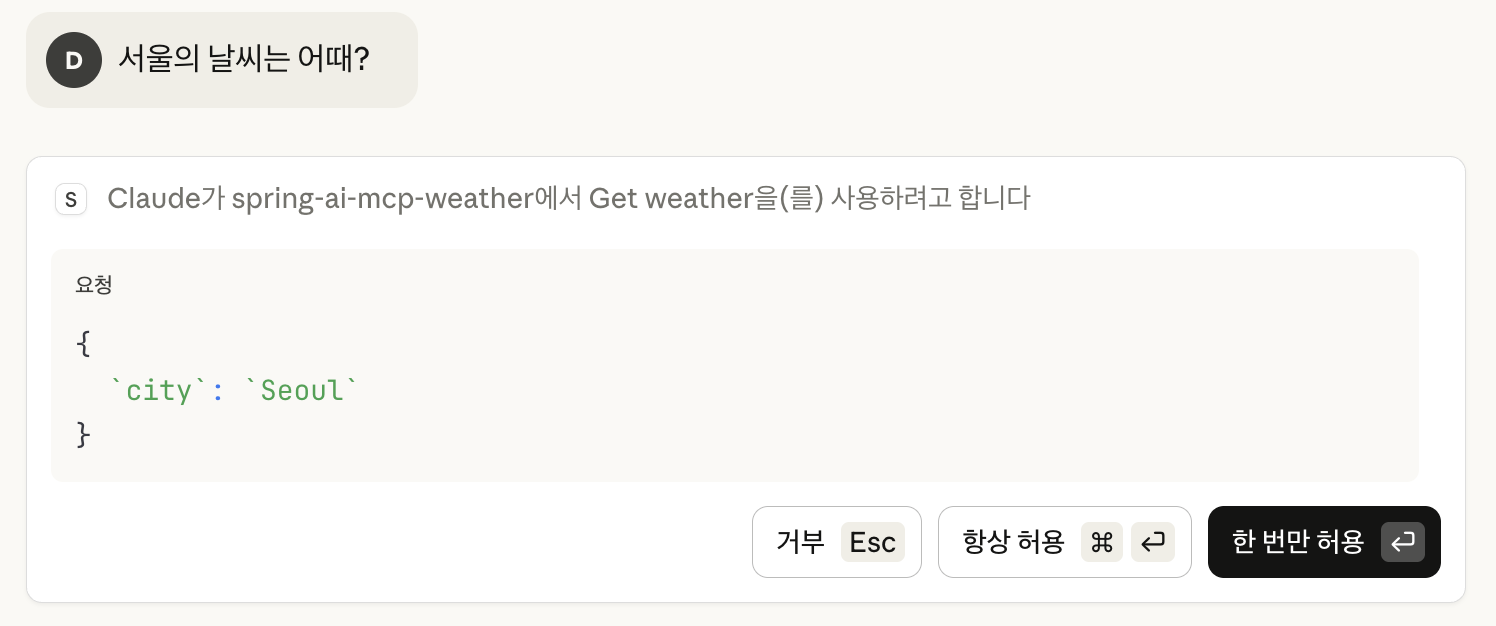
아래 창에서는 “서울의 날씨는 어때?“라고 입력을 하였다.
그러면, 다음과 같이 “Claude가 spring-ai-mcp-weather에서 Get weather을(를) 사용하려고 합니다.“라는 메세지와 함께, 허용 여부를 묻는다.
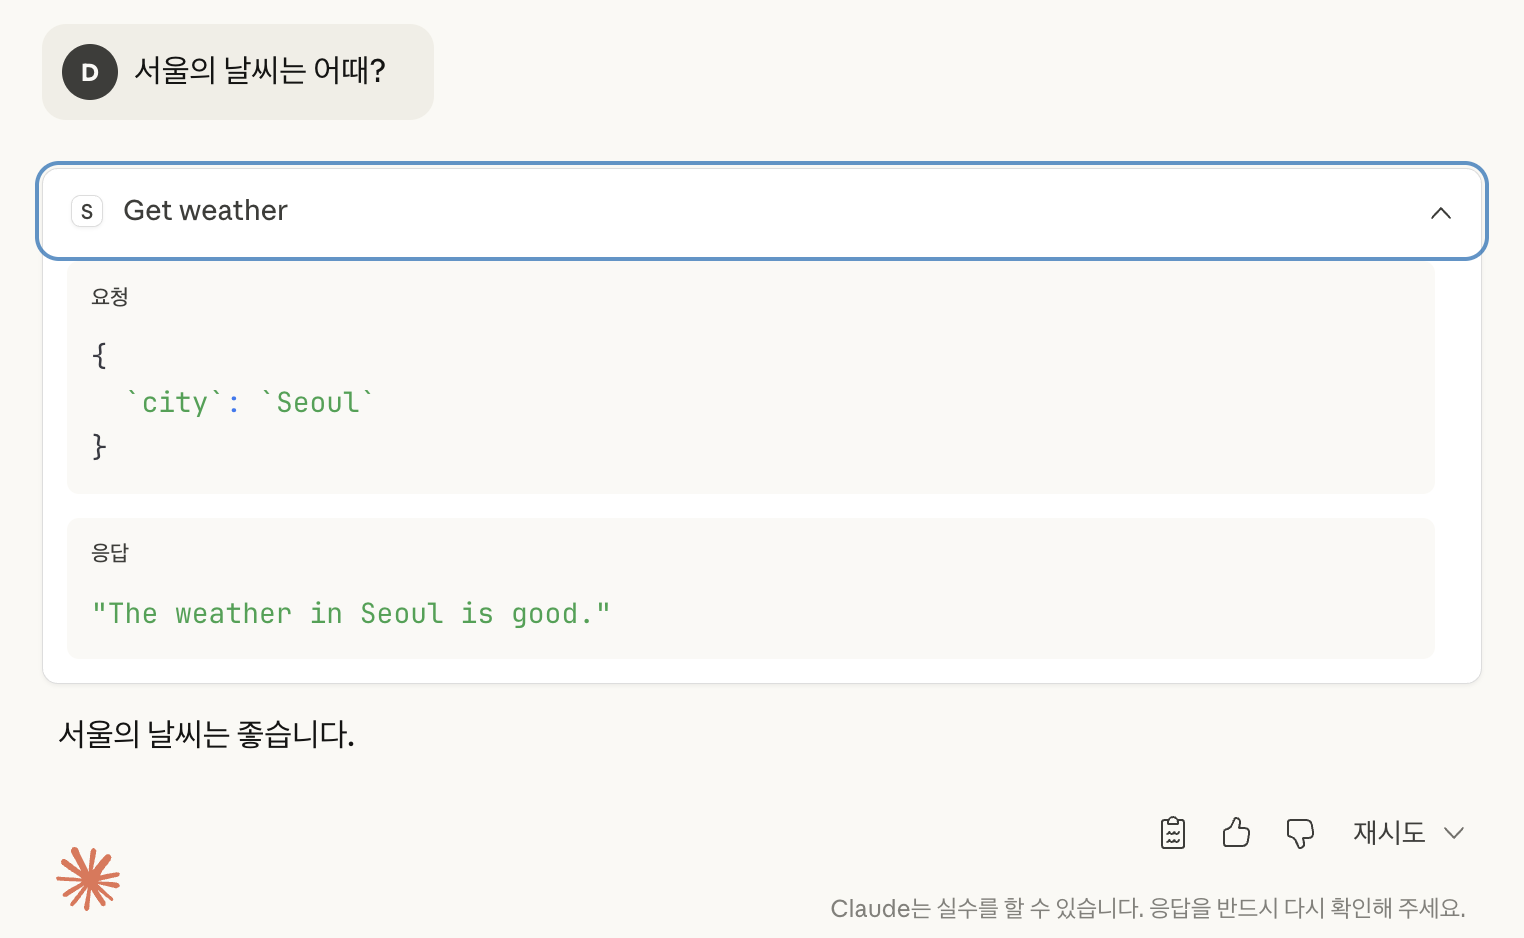
허용 버튼을 누르면, 응답으로 “서울 날씨는 좋습니다.“라는 응답하는 것을 볼 수 있다.
“Get weather"를 누르면 요청과 응답에 대해서도 확인할 수 있다.
참고
- 조대협의 블로그:티스토리 | MCP (Model Context Protocol) 2. 서버 개발하기
- Spring | Model Context Protocol (MCP)
- GitHub | spring-ai-examples | starter-stdio-server
위에 예제 코드는 GitHub에서 확인해 볼 수 있다.